Dual-Master Network
There could be situations where two masters need to control a 1-Wire network, e.g., as backup or to exchange data with each other. Figure 3 shows a circuit to accomplish this. In this example, the DS1996 memory iButton serves as a temporary storage for the data packets to be exchanged. The ID chips are optional. If installed, they could store system-specific data telling the hosts that they are accessing a shared network with storage buffer and handshaking logic. Besides the memory iButton there could be a network of 1-Wire slaves. The R1/C1 combination shown in Figure 1 is also recommended for the dual-master application; it should be included on both sides.
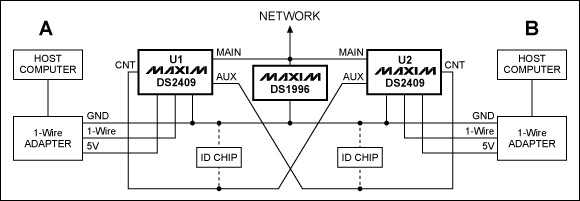
Figure 3. Dual-master concept. If identical voltage cannot be guaranteed, power both DS2409 devices from the same source.
As a starting condition, the main outputs and the auxiliary outputs of both DS2409s are inactive. The shared network is pulled to 5V from both DS2409s, thus lowering the effective pullup resistor to 750Ω. Both hosts regularly read the status information of their DS2409 to know whether the other host has taken control over the 1-Wire network.
Assume now that host A wants to access the DS1996 to send a message to host B. To access the memory iButton (DS1996), host A first activates the control output of U1, which pulls the auxiliary output of U2 low. Host B, meanwhile, has been reading the U2 status information and therefore knows that host A has taken over. Next, host A activates the main output of coupler U1 and writes data to the memory iButton. When finished writing, host A deactivates the main output of U1 and deactivates the control output.
Host B, still reading the U2 status information, realizes that host A has finished writing. Now, host B activates the control output of U2, which pulls the auxiliary output of U1 low. Host A reads the U1 status information and therefore knows that host B has taken over. Host B now activates the main output of U2 and reads the message from the memory iButton. After processing the message, host B writes a response to the iButton. When finished, host B deactivates the main output of U2 and deactivates the control output. Host A, still reading the U1 status information, knows that host B's access has ended.
?
Function Commands and Their Typical Use
The DS2409 understands a total of 11 commands, which implement either network functions or control functions. Table 4 lists these commands and indicates their purpose and typical use. The commands are sorted by their importance in a network application. For more details, refer to the DS2409 data sheet.
Table 4. DS2409 Function Commands and Their Typical Use
| Command Name | Function | Purpose | Typical Use |
| Match ROM | Network | Selecting a single 1-Wire slave | The main addressing mode |
| Smart-On Main | Control | Activating the main output with test for presence pulse and short | Cautious output activation, e.g., with the intention of a subsequent Match ROM to open the path to the next layer |
| Smart-On Auxiliary | Control | Activating the auxiliary output with test for presence pulse and short | Cautious output activation, e.g., with the intention of a subsequent Match ROM to open the path to the next layer |
| Skip ROM | Network | Addressing all 1-Wire slaves on the active branches of the network | To broadcast a command, e.g., All Lines Off |
| All Lines Off | Control | Clearing event flags; output deactivation; termination of Discharge Lines command | After a Skip ROM command: disconnecting the current path; general network reset without changing any configuration |
| Status Read/Write | Control | Read: verifying output status and configuration; Write: device configuration |
Read: output level sensing (e.g., handshake in the dual-master concept); event flag testing (smart probe point); verifying configuration and which output is active Write: changing the mode and association of the control output; direct operation of the control output. |
| Conditional Search ROM | Network | Identifying 1-Wire slaves on the active branches of the network that need attention | Detecting the arrival of an iButton at a smart probe point |
| Search ROM | Network | Identifying all 1-Wire slaves on the active branches of the network | Determining the topology of the network; creating an inventory of all slaves in the network. |
| Discharge Lines | Control | Powering down both outputs | Power-on reset of parasitically powered slaves connected to both outputs; network troubleshooting |
| Direct-On Main | Control | Activating the main output | Fast output activation |
| Read ROM | Network | Reading the ROM ID | (Not useful in a multiple slave network) |
Particularly interesting is the Smart-On command (Figure 4). The top trace shows the communication of the incoming 1-Wire bus, which is a Smart-On Auxiliary command in this example. The first byte is the command code 33h, followed by the reset stimulus FFh, the reset response (00h, = presence pulse detected), and the confirmation byte (33h, = no short). The center trace shows the activity on the auxiliary output, i.e., a reset/presence detect (PD) cycle. The bottom trace shows the transition at the Control output, as the main output is deactivated prior to the activation of the auxiliary output. Any communication after the confirmation byte is passed through to the activated output. The presence pulse reporting is correct only if preceded by an All Lines Off command.
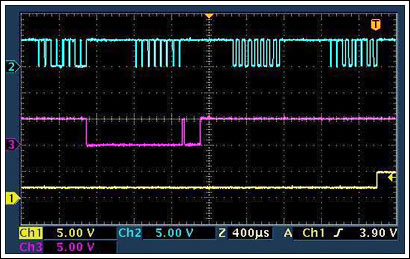
Figure 4. Smart-On Auxiliary command.
The normal way to deactivate an output is through the All Lines Off command (Figure 5). The top trace shows the command byte 66h, followed by the confirmation byte. While the command byte is passed through to the output (center trace), the confirmation byte is not. The bottom trace shows the control output, as it changes with the deactivation of the output.
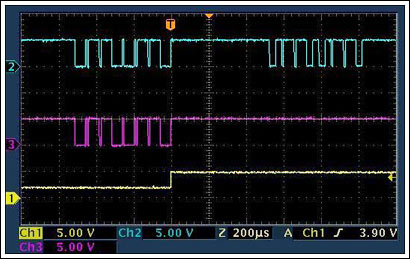
Figure 5. All Lines Off command.
Besides the Smart-On, there is a Direct-On command for the main output (Figure 6). The scope traces look just like a mirror image of the All Lines Off command. Immediately after the command code A5h, the main output is activated (bottom trace). The confirmation byte is passed through to the output (center trace). If this command is used, a reset/PD cycle must follow to ensure that the slaves on the activated output are synchronized with the master.
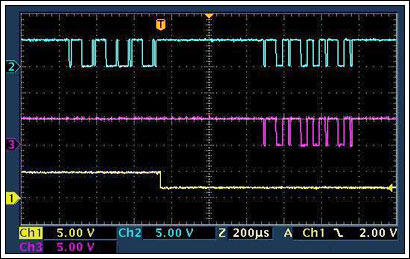
Figure 6. Direct-On Main command.
 電子發(fā)燒友App








評論