通過這個項目控制 LED 亮度的開啟、關閉和自動更改,并發出警告,以提示周圍環境亮度的突然變化。
1、簡介
該項目主要具有三個功能,即打開 LED、自行改變 LED 強度和關閉 LED。這些功能分別使用 Bolt Android 應用程序中設計的三個按鈕進行控制,即 ON、AUTO 和 OFF。單擊 AUTO 按鈕時,LED 的亮度由使用光檢測電阻器 (LDR) 相對于周圍環境的光強度確定) 或光傳感器。LDR 的讀數映射到 LED 的強度范圍,并使用脈沖寬度調制 (PWM) 生成可變輸出。
注意:如果該系統用于監測光敏環境的光強度,例如某種藥物儲存,那么光強度的突然變化可能是有害的。使用 Z 分數分析檢測到這種突然變化,并使用 Telegram Bot 設置了警報系統以通知操作員。然后可以使用應用程序立即打開或關閉燈。
2、Telegram 上的警報通知

3. LED亮度自動控制
在本節中,我們研究項目的“自動”功能,即根據周圍環境的亮度自動改變 LED 的強度。使用 LDR 測量周圍環境的亮度。
3.1 LED 和 LDR 的電路連接
下面給出了 LED 和 LDR 的電路連接以及螺栓模塊,用于根據周圍環境的亮度自動 LED 強度。
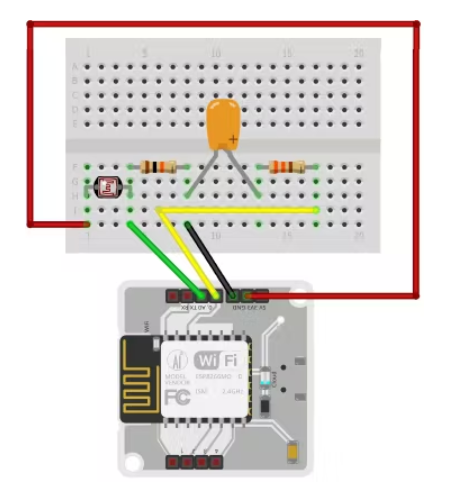
LDR 的輸入來自模擬引腳 A0,LED 的輸出寫入數字引腳 0。LDR 端子沒有極性。使用螺栓模塊的 3.3V 引腳為 LDR 供電。LDR 上的電阻隨著落在其上的光強度的變化而變化。由于 Bolt 模塊無法讀取電阻值,但可以讀取電壓值,因此制作了一個分壓器電路,并且 Bolt 模塊的輸入是 10k 電阻兩端的電壓(因為它連接在 LDR 端子和地之間),這取決于關于 LDR 的電阻。LED 的較長端子連接到較高的電位,較短的端子連接到較低的電位。這里較短的端子接地,較長的端子通過串聯的 330k 電阻連接到數字引腳 0。數字引腳 0 輸出(取決于 LDR/A0 引腳輸入)充當 LED 的電源并因此確定。它的強度
3.2配置文件
該項目的 python 編碼已在 Ubuntu (Linux) 中完成。在我們開始編寫 Python 中自動控制 LED 亮度的代碼之前,我們需要制作一個配置文件,該文件將包含每個用戶/設備的特定鍵。我們將在我們的主代碼中導入這個文件并使用各種屬性。這樣做的好處是每個用戶只需更改配置文件的內容即可使用該產品。
以下是配置文件(命名為 conf.py):
API_KEY = “XXXX” //Bolt Cloud API Key
DEVICE_ID = “BOLTXXXX” //Device ID of the Bolt Module
TELEGRAM_CHAT_ID = “-XXXX” //Chat ID of the created Telegram Channel
TELEGRAM_BOT_ID = “botXXXX” //Bot ID of the created Telegram Bot
FRAME_SIZE = 10 //Frame Size for Z score analysis
MUL_FACTOR = 1 //Multiplication factor for Z score analysis
Bolt 模塊的 API 密鑰和設備 ID 可以如下確定:
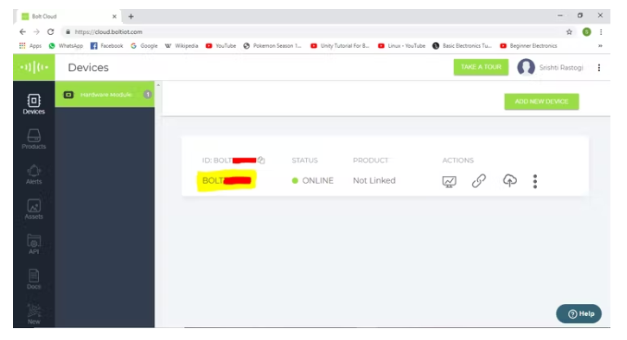
按照https://cloud.boltiot.com/ 上的說明將您的 Bolt 設備連接到 Bolt 云。
之后將出現以下屏幕。螺栓設備 ID 以黃色突出顯示。
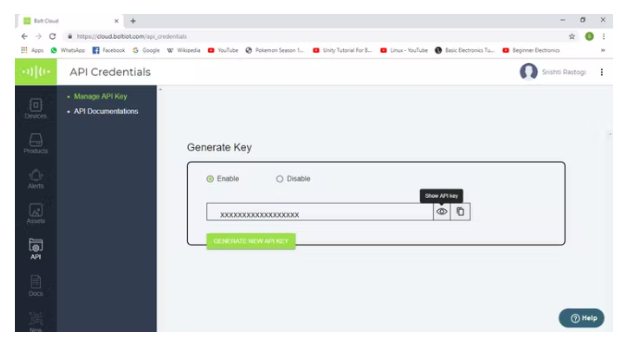
轉到 API 部分以了解 API 密鑰。
3.3 LDR 值到 LED 值的映射
LDR 的取值范圍是從 0 到 1024,而 LED 的取值范圍是從 0 到 255。顯然,一對一映射是不可能的,但可以進行大約 4:1 的映射。執行如下:input_to_LED = 255 - (output_from_LDR / 4) LDR 的輸出從 255(LED 的最大強度)中減去,因為映射必須反向進行,即周圍環境中的亮度越高,LED 的亮度越低。
3.4光強突變檢測(Z-評分分析)
Z分數分析用于異常檢測。此處的異常是指變量的值(周圍環境的光強度)超出某個值范圍。值的范圍稱為界限(上限和下限)。這些界限是使用輸入值、幀大小和乘法因子計算的。幀大小是 Z 分數分析所需的最小輸入值數量,乘法因子確定邊界與輸入值曲線的接近程度。

上面給出的是計算邊界的公式。這里輸入表示為“Vi”,“r”表示幀大小,“C”是乘法因子。首先,我們計算輸入值的平均值(Mn)(對于每個新輸入,再次計算平均值)。每個輸入值的變化(來自平均值)為 (Vi - Mn)^2。Z 分數 (Zn) 的計算如上所示(每個輸入值的變化平均值的平方根乘以乘法因子)。界限表示為“Tn”,上限計算為 (Vi + Zn),下限計算為 (Vi - Zn)。
幀大小和倍增因子是使用試錯法確定的。
3.5創建 Telegram 頻道和機器人
安裝 Telegram App 并使用您的手機號碼登錄。然后按照以下步驟創建 Telegram 頻道。
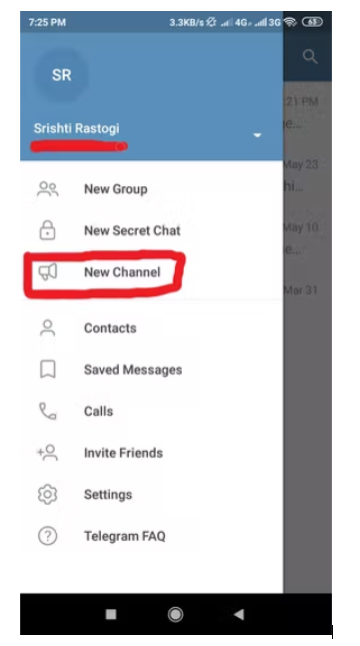
在配置文件中,輸入 Telegram Bot ID(或令牌)。
要知道 Telegram Chat ID,首先向頻道發送消息。然后在瀏覽器中輸入以下網址:
https://api.telegram.org/bot《token》/getUpdates
(輸入令牌時省略“《”和“》”)
如下所示的 json 數組將出現具有 Telegram 聊天 ID。Telegram 頻道聊天 ID 被紅色覆蓋。

3.6 ‘AUTO’ 功能的完整代碼
import requests, json, time, math, statistics //import various python libraries
from boltiot import Bolt
//import the boltiot module from the Bolt python library
import conf ? ? ? ? ? ? ? ? ?//import the configuration file
??
//---------FUNCTION TO COMPUTE BOUNDS OR Z SCORE ANALYSIS------------//
def compute_bounds(history_data, frame_size, factor):?
//Function to compute bounds
? ? if len(history_data) < frame_size:
? ? ? ? return none
? ? if len(history_data) > frame_size:
? ? ? ? del history_data[0:len(history_data) - frame_size]
? ? Mn = statistics.mean(history_data)
? ? Variance = 0
? ? for data in history_data:
? ? ? ? Variance += math.pow((data-Mn),2)
? ? Zn = factor * math.sqrt(Variance/frame_size)
? ? High_bound = history_data[frame_size -1] +Zn
? ? Low_bound = history_data[frame_size - 1] - Zn
? ? return [High_bound, Low_bound] ? ?//Returns Low Bound and High Bound
??
//---------------FUNCTION FOR TELEGRAM ALERTS----------------------//
def send_telegram_message(message):
? ? url = "https://api.telegram.org/"+ conf.TELEGRAM_BOT_ID +"/sendMessage"
? ? data = {
? ? ? ? ? ? "chat_id": conf.TELEGRAM_CHAT_ID,
? ? ? ? ? ? "text": message
? ? }
? ? try:
? ? ? ? response = requests.request(
? ? ? ? ? ? "GET"
? ? ? ? ? ? url,
? ? ? ? ? ? params=data
? ? ? ? )
? ? ? ? print("Telegram response:")
? ? ? ? print(response.text)
? ? ? ? telegram_data = json.loads(response.text)
? ? ? ? return telegram_data["ok"]
? ? except Exception as e:
? ? ? ? print("An error occurred in sending the alert message via Telegram")
? ? ? ? print(e)
? ? ? ? return False
//-----------------------------------------------------------------//
??
mybolt = Bolt(conf.API_KEY, conf.DEVICE_ID) ? ?//To identify your bolt device
history_data = [] ? ? ? ? ? ? ? ?//Array of input values from LDR
??
while True:
??
//---------------------READ INPUT FROM LDR--------------------------//
? ? response_ldr = mybolt.analogRead('A0') ? ? //Read input from LDR at A0 pin
? ? ldr_data = json.loads(response_ldr)//Retrieve the input data in json format
? ? if ldr_data['success']!='1':
? ? ? ? print("There was an error while retrieving the data")
? ? ? ? print(ldr_data['value'])
? ? ? ? time.sleep(10)
? ? ? ? continue
? ? try:
? ? ? ? sensor_value = int(data_ldr['value'])
? ? ? ? //store current input value in variable?
? ? except e:
? ? ? ? print("There was an error while parsing the response")
? ? ? ? print(e)
? ? ? ? continue
? ? print("LDR sensor value is: "+str(sensor_value)) //Print LDR input value
? ? print(response_ldr)
??
//----------------------MONITORING INTENSITY OF LED--------------------------// ? ??
? ? led_value_1 = int(sensor_value/4)
? ? if led_value-1 > 255:
? ? ? ? led_value_1 = 255
? ? led_value = 255 - led_value_1//Output value to LED based on LDR input value
? ? response_led = mybolt.analogWrite('0', led_value) //Write output at pin 0
? ? print("Automated LED value is: "+str(led_value)) //Print LED output value
? ? print(response_led)
??
//----------------PERFORMING Z SCORE ANALYSIS--------------------------//
? ? bound = compute_bounds(history_data, conf.FRAME_SIZE, conf.MUL_FACTOR)
? ? //Call compute_bounds function
??
//-------------COLLECTING SUFFICIENT DATA FOR Z SCORE ANALYSIS---------//
? ? if not bound:
? ? //If number of inputs are not sufficient to do Z score analysis
? ? ? ? required_data_count = conf.FRAME_SIZE - len(history_data) -1
? ? ? ? if (required_data_count != 0 and required_data_count != 1):
? ? ? ? ? ? print("Not enough data to compute Z score. Need",required_data_count,"more data points.")
? ? ? ? elif (required_data_count == 1):
? ? ? ? ? ? print("Not enough data to compute Z score. Need 1 more data point.")
? ? ? ? else:
? ? ? ? ? ? print("Enough data to compute Z score.")
? ? ? ? history_data.append(int(ldr_data['value']))
? ? ? ? //Append each new input to array history_data[]
? ? ? ? time.sleep(10) ? ?//Wait for 10 seconds
? ? ? ? continue
??
//-----------DETECTING ANOMALY AND SENDING ALERTS--------------//
? ? try:
? ? ? ? if sensor_value > bound[0]: //If input crosses upper bound
? ? ? ? ? ? print("The light level has increased suddenly.")
? ? ? ? ? ? message = "The light intensity has increased suddenly. The current value is "+str(sensor_value)+". The automated LED intensity is "+str(led_value)+"."
? ? ? ? ? ? telegram_status = send_telegram_message(message)
? ? ? ? ? ? print("Telegram status:",telegram_status)
? ? ? ? elif sensor_value < bound[1]: //If input crosses lower bound
? ? ? ? ? ? print("The light level has decreased suddenly.")
? ? ? ? ? ? message = "The light intensity has decreased suddenly. The current value is "+str(sensor_value)+". The automated LED intensity is "+str(led_value)+"."
? ? ? ? ? ? telegram_status = send_telegram_message(message)
? ? ? ? ? ? print("Telegram status:",telegram_status)
? ? ? ? history_data.append(sensor_value)?
? ? ? ? //Append each new input to array history_data[]
? ? except exception as e:
? ? ? ? print("Error")
? ? ? ? print(e)
? ??
? ? time.sleep(10) ? ?//Wait for 10 seconds
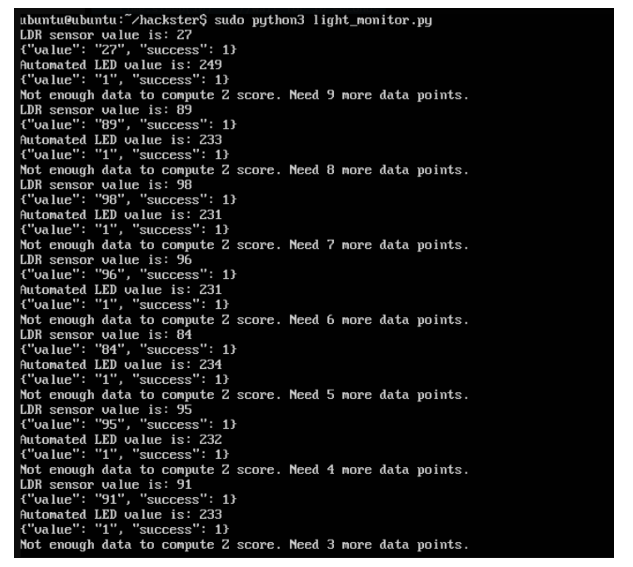
3.7 Python代碼輸出截圖(AUTO功能)
4. 打開/關閉 LED
使用 Bolt 模塊的 digitalWrite() JavaScript 函數,可以將 LED 的輸出設為“HIGH”或“LOW”,從而打開或關閉 LED。只有一個輸入引腳可同時用于 ON 和 OFF 功能。由于數字引腳 0 用于自動功能,因此我們將數字引腳 1 用于開/關功能。但是我們不能同時將兩個不同的輸入引腳連接到 LED。因此,為了根據用戶的選擇一次只將一個輸入連接到 LED,我們使用 2:1 多路復用器。
4.1多路復用器的概念
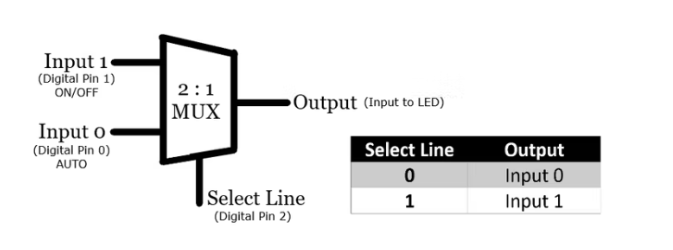
上圖表示 2:1 多路復用器的功能。從真值表中我們看到,如果選擇行的值為“0”或“低”,則輸出等于輸入 0,如果選擇行的值為“1”或“高”,則輸出等于輸入1。我們使用Bolt模塊的數字引腳2給選擇線輸入。我們得出以下結論:
要使 ON/OFF 功能起作用,請選擇 Line = ‘1’,因此必須使用 digitalWrite() 函數將數字引腳 2 的值寫入為“HIGH”。此外,LED 是 ON 還是 OFF 將取決于寫入數字引腳 1 的值,即“HIGH”表示 LED 點亮,“LOW”表示 LED 熄滅。如果 Select Line = ‘0’ 則系統將使用 python 程序在 AUTO 模式下運行,該程序將值寫入數字引腳 0 并自動化 LED 的強度
4.2使用基本門實現 2:1 多路復用器
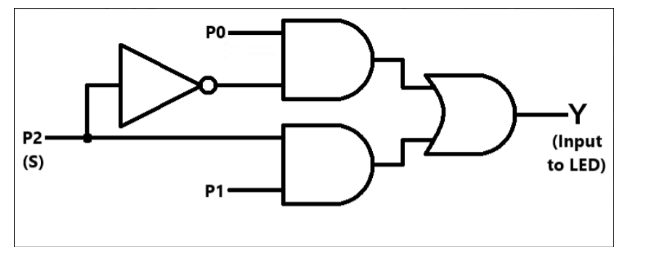
S 代表選擇線,而 S‘ 代表它的否定。令P0、P1、P2分別代表數字引腳0、1、2的值。2:1多路復用器的布爾函數如下:輸出=S’.P0+S.P1;其中 S 是 P2 的輸入
顯然,要實現多路復用器,我們需要一個非門、兩個與門和一個或門。這些門的 IC 編號分別為 7404、7408 和 7432。2:1多路復用器的邏輯門圖和實現如下:
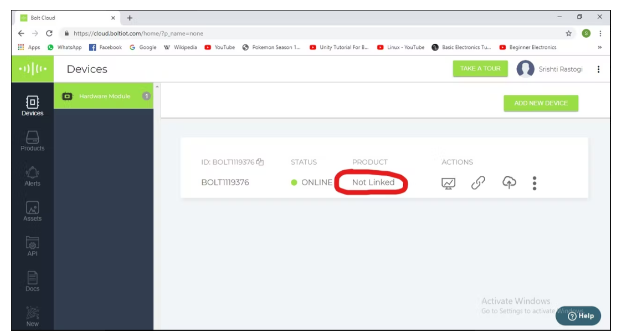
4.3 在 Bolt Cloud 上設置
轉到https://cloud.boltiot.com/ ,然后按照以下步驟操作:
4.4用戶界面設計
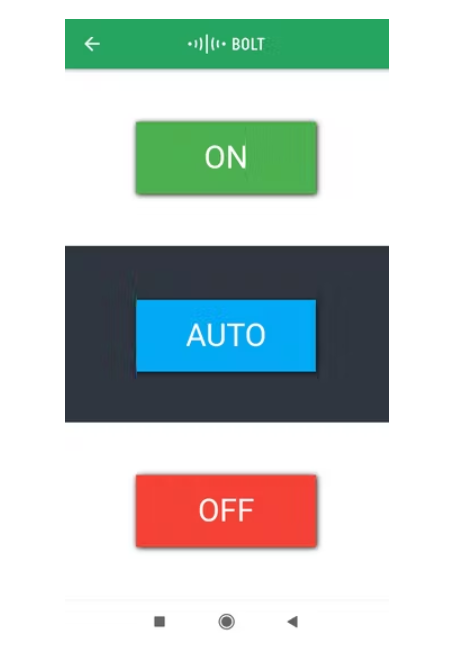
用戶界面使用 html 設計并使用 Bolt Android 應用程序實現。UI 與 Bolt 模塊的鏈接是使用 JavaScript 函數 digitalWrite() 完成的。
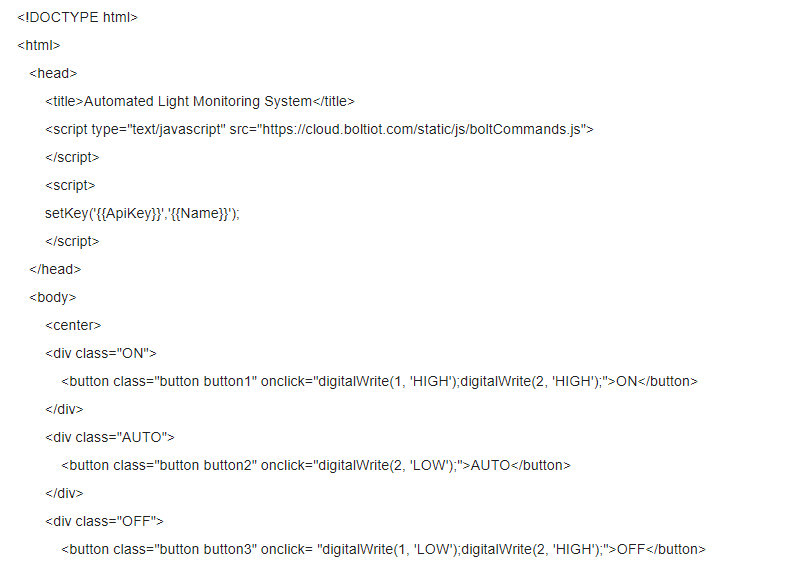
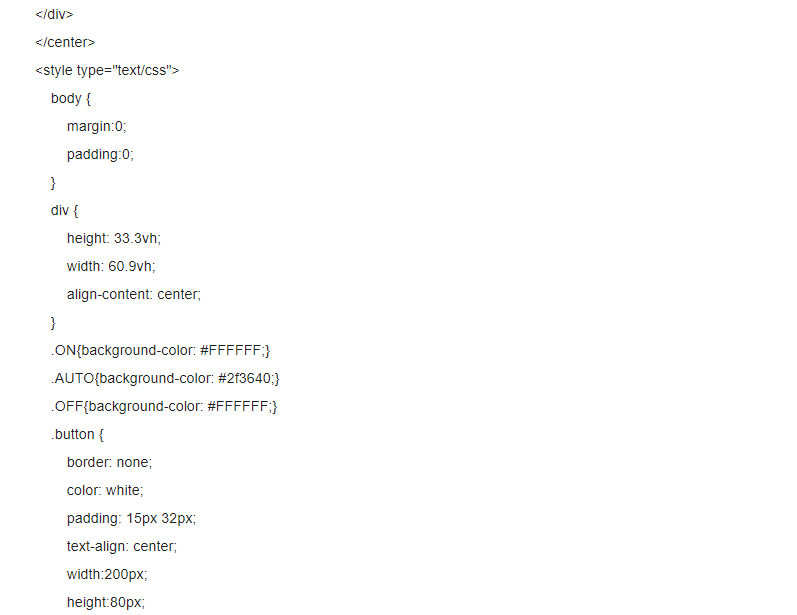

設計的用戶界面如下圖所示:
4.5驗收
到此項目所需的所有操作步驟都已經完成了,試用你的自動燈光監控系統吧。
 電子發燒友App




評論