引言
本文介紹了如何利用MAXQ7667智能SoC (片上系統(tǒng))確定超聲傳感器的諧振頻率和阻尼特性。這些功能有助于診斷傳感器模塊,優(yōu)化系統(tǒng)性能,并且可以在生產(chǎn)過程中用于校準。本應用筆記并非針對所有系統(tǒng)泛泛地討論“如何實現(xiàn)”,而是針對特定的傳感器模型討論設計細節(jié)以及特定條件下的性能。利用這些信息,用戶可以大大簡化系統(tǒng)測試。另外,這些測試假定超聲波反射目標與傳感器的距離大于1英尺。
測試裝置
本文中的所有測試數(shù)據(jù)取自MAXQ7667 EV (評估)板,這些數(shù)據(jù)通過評估板的RS-232串口傳送到PC,然后利用Excel表產(chǎn)生曲線圖。傳感器采用隨評估板提供的40kHz 400EP250。傳感器水平安裝在電路板上,可以方便地在傳感器上加裝其它材料以改變傳感器的性能。這里采用了三種傳感器條件應用于各種測試:清潔干燥的傳感器(正常工作條件)、在傳感器表面注水、傳感器表面附有油漬。
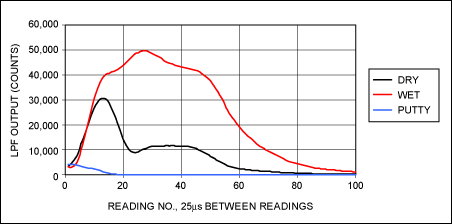
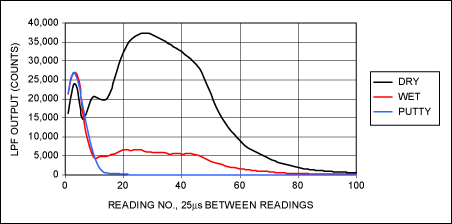
圖1至圖3顯示了這些不同條件下傳感器的參數(shù),可以看到有較大的差異。傳感器表面注水會降低傳感器的諧振頻率、減小阻尼;油漬的影響則相反,會提高諧振頻率、并顯著增大阻尼。
阻尼測試
阻尼測試用于測量傳感器的諧振時間,測試非常簡單,首先產(chǎn)生一個短脈沖激勵傳感器,然后監(jiān)測傳感器輸出,觀察信號的衰減速度。圖1至圖3給出了三種不同頻率下回波接收通道的阻尼。從三組曲線可以很容易看出油漬會導致強阻尼。另外,如果觀察阻尼的細微變化,這些曲線還顯示了接收頻率的重要作用。
由于該測試非常簡單,可以在多個頻率下進行測試。在多個頻率下進行測試時,最好保持相對恒定的激勵脈沖寬度。利用一個持續(xù)時間固定的激勵窄脈沖,可以消除傳感器能量變化或者在諧振頻率處激勵傳感器造成的差異。
圖1、圖2和圖3中,以25μs的間隔采集LPF (低通濾波器)輸出,傳感器激勵脈沖寬度近似為6μs。注意,如果只使用一個頻率并且PLL已處于所要求的頻率,該測試可以在低于3ms的間隔下進行。在兩次測量之間有充分的時間觀測峰值,并檢測信號衰減到給定峰值百分比的時間。如果使用多個頻率,可能需要額外的測量時間,同時也需要更多時間使PLL穩(wěn)定到一個新的頻率。
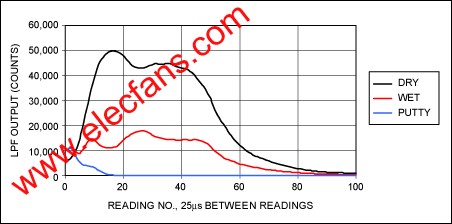
圖1. 利用40kHz中心頻率濾波器時的阻尼測量
?
圖2. 利用35kHz中心頻率濾波器時的阻尼測量
?
圖3. 利用45kHz中心頻率濾波器時的阻尼測量
掃頻
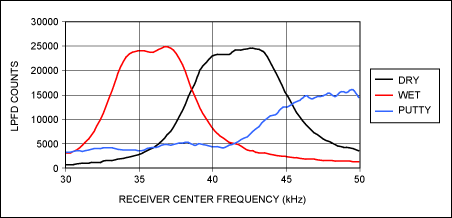
掃頻可以確認傳感器的諧振頻率。圖4清楚地顯示了不同外加材料(三種不同測試條件)對傳感器諧振頻率的影響。從圖4數(shù)據(jù)可以看出:接收器中心頻率以400Hz的間隔從30kHz變化到50kHz,共計51個頻率。對于51個頻率的每個頻率,從激勵到讀取LPF輸出的時間間隔相同。診斷時需要特別注意:從激勵到讀取LPF數(shù)據(jù)的時間間隔必須正確。這個時間間隔必須足夠長,使回波接收通道脫離飽和;但還要足夠短,保證傳感器仍然能夠產(chǎn)生比較強的信號。似乎單一的固定時間間隔很難滿足所有條件。例如,從圖2可以明顯看出,如果傳感器有油漬,信號在正常的傳感器脫離飽和之前就被完全衰減掉。考慮到這種狀況,必須動態(tài)調(diào)整從激勵到測量LPF輸出的時間間隔。幸運的是阻尼測試(見下文)可以很容易地確定一個較好的時間間隔。
為了收集圖4數(shù)據(jù)(即LPF輸出數(shù)據(jù)),阻尼測試首先在三種不同頻率下進行,保存從激勵到信號衰減到峰值一半的時間。三次測試的最長時間間隔將用作掃頻測試的時間間隔。這個過程確定了能夠保證任何傳感器條件下都可以產(chǎn)生較好的輸出信號的時間間隔。
?
圖4. 三種傳感器測試條件下的掃頻測試
總之,為了確定從激勵到測量的時間間隔,掃頻測試之前至少進行一次阻尼測試。掃頻測試需要比阻尼測試更長的時間。頻率步進變化多個頻點,每個頻率必須在激勵傳感器以及進行相應的測量之前建立。這種情況下,整個測試大約需要650ms。如果PLL頻率建立時間較短,或者是減少測量頻點、降低阻尼測試次數(shù),可以縮短測試時間。而這些改變會導致傳感器測量參數(shù)精度的降低,但能夠滿足絕大多數(shù)應用的要求。
圖4數(shù)據(jù)顯示了傳感器相當寬的諧振頻帶,與傳感器本身的性能相比,這個諧振帶寬與MAXQ7667的帶通濾波器帶寬的關(guān)系更密切。即便如此,這個測試仍然對確定傳感器的中心頻率非常有用。
簡化測試條件
本應用筆記提供的圖表為設計人員提供了一個簡便的參考,但很難進行自動診斷。為了簡化測試過程,可以將數(shù)據(jù)減少到幾個數(shù)值,然后將這些數(shù)值和表格中的參考值進行對比。這些參考值可以按溫度排序。而溫度很容易通過SAR ADC和熱敏電阻得到。
以下程序代碼(附錄A)用于捕獲圖4中的數(shù)據(jù),該程序還提供了三方面的數(shù)據(jù),可用于定義傳感器的條件。這些數(shù)據(jù)是:
阻尼測試中,諧振頻率處的LPF峰值數(shù)據(jù)。
阻尼時間,或者是從激勵到信號衰減至峰值一半的時間。
中心頻率或諧振頻率,該數(shù)值表示為PLL的建立時間,是下限PLL建立時間(信號為峰值的70%)和上限PLL建立時間(信號為峰值的70%)的平均值,其中70%是任意決定的。
表1分別顯示了三種傳感器條件下的數(shù)據(jù)。通過這些數(shù)據(jù),診斷程序很容易區(qū)分傳感器所處的條件。
表1. 各種傳感器工作條件下的數(shù)據(jù)總結(jié) Peak LPF Reading (Counts)Damping Time (μs)Center Frequency (PLL)
Dry244771394290
Wet247401435150
Putty158540323430
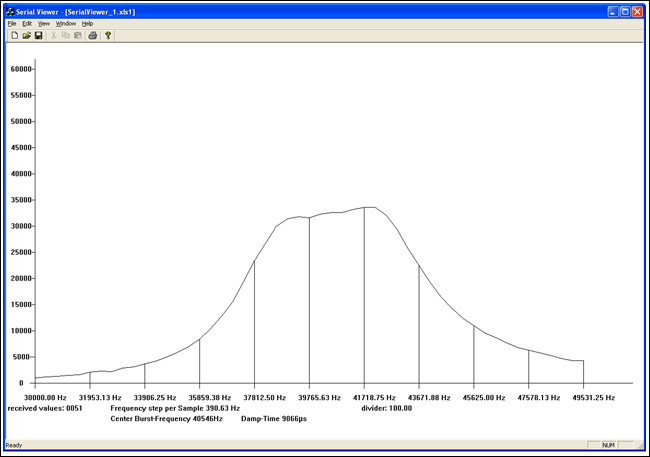
可以下載用于IAR?編譯器2.12A的完整軟件,如果將評估板的RS-232串口連接到PC的COM1,運行PC程序Transducer_Calibrate_115k2.exe,將會顯示隨頻率變化的諧振曲線和評估的諧振頻率(圖5)。
?
詳細圖片(PDF, 325kB)
圖5. 輸出曲線圖示例
附錄A. 軟件例程
MAXQ7667傳感器校準文件
// This routine measures the transducer damping at the specified frequency (PLLfreq).
// The system timer is used to measure when the LPF output (LPFD) has dropped to 1/2 the peak value.
// This is the settling time that will be used later when doing the frequency sweep.
unsigned damping_half_time (unsigned PLLfreq, unsigned pulse_width)
{
unsigned short i;
unsigned short peak = 0;
unsigned short half_peak = 0;
unsigned short temp = 0;
SCNT_bit.STIME = 0; // Make sure system timer is off.
STIM = 0; // Clear the system timer.
SCNT_bit.STDIV = 4; // Set system timer prescale divider to 16 (1μs per cycle).
PLLF_bit.PLLF = PLLfreq; // Set the PLL frequency.
BPH = pulse_width; // Pulse width = BPH/(receive frequency * 400) when BDIV = 0xC.
usWaitTimer2(10000); // Let the PLL settle for 10ms.
SCNT_bit.STIME = 1; // Start the system timer.
BPH_bit .BSTT = 1; // Send a burst.
usWaitTimer2(50); // Wait for LPF to partially settle.
RunTimer0_us(20); // Start timer # 1 with a reload time of every 20μs.
for (i = 0; i < 200; i++)
{
temp = LPFD; // Read the output of the lowpass filter.
if (temp > 0x2000 && temp > peak) {peak = temp;} // Save the peak value if it is greater than 2000.
if (temp < peak/2 && half_peak == 0) // If LPFD is less than half the peak value and the half peak time
{ // has not been set, then
half_peak = STIM; // save the time it took to reach half the peak value.
i = 101; // Half peak found so exit the loop.
}
while (T2CNB0_bit.TF2 == 0) {} // Wait for timer # 0.
T2CNB0_bit.TF2 = 0; // Clear flag.
}
T2CNA0_bit.TR2 = 0; // Stop timer # 0.
return half_peak;
}
void main()
{
unsigned short i = 0;
unsigned short peak = 0;
unsigned short first70 = 0;
unsigned short second70 = 0;
unsigned short center_pllf;
unsigned short wait2measure;
unsigned short halfpeak;
init();
// **********************************
// **********************************
// Configuration settings
echo_receive_gain(0); // Set receiver to minimum gain (allowed values 0-31)
Burst_Clock_Divider = 400; // for calculating the burst-frequency in PC-Application.
burst_setup(BURST_CLK_PLL, BURST_PULSE_1, BURST_DIV_400, 0, PLL_CLOCK_16MHZ, 0);
step_size=10; // Sets the step-size (steps go from 0 to 511).
// END configuration settings.
// ******************************
// ******************************
while(1)
{
// Use the "damping_half_time" routine to measure the time in μs that it takes for the
// ringing to drop to half of the peak value. Do this at more than one frequency so that
// one of the frequencies will be within range of the transducer.
wait2measure = damping_half_time(128, 88); //Measure damping time at 35kHz.
halfpeak = damping_half_time(256, 101); //Measure damping time at 40kHz.
if (wait2measure < halfpeak) {wait2measure = halfpeak;} // Save the longest time.
halfpeak = damping_half_time(384, 113); //Measure damping time at 45kHz.
if (wait2measure < halfpeak) {wait2measure = halfpeak;} // Save the longest time.
// Repeatedly pulse the transducer with a constant width pulse while sweeping the receiver
// frequency. Use the half-time value from the damping test (wait2measure) for the interval
// between pulse transmission and reading LPFD (lowpass filter data).
PLLF_bit.PLLF = 0; // Start the sweep at 30kHz.
BPH = 77; // Pulse ~6.3μs. This value is easy to maintain over frequency.
peak = 0;
number_of_steps = 0;
do // Sweep from 30kHz to 50kHz with step_size * 39.062500kHz.
{
usWaitTimer2(5000); // Wait 5ms for the frequency to settle.
STIM = 0; // Reset the system timer. It controls the Pulse to LPF read time.
BPH_bit .BSTT = 1; // Send burst.
while(STIM < wait2measure) {} // Wait the specified amount of time for the ringing to dampen.
lpfdata[number_of_steps]= LPFD; // Store the LPF reading.
if(lpfdata[number_of_steps]> peak) {peak = lpfdata[number_of_steps];} //Save the peak value.
number_of_steps++;
PLLF_bit.PLLF = number_of_steps * step_size; // Increase the frequency.
BPH = 77 + number_of_steps; // Increase the duty cycle to maintain pulse width.
} while (PLLF < 512-step_size);
// Find the center frequency based on the average of the two frequencies that have a
// LPFD reading that is 70% of the peak reading.
for (i = 0; i < number_of_steps; i++)
{
if (lpfdata[i] > peak*0.7)
{
first70 = i;
i = number_of_steps;
}
}
for (i = number_of_steps; i >0; i--)
{
if (lpfdata[i] > peak*0.7)
{
second70 = i;
i= 1;
}
}
i = (first70 + second70)/2; // i = the loop value at the center frequency.
center_pllf = i*step_size; // Set PLLF_bit.PLLF to this value for the resonant frequency.
//Remeasure damping using the center frequency.
damp_time = damping_half_time(center_pllf, 75);
// At this point there are three valuable pieces of information about the transducer.
// Peak = the peak value from the frequency sweep.
// center_pllf = the PLLF setting at the resonant frequency.
// damp_time = time for the resonance to decay to 1/2 the peak value.
center_burst_frequency = 16000000/Burst_Clock_Divider*(center_pllf+768)/1024;
SendData();
} // While(1)
} // End Main
 電子發(fā)燒友App





評論