想掙脫地心引力的束縛?想練習跑酷在垂直的墻壁上疾走?——不要用崇拜的目光注視我,雖然我就是飛檐走壁,仁者無敵的可愛玲瓏Wallbots!當然我也不介意你稱呼我的藝名:【蜘蛛俠】

墻面上爬來爬去的是神馬?!莫要驚慌,既不是壁虎也不是變異蜘蛛,它們是可愛的Wallbots——能在垂直表面進行穿越的機器人。想知道怎么制作?嗯哼,往下看吧~小W可以在任何含金屬墻面上移動,包括電梯,白板,冰箱、金屬門。 小W還配備了幾個光傳感器,通過它們可以進行簡單的交互。 3種模式可供選擇,通過光傳感器進行轉換: 紅色走得快,趨近障礙物(例如人的手或者小W的兄弟姐妹們); 綠色走得慢,遠離障礙; 黃色走得最慢,檢測到物體時完全停止。
1 工具和材料
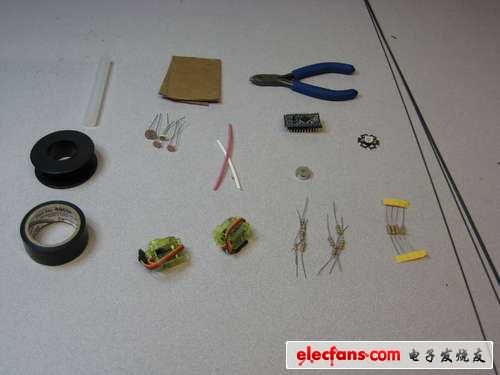
● 一些不易彎曲的硬線
● 絕緣膠布
● 線
● 硬板紙
● 膠棒
● 熱膠q1an9
● 剪刀
● 剪鉗(絞線的那個)
●2.2K歐姆電阻*4
● 10K歐姆電阻
● 100歐姆電阻
● 伺服電機*2
● 磁鐵片*6
● 1個RGB LED燈
● 1個輕型的電池
2. 使伺服電機連續運轉之入門篇

● 把固定它的殼子打開,對每個伺服機做簡單修改就能得到我們需要的連續轉動,先撬開殼子。
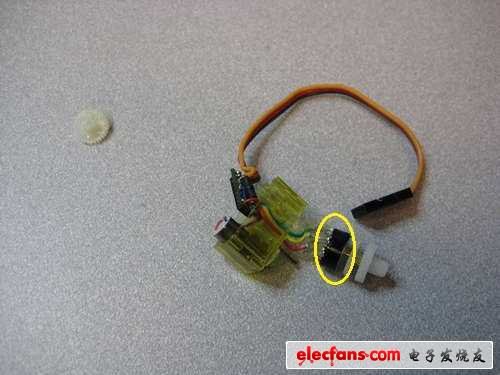
● 把妨礙轉動的殼子剪掉,這樣電位計就能一直獲得連續信號。
● 這個黑色的部分是用來讓它轉了180度后停止的,看見沒?兩個黑色塑料小片兒。
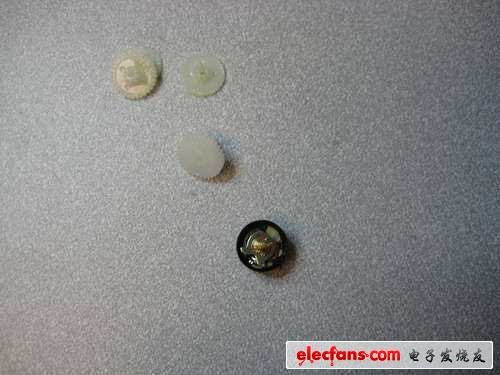
● 取下齒輪
● 把黑色殼子上的線剪下(下一個大步會告訴你怎么處理它們)。
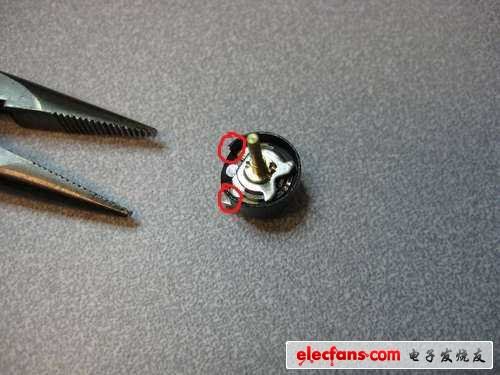
● 把擋著連續轉動的小塑料片兒剪掉。
3 使伺服電機連續轉動之進階篇
● 現在,電位計已被成功調戲~(≧▽≦)/~,她一直采集連續信號。
● 從黑殼子上剪出紅色,綠色和黃色的線(這個應當在上一步就做好了)。

● 綠色的線和黃色線之間焊個2.2K的電阻
● 在紅色和黃色的線之間也焊個2.2K的電阻
4 反向設置
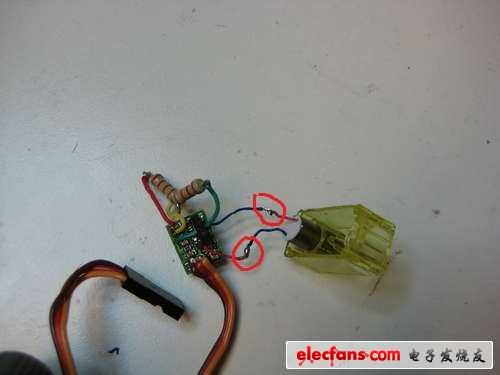
● 在相同模擬信號下,伺服機的轉向一般是相同的。他們對稱安裝在小W上,但是要讓一個反向怎么辦?在硬件和軟件上都可以解決(我用硬件做的,因為我是代碼懶人,摔!)。
● 剪下電機到電機板子上的紅色和藍色的線。
● 焊接紅線到藍線,然后藍線到紅線(頭暈了吧?其實就是像圖上那樣交叉一下)。
5 組裝電機

● 這步很容易嘿!盡可能溫柔滴把線塞到伺服機殼子里面,然后把齒輪裝配好。可是捏,我加了電阻后,以前的殼子就不合適了,所以我用絕緣膠布把他們纏在一塊兒的。
6 齒輪上陣
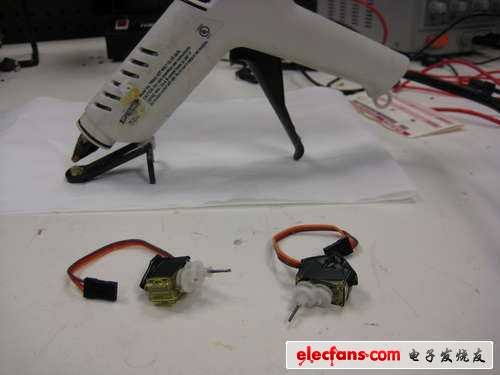
● 怎么附上去呢?我用的熱膠,其實任何粘性強的玩意兒都可以使,先剪兩根1英寸長的硬線。
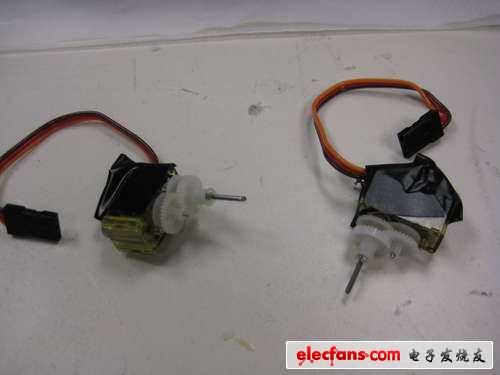
● 把每根線用熱膠粘在伺服機頂部的齒輪里面。線要對半,露一半出來!
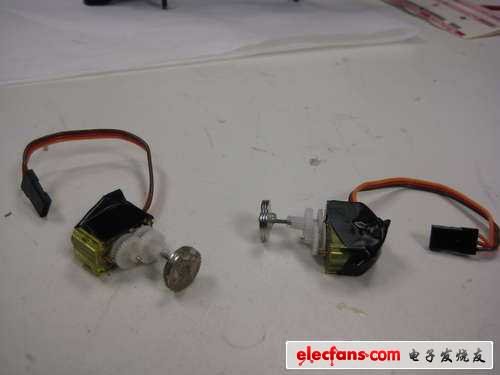
● 在每根線的末端粘3個磁盤。磁盤也必須是對準中心!
7 伺服機與單片機對接
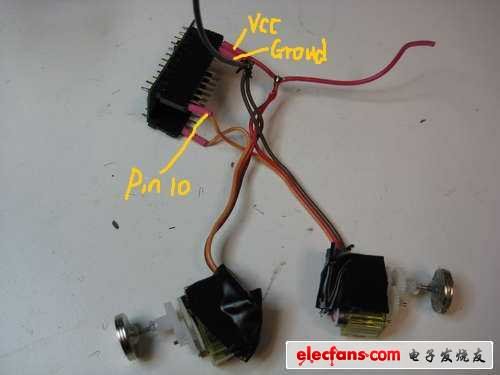
● 我用PIN 9和 PIN 10來驅動電機。
● Pin 9 -》伺服機1的橙線。
● Pin 10 -》伺服機2的橙線
● Ground -》伺服機1,2的黑線。
● VCC -》伺服機1,2的紅線。
8 接光敏電阻
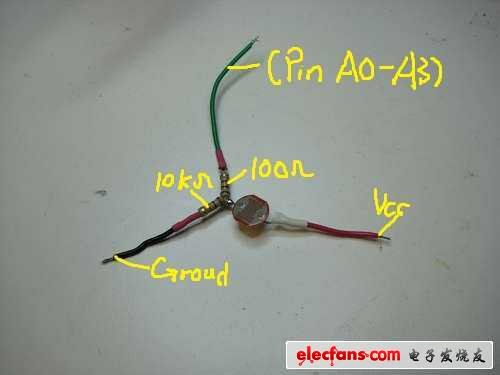
● 把每個光敏電阻(光傳感器)都連到Arduino上,一共4個傳感器,左、右、前、后。
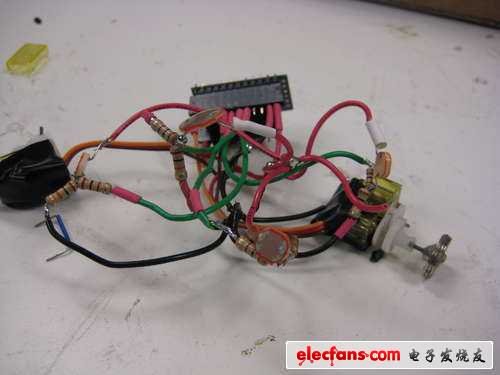
● 每個光傳感器的電路圖下面有,傳感器的一條線連接到VCC;另一條線連到10K和100歐姆的電阻上。10K電阻接地,100歐姆電阻連接輸入端。每個傳感器的輸入(綠線)連到MINI上的模擬端口(A0,A1,A2,A3)。
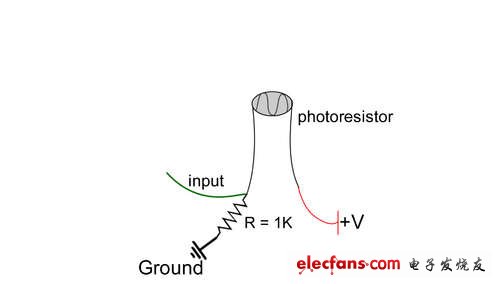
● 我程序里是這樣設置的:Analog 0 -》 頂部的傳感器;Analog 1 -》 左邊的傳感器;Analog 2 -》 前面的傳感器;Analog 3 -》 右邊的傳感器。
9 加上RGB LED燈
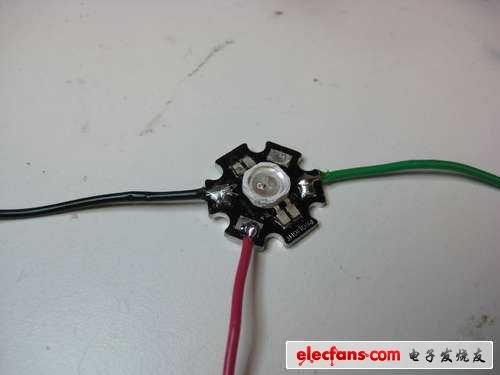
● 把每個光敏電阻(光傳感器)都連到Arduino上,一共4個傳感器,左、右、前、后。
● 你是不是想在每個端口和LED燈之間放個電阻(200 歐姆左右)?我沒有醬紫,因為我的LED燈可以承受的電壓比Arduino能提供的高得多,所以不會被燒。
10 安裝電池● 其實捏,能提供3—4V的電池都可以用,越輕越好。我使用了sparkfun鋰電池。接地,然后高壓直接接Arduino的VCC口。
11 上程序!● 這代碼是關于2個伺服電機根據4個光傳感器的輸入值而進行驅動。根據模式,有幾種運動方式。
*/
#include 《Servo.h》
// Right and left servos
Servo servo1;
Servo servo2;
// Light Sensors
int topSensor = 0; //700
int leftSensor = 1; /// Threshhold is 400
int frontSensor = 2; //400
int rightSensor = 3; //300
// Hardcoded thresholds (not used because we auto-calibrate)
int topThreshhold = 400;
int leftThreshhold = 550;
int frontThreshhold = 200;
int rightThreshhold = 650;
// Current robot type (red gree or yellow)
int STATE = 0;
// State values
int RED = 0;
int GREEN = 1;
int ORANGE = 2;
// Pins to drive the top tri-color LED
int redPin = 5;
int greenPin = 6;
// Values to hold sensor readings
int front;
int right;
int left;
int top;
// Auto-calibrate light sensor thresholds
void calibrate() {
Serial.println(“CALIBRATING”);
long int val = 0;
for (int i = 0; i《5; i++) {
val += analogRead(frontSensor);
delay(10);
}
frontThreshhold = (val /5) - 80;
val = 0;
for (int i = 0; i《5; i++) {
val = val + analogRead(topSensor);
Serial.println(analogRead(topSensor));
Serial.println(val);
delay(10);
}
topThreshhold = (val /5) -200;
val = 0;
for (int i = 0; i《5; i++) {
val += analogRead(rightSensor);
}
rightThreshhold = (val /5) - 100;
val = 0;
for (int i = 0; i《5; i++) {
val += analogRead(leftSensor);
}
leftThreshhold = (val /5) - 100;
// Print threshold values for debug
Serial.print(“top: ”);
Serial.println(topThreshhold);
Serial.print(“right: ”);
Serial.println(rightThreshhold);
Serial.print(“left: ”);
Serial.println(leftThreshhold);
Serial.print(“front: ”);
Serial.println(frontThreshhold);
}
void setup()
{
// turn on pin 13 for debug
pinMode(13, OUTPUT);
digitalWrite(13, HIGH);
// setup sensor pins
for (int i = 0; i《4; i++) {
pinMode(i, INPUT);
}
Serial.begin(9600);
calibrate();
// generate a random state
STATE = random(0, 3);
setColor(STATE);
}
// MOTOR FUNCTIONS
void turnLeft()
{
Serial.println(“LEFT”);
start();
delay(20);
for (int i = 0; i《20; i++) {
servo2.write(179);
servo1.write(1);
delay(20);
}
stop();
delay(20);
}
void turnRight() {
Serial.println(“RIGHT”);
start();
delay(20);
for (int i = 0; i《20; i++) {
servo2.write(1);
servo1.write(179);
delay(20);
}
stop();
delay(20);
}
void goForward(int del = 20) {
Serial.println(“FORWARD”);
start();
delay(20);
for (int i = 0; i《20; i++) {
servo1.write(179);
servo2.write(179);
delay(del);
}
stop();
delay(20);
}
void stop() {
servo1.detach();
servo2.detach();
delay(10);
}
void start() {
servo1.attach(10);
servo2.attach(9);
}
// Set the color of the top tri-color LED based on the current state
void setColor(int color) {
if (color == RED) {
digitalWrite(greenPin, 0);
analogWrite(redPin, 180);
}
else if (color == GREEN) {
digitalWrite(redPin, 0);
analogWrite(greenPin, 180);
}
else if (color == ORANGE) {
analogWrite(redPin, 100);
analogWrite(greenPin, 100);
}
}
// Blink the yellow color (when robot is confused)
void blinkOrange() {
for (int i = 0; i《5; i++) {
analogWrite(redPin, 100);
analogWrite(greenPin, 100);
delay(300);
digitalWrite(redPin, 0);
digitalWrite(greenPin, 0);
delay(300);
}
analogWrite(redPin, 100);
analogWrite(greenPin, 100);
}
void loop()
{
top = analogRead(topSensor);
long int time = millis();
while (analogRead(topSensor) 《 topThreshhold) {
delay(10); // while there is an arm wave from the user don‘t do anything
}
if ((millis() - time) 》 3000) {
// if the sensor was covered for more than 3 seconds, re-calibrate
calibrate();
}
// if the top sensor was covered, we change state
if (top 《 topThreshhold) {
STATE = (STATE+1) %3;
setColor(STATE);
Serial.print(“CHANGED STATE: ”);
Serial.println(STATE);
}
// Read the other sensors
right = analogRead(rightSensor);
left = analogRead(leftSensor);
front = analogRead(frontSensor);
if (STATE == RED) {
// go towards objects
if (front 《 frontThreshhold) {
goForward();
} else if (right 《 rightThreshhold) {
turnRight();
} else if (left《leftThreshhold) {
turnLeft();
} else {
goForward();
}
}
if (STATE == GREEN) {
// go away from objects
if (front 《 frontThreshhold) {
int dir = random(0,2);
if (dir == 0 && right 》 rightThreshhold) {
turnRight();
} else if (dir == 1 && left 》 leftThreshhold) {
turnLeft();
}
} else if (right 《 rightThreshhold) {
if (left 》 leftThreshhold) {
turnLeft();
} else {
goForward();
}
} else if (left《leftThreshhold) {
if (right 》 rightThreshhold) {
turnRight();
} else {
goForward();
}
} else {
goForward();
}
delay(200);
}
if (STATE == ORANGE) {
// only move if there are no hand motions- otherwise blink
int dir = random(0, 3);
if (left《leftThreshhold || right《rightThreshhold ||
front《leftThreshhold) {
blinkOrange();
} else {
if (dir == 0) {
goForward();
} else if (dir == 1) {
turnRight();
} else if (dir == 2) {
turnLeft();
}
delay(1000);
}
delay(10);
}
}
紅色最快,趨向物體(當光傳感器檢測到光被擋住時);
藍色是中速,背向物體(背向黑色區域);
黃色最慢,檢測到物體就停止。
● 小W和它的兄弟姐妹們通過磁鐵輪子在墻上運動,可以左轉右轉和前行;根據不同模式可進行調速。
● 當頂部的傳感器被遮住超過3秒,所有傳感器自動校準。
12 別讓小W裸奔
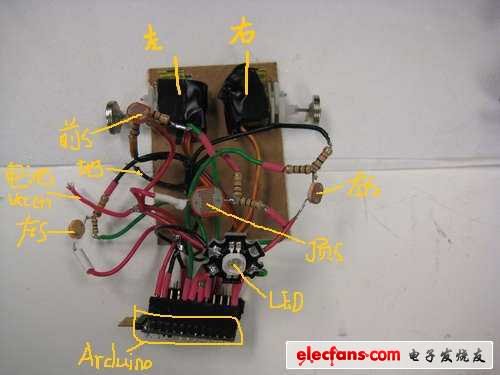
● 給小W穿件衣裳。但之前必須確定程序能跑,然后你能分得清哪個伺服機是左,哪個是右。
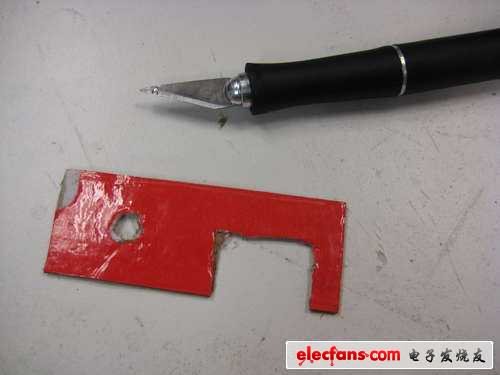
● 因為小W要垂直運動,衣裳越輕越好啊!我用的硬紙殼,其實報紙或者輕塑料都能使。
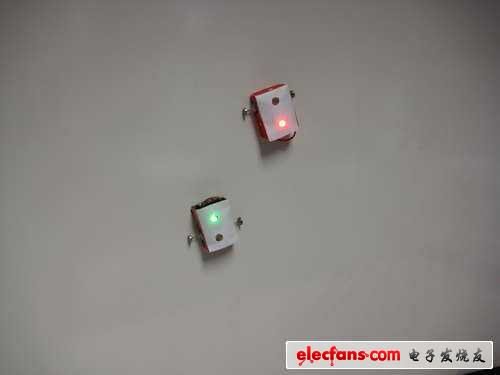
● 我把伺服機用熱膠黏在硬紙盒里,傳感器分布在前后左右,然后用硬紙殼加固。為了讓熱傳感器和齒輪舒舒服服在里面呆著,我量體裁衣剪了些洞。小W的頂部其實就是。。。就是一張紙!
● 然后。。。然后沒有然后了,你就做好了,玩兒去吧!
 電子發燒友App


評論