步驟1:設置硬件

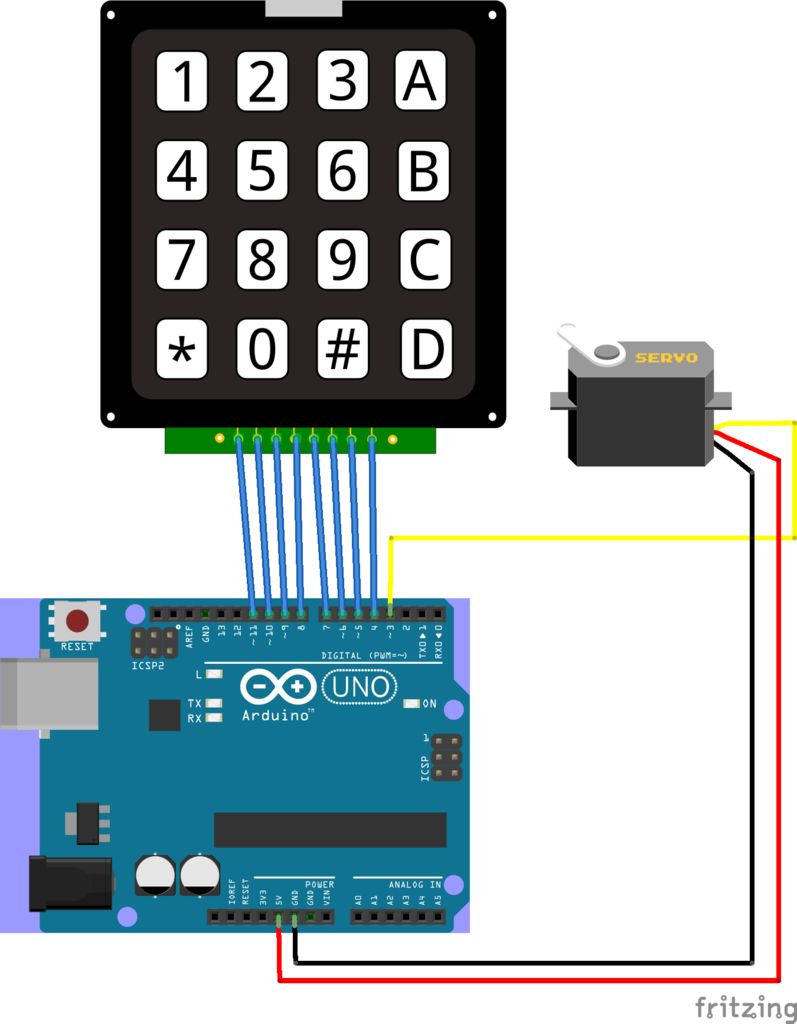
設置很簡單。我們將使用:
引腳4 - 11:鍵盤輸入
引腳3:伺服電機輸出
VCC(5V)
GND(接地)
鍵盤輸入垂直向下連接。將鍵盤上的每根電線從右到左連接到引腳4-11。伺服電機直接連接到5V,接地和引腳3.在我的伺服(Tower Pro SG90)上,紅線為5V,接地為棕色,輸出引腳為黃色。檢查伺服電機的文檔。
步驟2:代碼
讓我們看一下代碼:
#include
#include
// Set up keypad variables:
int numKeyPresses = 0; // Track number of key presses
int maxKeyPresses = 3; // Only allow 3 digits to be entered
int keyPresses[3] = { 0, 0, 0 }; // Initialize an empty array to hold input
const byte numRows= 4; // # of rows on the keypad
const byte numCols= 4; // # of columns on the keypad
// Set up servo variables:
int angle = 0; // Angle in degrees to position servo [0-180]
int angleMultiplier = 1; // Multiply by each digit, divide by 10 on each input
Servo servo; // Create the servo object
int servoPin = 3; // Set the servo pin
char keymap[numRows][numCols]= // Setup the keypad layout
{
{‘1’, ‘2’, ‘3’, ‘A’},
{‘4’, ‘5’, ‘6’, ‘B’},
{‘7’, ‘8’, ‘9’, ‘C’},
{‘*’, ‘0’, ‘#’, ‘D’},
};
在這里,我們導入鍵盤和伺服庫來幫助進行一些輸入和輸出處理。 numkeyPresses變量跟蹤已輸入的條目數。當達到maxKeyPresses時,這將重置為0.鍵盤映射設置為4x4矩陣,模仿物理鍵盤。
// Connect keypad ROW0, ROW1, ROW2 and ROW3 to these Arduino pins.
byte rowPins[numRows] = { 11, 10, 9, 8 };
// Connect keypad COL0, COL1 and COL2 to these Arduino pins.
byte colPins[numCols] = { 7, 6, 5, 4 };
// Create the Keypad
Keypad kpd = Keypad( makeKeymap( keymap ), rowPins, colPins, numRows, numCols );
void setup()
{
Serial.begin(9600); // Start up serial comms
resetAngleMultiplier(); // Start accepting numeric input
servo.attach( servoPin ); // Attaches the servo to the servo object
} // setup
這里我們使用一個名為resetAngleMultiplier的方法,我將使用馬上討論一下。我們的想法是,我們希望在數學上將輸入轉換為可用數字,而不是字符。這使我們做到了這一點。
void loop()
{
char key = kpd.getKey();
if( key ) // Check for a valid key
{
if( key 》= 0x41 && key 《= 0x44 || key == 0x23 || key == 0x2A )
{
resetInput();
Serial.println( “ERROR: Numeric input only!” );
} // ^ if invalid entry
else // Else, entry is valid:
{
angle += angleMultiplier * ( key - 0x30 );
angleMultiplier /= 10;
if( numKeyPresses == maxKeyPresses - 1 )
{
setServo( angle ); // Use the input to turn servo
resetInput();
}
else
{
numKeyPresses++;
}
Serial.println( (String) angle );
}
} // if( key )
} // loop
這里我們接受輸入并處理它。我們將討論如何處理它。
void setServo( int angle )
{
if( angle 》 180 )
angle = 180;
Serial.println( “Setting servo to ” + (String) angle + “ degrees.” );
servo.write( angle ); // Set the servo position
} // setServo
void resetAngleMultiplier()
{
angleMultiplier = 1;
/* We started out with a multiplier of 10^0 (or 1)。 For each
number we want to accept, we want to have a multiplier one
order of magnitude greater. So, for example, for 5 digits, the
multiplier starts out as 10 000. */
for( int i = 0; i 《 maxKeyPresses - 1; i++ )
angleMultiplier *= 10;
} // resetAngleMultiplier
void resetInput()
{
resetAngleMultiplier(); // Reset the numeric input
angle = 0; // Reset the angle
numKeyPresses = 0; // Reset number of key presses
}
數學
在循環中,我們檢查非數字輸入并重置numKeyPresses變量if檢測。進行轉換的部分是:angle + = angleMultiplier *(key - 0x30)。當我們獲得按鍵時,它將作為鍵映射2-diminsional數組中的字符返回。 key - 0x30以十六進制的形式減去30以獲得它的數字等價物。
然后,我們必須將它乘以angleMultiplier。角度乘數從100開始。因此,例如,如果第一個數字輸入為3,則添加到角度的數字將為300.然后將角度乘數除以10,以便下一次迭代,角度乘數將為10如果輸入2,則將其乘以10并相加,得到320.這將一直持續到輸入結束。
我寫這個是可擴展的,允許擴展maxKeyPresses。 C ++的最大整數值是2147483647,所以使用這個程序,理論上你可以輸入多達10位的輸入,只要實際的密鑰代碼加起來不超過這個數。您總是可以使用 long 來存儲輸入,但出于我們的目的,沒有必要。
應用數學
所以,現在我們我們(可能過于復雜)的計算,只需將其傳遞給伺服機構,將其定位到該特定角度。這里限制為180度的移動。如果數字輸入超過180,則重置為180度并傳遞給伺服。這可能有多個應用程序,無論您是想在家中實現鎖定系統,安全攝像機定位器,還是您需要的任何應用程序。
責任編輯:wv
-
鍵盤
+關注
關注
4文章
866瀏覽量
40759 -
伺服
+關注
關注
16文章
670瀏覽量
41908 -
Arduino
+關注
關注
190文章
6499瀏覽量
192463
發布評論請先 登錄
PLC與伺服控制有什么區別
伺服驅動器的控制方式分析
其利天下技術·伺服電機編碼器的作用及工作原理·低壓伺服電機驅動方案開發

伺服電機原理及控制應用
伺服電機的控制方式有哪些?舉例分析
伺服驅動器和伺服電機介紹
步進電機的伺服控制方法有哪些
步進電機伺服控制系統的作用
伺服控制系統的分類方式和常見伺服控制系統介紹

開源項目!基于 Arduino DIY 漂亮的宏機械鍵盤
PLSY指令怎樣控制伺服正反轉
直流伺服電機的主要控制方式
伺服電機怎么選型和計算(伺服電機電流環控制原理)


評論