步驟1:材料
硬件:
》 Arduino Leonardo
》 HC-05藍(lán)牙模塊
》某些跳線
軟件:
》 Android Studio
》 Arduino IDE(集成開發(fā)環(huán)境)
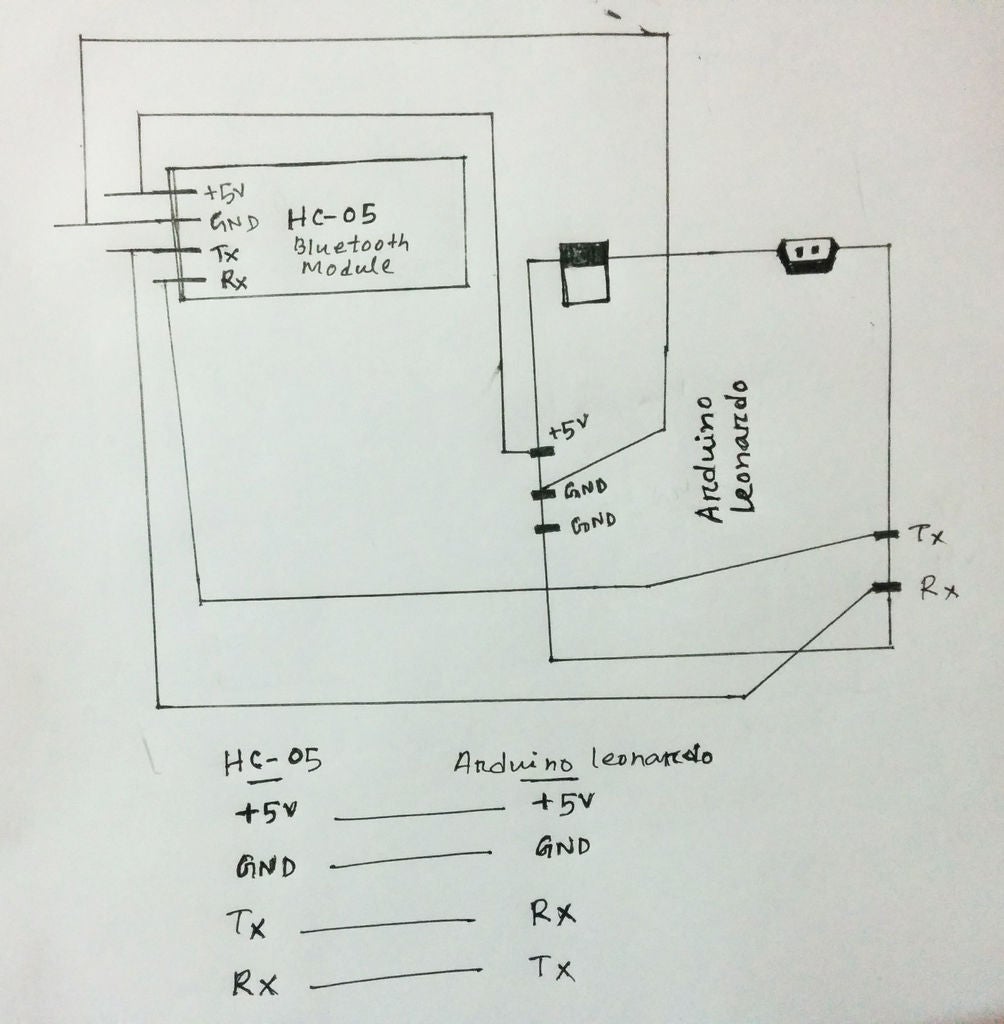
步驟2:原理圖和組裝

》將HC-05藍(lán)牙模塊+ 5v連接到Arduino Leonardo + 5v
》將HC-05藍(lán)牙模塊GND連接到Arduino Leonardo GND
》將HC-05藍(lán)牙模塊TX連接到Arduino Leonardo RX
》將HC-05藍(lán)牙模塊RX連接到Arduino Leonardo TX
HC-05 ---- --------------------------------------- Arduino Leonardo
+ 5v --------------------------------- ----- ------------ + 5v
GND ----------------- ------------------------------- GND
TX- ---------------------------------------------- RX
RX -------------------------------------- ----------- TX
第3步:將代碼上傳到Arduino
現(xiàn)在從https下載Arduino IDE ://www.arduino.cc/en/Main/捐贈(zèng)并安裝它,然后從給定鏈接下載我的Arduino鍵盤仿真代碼,然后將其上傳到您的Arduino Leonardo。
步驟4:Android代碼說明
》首先,您將在Android Studio中通過File創(chuàng)建一個(gè)新項(xiàng)目,并為其指定項(xiàng)目名稱BluetoothDeviceList和創(chuàng)建ListView和Button。當(dāng)您的Android連接到藍(lán)牙并按下按鈕時(shí),ListView顯示設(shè)備列表數(shù)據(jù)
Button btnPaired;
ListView devicelist;
//Bluetooth
private BluetoothAdapter myBluetooth = null;
private Set pairedDevices;
public static String EXTRA_ADDRESS = “device_address”; @Override
protected void onCreate(Bundle savedInstanceState) {
super.onCreate(savedInstanceState);
setContentView(R.layout.activity_bluetooth_list);
Toolbar toolbar = (Toolbar) findViewById(R.id.toolbar);
setSupportActionBar(toolbar); btnPaired = (Button)findViewById(R.id.button);
devicelist = (ListView)findViewById(R.id.listView);
myBluetooth = BluetoothAdapter.getDefaultAdapter(); if(myBluetooth == null)
{
//Show a mensag. that the device has no bluetooth adapter
Toast.makeText(getApplicationContext(), “Bluetooth Device Not Available”, Toast.LENGTH_LONG).show(); //finish apk
finish();
}
else if(!myBluetooth.isEnabled())
{
//Ask to the user turn the bluetooth on
Intent turnBTon = new Intent(BluetoothAdapter.ACTION_REQUEST_ENABLE);
startActivityForResult(turnBTon,1);
} btnPaired.setOnClickListener(new View.OnClickListener() {
@Override
public void onClick(View v)
{
pairedDevicesList();
}
});
》》創(chuàng)建一個(gè)函數(shù)并命名 pairedDevicesList()。此函數(shù)負(fù)責(zé)獲取藍(lán)牙配對(duì)設(shè)備名稱和設(shè)備地址,我們獲取ArrayList并將SetArrayAdapter包含所有配對(duì)設(shè)備列表數(shù)據(jù),并在顯示設(shè)備按鈕onclickListener()中調(diào)用 pairedDevicesList()函數(shù);配對(duì)的設(shè)備僅在我們按下“顯示設(shè)備”按鈕時(shí)才起作用
private void pairedDevicesList()
{
pairedDevices = myBluetooth.getBondedDevices();
ArrayList list = new ArrayList(); if (pairedDevices.size()》0)
{
for(BluetoothDevice bt : pairedDevices)
{
list.add(bt.getName() + “ ” + bt.getAddress()); //Get the device‘s name and the address
}
}
else
{
Toast.makeText(getApplicationContext(), “No Paired Bluetooth Devices Found.”, Toast.LENGTH_LONG).show();
} final ArrayAdapter adapter = new ArrayAdapter(this,android.R.layout.simple_list_item_1, list);
devicelist.setAdapter(adapter);
devicelist.setOnItemClickListener(myListClickListener); }
》》現(xiàn)在將onItemClickListener添加到配對(duì)設(shè)備列表。當(dāng)我們按下任何設(shè)備(如ListView列表中的HC-05模塊),然后給定的功能可以從按下的項(xiàng)目/列表中的設(shè)備中獲取MAC地址時(shí),這很有用
private AdapterView.OnItemClickListener myListClickListener = new AdapterView.OnItemClickListener()
{
public void onItemClick (AdapterView
-
Android
+關(guān)注
關(guān)注
12文章
3938瀏覽量
127522 -
Arduino
+關(guān)注
關(guān)注
188文章
6471瀏覽量
187293 -
游戲控制器
+關(guān)注
關(guān)注
0文章
15瀏覽量
3022
發(fā)布評(píng)論請(qǐng)先 登錄
相關(guān)推薦
stm32與Arduino的比較
ARK3399 USB2.0 PC攝像頭控制器規(guī)格書
游戲、AR和VR控制器中的位置檢測(cè)

PCI1510 GGU/GVF/PGE/RGVF/RZVF/ZGU/ZVF PC卡控制器數(shù)據(jù)表

機(jī)器視覺控制器哪種好
PCI1420 PC卡控制器數(shù)據(jù)表

PCI1520-EP PC卡控制器數(shù)據(jù)手冊(cè)數(shù)據(jù)表

工業(yè)控制器的制作與數(shù)學(xué)的關(guān)系


 如何制作Android Arduino PC游戲控制器


評(píng)論