概述
馬里奧云與烤面包機
在此項目中,我們正在制作復古風格的可穿戴設備!
吊墜具有IPS顯示屏和動畫圖形。它使用Adafruit的CircuitPython創(chuàng)建動畫精靈,看起來像是在飛行的烤面包機和滾動的云。
我們最初是在Pro Trinket項目中完成這兩個任務的,分別是用于烤面包機的單色OLED和用于云的彩色OLED。為了跟上現(xiàn)代和新的高可見度IPS顯示屏的需要,我們在這里將兩個項目都升級為使用CircuitPython代替Arduino,以簡化自定義。顯示屏看起來也好很多,但是價格和構造都差不多!
3D打印復古吊墜
使用CircuitPython,您可以使用DisplayIO庫生成自定義圖形和界面。
您可以使用位圖圖像創(chuàng)建子圖形表和調色板以生成彩色像素。
該項目中的代碼隨機生成可在屏幕上連續(xù)滾動的飛行烤面包機。我們認為這是一個很好的例子,讓人們開始使用DisplayIO和CircuitPython。
我們制作了兩個版本,每個顯示器一個版本,因此您可以使用1.3英寸或1.54英寸IPS顯示器。
換出圖形并修改代碼以制作自己的動畫也很容易。
零件
選擇您想要的顯示尺寸:
帶MicroSD的Adafruit 1.3“ 240x240廣角TFT LCD顯示屏
或
Adafruit 1.54“ 240x240廣角TFT LCD顯示屏使用MicroSD
然后添加以下內容:
Adafruit ItsyBitsy M4 Express,具有ATSAMD51
Adafruit LiIon/LiPoly背包附加件(用于Pro Trinket/ItsyBitsy)
對面包板友好SPDT滑動開關
鋰離子聚合物電池-3.7v 150mAh
帶MicroSD的Adafruit 1.3“ 240x240廣角TFT LCD顯示屏
產(chǎn)品ID:4313
我們一直在尋找這樣的顯示器-它的對角線很小,只有1.3英寸,但具有260 ppi的高密度,240x240像素的顯示器。 。.
缺貨
缺貨
帶MicroSD的Adafruit 1.54“ 240x240廣角TFT LCD顯示屏
產(chǎn)品ID:3787
我們一直在尋找這樣的顯示器g時間-它只有1.5英寸的對角線,但具有220 ppi的高密度,240x240像素的顯示屏以及全視角。它。..
缺貨
缺貨
具有ATSAMD51的Adafruit ItsyBitsy M4 Express
產(chǎn)品ID:3800
比羽毛小但比小飾品大的東西?這是一款具有Microchip ATSAMD51的Adafruit ItsyBitsy M4 Express!小,。..
$ 14.95
進貨
添加到購物車
Adafruit LiIon/LiPoly背包附件(適用于Pro Trinket/ItsyBitsy)
產(chǎn)品ID:2124
如果您有ItsyBitsy或Pro Trinket,您可能知道它是便攜式項目的理想選擇。這款LiPoly背包非常容易做到!代替接線2 。..
$ 4.95
進貨
添加到購物車
適用于面包板的SPDT滑動開關
產(chǎn)品ID:805
這些漂亮的開關非常適合與面包板和穿孔板項目一起使用。它們的間距為0.1英寸,可以很好地插入無焊面包板中。它們易于切換。..
$ 0.95
現(xiàn)貨
添加到購物車
鋰離子聚合物電池-3.7v 150mAh
產(chǎn)品ID:1317
鋰離子聚合物電池(也稱為“ lipo”或“ lipoly”)電池很薄,輕巧而功能強大;完全充電后的輸出范圍為4.2V至3.7V。這款電池。..
$ 5.95
IN STOCK
添加到購物車
硅樹脂套絞線帶狀電纜-10線長1米
產(chǎn)品ID:3890
對于那些喜歡使用我們的有機硅包覆電線的人,但始終尋找他們的接線游戲。現(xiàn)在我們有硅膠蓋帶狀電纜!這些可能看起來。..
$ 3.95
庫存中
添加到購物車
電路圖
CircuitDiagram 》
下圖為組件的布線提供了直觀的參考。此圖是使用Fritzing軟件創(chuàng)建的。
用于Fritzing的Adafruit庫
使用Adafruit的Fritzing零件庫為您的項目創(chuàng)建電路圖。下載庫或僅抓取各個部分。從GitHub Adafruit Fritzing部件獲取庫和部件。
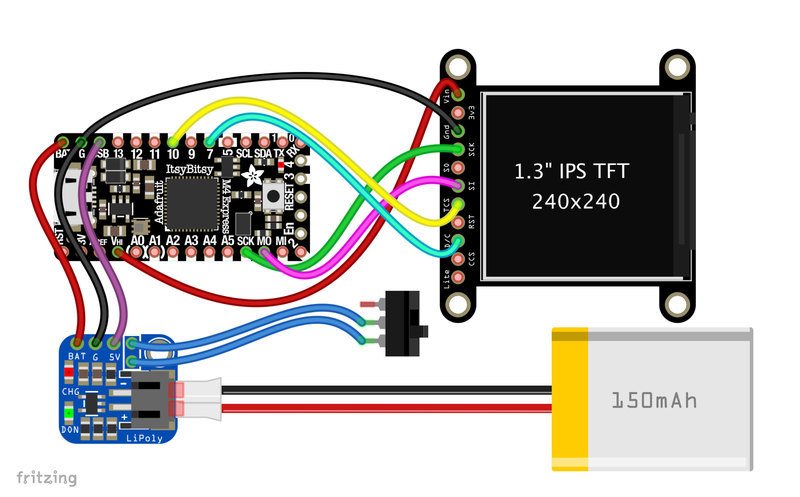
circuit_diagram.fzz
ItsyBItsy M4到Lipo背包
BAT 從Lipo背包上的ItsyBitsy M4到 BAT
G 從Lipo背包上的ItsyBitsy M4到 G
USB ,從Lisy背包上的ItsyBitsy M4到 5V
顯示
從
VIN 從顯示更改為 Vhi (從顯示至 G)
GND (從顯示)到ItyBItsy M4上的 SCK
SI 》從顯示到ItsyBItsy M4上的 MO
D/C 從顯示到ItsyBItsy M4上的 7
切換
從切換到Lipo背包
從切換到Lipo背包的左/右
150mAh的鋰電池連接到Lipo背包上的2針JST端口。可以通過ItsyBitsy M4上的microUSB端口為電池充電。
軟件
使用CircuitPython設置ItsyBitsy M4
我們需要進行板卡設置,以便我們可以運行CircuitPython代碼。讓我們逐步完成這些步驟,以將最新版本的CircuitPython安裝到板上。
Mu Python編輯器
Mu是一個簡單的Python編輯器,可與Adafruit CircuitPython硬件一起使用。它是用Python編寫的,可在Windows,MacOS,Linux和Raspberry Pi上運行。串行控制臺是內置的,因此您可以立即從板子的串行輸出中獲得反饋!雖然您可以在代碼中使用任何文本編輯器,但Mu使其超級簡單。
安裝和使用Mu編輯器
安裝或升級CircuitPython
您應確保ItsyBitsy M4上具有CircuitPython 4.0或更高版本。使用已知的優(yōu)質數(shù)據(jù)+電源線(而不是USB電源包隨附的俗氣的USB電纜,它們僅是電源)插入板子。您應該會看到一個彈出的新閃存驅動器。
如果驅動器為 CIRCUITPY ,請打開 boot_out.txt 文件以確保版本號為4.0或更高版本。
下載:文件
復制代碼
Adafruit CircuitPython 5.0.0-alpha.4 on 2019-09-15; Adafruit ItsyBitsy M4 Express with samd51j19 Adafruit CircuitPython 5.0.0-alpha.4 on 2019-09-15; Adafruit ItsyBitsy M4 Express with samd51j19
如果版本小于4,或者-您僅獲得名為 ITSYM4BOOT 的驅動器,請按照以下步驟操作要更新電路板CircuitPython軟件,請執(zhí)行以下操作:
通過下面的綠色按鈕下載ItsyBitsy M4的CircuitPython UF2。
通過USB將ItsyBitsy M4連接到計算機,然后按Reset(重置)按鈕。
將CircuitPython UF2 拖放到 ITSYM4BOOT 驅動器上-該驅動器將消失,并出現(xiàn)一個新的 CIRCUITPY 驅動器應該會出現(xiàn)。
下載itsyBItsy M4的CircuitPython
下載Adafruit CircuitPython庫捆綁
要運行代碼,我們需要下載一些庫。庫中包含的代碼有助于我們更輕松地與硬件連接。
下面的綠色按鈕鏈接到一個文件,其中包含CircuitPython可用的所有庫。要運行該項目的代碼,我們需要下面“必需的庫”列表中的兩個庫。解壓縮庫捆綁包并搜索庫。將文件拖放到 CIRCUITPY 驅動器上的名為 lib 的文件夾中(如果該文件夾不在ItsyBitsy M4上,則創(chuàng)建該文件夾)。
下載Circuit Python庫捆綁包
必需的庫
adafruit_st7789
adafruit_imageload
有了所有需要的文件后,目錄列表在文件和目錄上看起來類似于下面。

上傳代碼
該項目提供了兩個不同的 code.py 草圖。這兩個程序都可以在任何一個顯示器上使用。
單擊下面的下載鏈接以直接從GitHub獲取主要代碼。將文件重命名為 code.py 并將其拖放到 CIRCUITPY 主(根)目錄中。上載所有文件(包括庫)后,該代碼即可正常運行。
使用任何文本編輯器或常用的IDE修改代碼。我們建議如上所述使用Mu。
上載位圖
下載以下位圖圖像并將其保存到 CIRCUITPY 驅動器的根目錄。
tilesheet-2x.bmp 用于Mario Clouds代碼。
spritesheet-2x.bmp 用于Flying Toasters代碼。
位圖圖像的命名不同,因此兩個文件都可以駐留在 CIRCUITPY 驅動器中。
滾動云
下載:項目Zip 或 code.py | 在Github上查看
復制代碼
“”“
Continuously scroll randomly generated Mario style clouds.
Designed fr an ItsyBitsy M4 Express and a 1.3” 240x240 TFT
Adafruit invests time and resources providing this open source code.
Please support Adafruit and open source hardware by purchasing
products from Adafruit!
Written by Dave Astels for Adafruit Industries
Copyright (c) 2019 Adafruit Industries
Licensed under the MIT license.
All text above must be included in any redistribution.
“”“
import time
from random import seed, randint
import board
import displayio
from adafruit_st7789 import ST7789
import adafruit_imageload
# Sprite cell values
EMPTY = 0
LEFT = 1
MIDDLE = 2
RIGHT = 3
# These constants determine what happens when tiles are shifted.
# if randint(1, 10) 》 the value, the thing happens
# The chance a new cloud will enter
CHANCE_OF_NEW_CLOUD = 4
# The chance an existing cloud gets extended
CHANCE_OF_EXTENDING_A_CLOUD = 5
# Global variables
display = None
tilegrid = None
seed(int(time.monotonic()))
def make_display():
”“”Set up the display support.
Return the Display object.
“”“
spi = board.SPI()
while not spi.try_lock():
pass
spi.configure(baudrate=24000000) # Configure SPI for 24MHz
spi.unlock()
displayio.release_displays()
display_bus = displayio.FourWire(spi, command=board.D7, chip_select=board.D10, reset=board.D9)
return ST7789(display_bus, width=240, height=240, rowstart=80, auto_refresh=True)
def make_tilegrid():
”“”Construct and return the tilegrid.“”“
group = displayio.Group(max_size=10)
sprite_sheet, palette = adafruit_imageload.load(”/tilesheet-2x.bmp“,
bitmap=displayio.Bitmap,
palette=displayio.Palette)
grid = displayio.TileGrid(sprite_sheet, pixel_shader=palette,
width=9, height=5,
tile_height=48, tile_width=32,
default_tile=EMPTY)
group.append(grid)
display.show(group)
return grid
def evaluate_position(row, col):
”“”Return how long of a cloud is placable at the given location.
:param row: the tile row (0-4)
:param col: the tile column (0-8)
“”“
if tilegrid[col, row] != EMPTY or tilegrid[col + 1, row] != EMPTY:
return 0
end_col = col + 1
while end_col 《 9 and tilegrid[end_col, row] == EMPTY:
end_col += 1
return min([4, end_col - col])
def seed_clouds(number_of_clouds):
”“”Create the initial clouds so it doesn‘t start empty“”“
for _ in range(number_of_clouds):
while True:
row = randint(0, 4)
col = randint(0, 7)
cloud_length = evaluate_position(row, col)
if cloud_length 》 0:
break
l = randint(1, cloud_length)
tilegrid[col, row] = LEFT
for _ in range(l - 2):
col += 1
tilegrid[col, row] = MIDDLE
tilegrid[col + 1, row] = RIGHT
def slide_tiles():
”“”Move the tilegrid to the left, one pixel at a time, a full time width“”“
for _ in range(32):
tilegrid.x -= 1
display.refresh(target_frames_per_second=60)
def shift_tiles():
”“”Move tiles one spot to the left, and reset the tilegrid’s position“”“
for row in range(5):
for col in range(8):
tilegrid[col, row] = tilegrid[col + 1, row]
tilegrid[8, row] = EMPTY
tilegrid.x = 0
def extend_clouds():
”“”Extend any clouds on the right edge, either finishing them with a right
end or continuing them with a middle piece
“”“
for row in range(5):
if tilegrid[7, row] == LEFT or tilegrid[7, row] == MIDDLE:
if randint(1, 10) 》 CHANCE_OF_EXTENDING_A_CLOUD:
tilegrid[8, row] = MIDDLE
else:
tilegrid[8, row] = RIGHT
def add_cloud():
”“”Maybe add a new cloud on the right at a randon open row“”“
if randint(1, 10) 》 CHANCE_OF_NEW_CLOUD:
count = 0
while True:
count += 1
if count == 50:
return
row = randint(0, 4)
if tilegrid[7, row] == EMPTY and tilegrid[8, row] == EMPTY:
break
tilegrid[8, row] = LEFT
display = make_display()
tilegrid = make_tilegrid()
seed_clouds(5)
while True:
slide_tiles()
shift_tiles()
extend_clouds()
add_cloud()
”“”
Continuously scroll randomly generated Mario style clouds.
Designed fr an ItsyBitsy M4 Express and a 1.3“ 240x240 TFT
Adafruit invests time and resources providing this open source code.
Please support Adafruit and open source hardware by purchasing
products from Adafruit!
Written by Dave Astels for Adafruit Industries
Copyright (c) 2019 Adafruit Industries
Licensed under the MIT license.
All text above must be included in any redistribution.
”“”
import time
from random import seed, randint
import board
import displayio
from adafruit_st7789 import ST7789
import adafruit_imageload
# Sprite cell values
EMPTY = 0
LEFT = 1
MIDDLE = 2
RIGHT = 3
# These constants determine what happens when tiles are shifted.
# if randint(1, 10) 》 the value, the thing happens
# The chance a new cloud will enter
CHANCE_OF_NEW_CLOUD = 4
# The chance an existing cloud gets extended
CHANCE_OF_EXTENDING_A_CLOUD = 5
# Global variables
display = None
tilegrid = None
seed(int(time.monotonic()))
def make_display():
“”“Set up the display support.
Return the Display object.
”“”
spi = board.SPI()
while not spi.try_lock():
pass
spi.configure(baudrate=24000000) # Configure SPI for 24MHz
spi.unlock()
displayio.release_displays()
display_bus = displayio.FourWire(spi, command=board.D7, chip_select=board.D10, reset=board.D9)
return ST7789(display_bus, width=240, height=240, rowstart=80, auto_refresh=True)
def make_tilegrid():
“”“Construct and return the tilegrid.”“”
group = displayio.Group(max_size=10)
sprite_sheet, palette = adafruit_imageload.load(“/tilesheet-2x.bmp”,
bitmap=displayio.Bitmap,
palette=displayio.Palette)
grid = displayio.TileGrid(sprite_sheet, pixel_shader=palette,
width=9, height=5,
tile_height=48, tile_width=32,
default_tile=EMPTY)
group.append(grid)
display.show(group)
return grid
def evaluate_position(row, col):
“”“Return how long of a cloud is placable at the given location.
:param row: the tile row (0-4)
:param col: the tile column (0-8)
”“”
if tilegrid[col, row] != EMPTY or tilegrid[col + 1, row] != EMPTY:
return 0
end_col = col + 1
while end_col 《 9 and tilegrid[end_col, row] == EMPTY:
end_col += 1
return min([4, end_col - col])
def seed_clouds(number_of_clouds):
“”“Create the initial clouds so it doesn‘t start empty”“”
for _ in range(number_of_clouds):
while True:
row = randint(0, 4)
col = randint(0, 7)
cloud_length = evaluate_position(row, col)
if cloud_length 》 0:
break
l = randint(1, cloud_length)
tilegrid[col, row] = LEFT
for _ in range(l - 2):
col += 1
tilegrid[col, row] = MIDDLE
tilegrid[col + 1, row] = RIGHT
def slide_tiles():
“”“Move the tilegrid to the left, one pixel at a time, a full time width”“”
for _ in range(32):
tilegrid.x -= 1
display.refresh(target_frames_per_second=60)
def shift_tiles():
“”“Move tiles one spot to the left, and reset the tilegrid’s position”“”
for row in range(5):
for col in range(8):
tilegrid[col, row] = tilegrid[col + 1, row]
tilegrid[8, row] = EMPTY
tilegrid.x = 0
def extend_clouds():
“”“Extend any clouds on the right edge, either finishing them with a right
end or continuing them with a middle piece
”“”
for row in range(5):
if tilegrid[7, row] == LEFT or tilegrid[7, row] == MIDDLE:
if randint(1, 10) 》 CHANCE_OF_EXTENDING_A_CLOUD:
tilegrid[8, row] = MIDDLE
else:
tilegrid[8, row] = RIGHT
def add_cloud():
“”“Maybe add a new cloud on the right at a randon open row”“”
if randint(1, 10) 》 CHANCE_OF_NEW_CLOUD:
count = 0
while True:
count += 1
if count == 50:
return
row = randint(0, 4)
if tilegrid[7, row] == EMPTY and tilegrid[8, row] == EMPTY:
break
tilegrid[8, row] = LEFT
display = make_display()
tilegrid = make_tilegrid()
seed_clouds(5)
while True:
slide_tiles()
shift_tiles()
extend_clouds()
add_cloud()
飛行烤面包機
下載:Project Zip 或 code.py | 在Github上查看
復制代碼
“”“
Continuously scroll randomly generated After Dark style toasters.
Designed for an ItsyBitsy M4 Express and a 1.3” 240x240 TFT
Adafruit invests time and resources providing this open source code.
Please support Adafruit and open source hardware by purchasing
products from Adafruit!
Written by Dave Astels for Adafruit Industries
Copyright (c) 2019 Adafruit Industries
Licensed under the MIT license.
All text above must be included in any redistribution.
Requires CircuitPython 5.0 or later.
“”“
import time
from random import seed, randint
import board
import displayio
from adafruit_st7789 import ST7789
import adafruit_imageload
# Sprite cell values
EMPTY = 0
CELL_1 = EMPTY + 1
CELL_2 = CELL_1 + 1
CELL_3 = CELL_2 + 1
CELL_4 = CELL_3 + 1
TOAST = CELL_4 + 1
NUMBER_OF_SPRITES = TOAST + 1
# Animation support
FIRST_CELL = CELL_1
LAST_CELL = CELL_4
NUMBER_OF_CELLS = (LAST_CELL - FIRST_CELL) + 1
# A boolean array corresponding to the sprites, True if it‘s part of the animation sequence.
ANIMATED = [_sprite 》= FIRST_CELL and _sprite 《= LAST_CELL for _sprite in range(NUMBER_OF_SPRITES)]
# The chance (out of 10) that toast will enter
CHANCE_OF_NEW_TOAST = 2
# How many sprites to styart with
INITIAL_NUMBER_OF_SPRITES = 4
# Global variables
display = None
tilegrid = None
seed(int(time.monotonic()))
def make_display():
”“”Set up the display support.
Return the Display object.
“”“
spi = board.SPI()
while not spi.try_lock():
pass
spi.configure(baudrate=24000000) # Configure SPI for 24MHz
spi.unlock()
displayio.release_displays()
display_bus = displayio.FourWire(spi, command=board.D7, chip_select=board.D10, reset=board.D9)
return ST7789(display_bus, width=240, height=240, rowstart=80, auto_refresh=True)
def make_tilegrid():
”“”Construct and return the tilegrid.“”“
group = displayio.Group(max_size=10)
sprite_sheet, palette = adafruit_imageload.load(”/spritesheet-2x.bmp“,
bitmap=displayio.Bitmap,
palette=displayio.Palette)
grid = displayio.TileGrid(sprite_sheet, pixel_shader=palette,
width=5, height=5,
tile_height=64, tile_width=64,
x=0, y=-64,
default_tile=EMPTY)
group.append(grid)
display.show(group)
return grid
def random_cell():
return randint(FIRST_CELL, LAST_CELL)
def evaluate_position(row, col):
”“”Return whether how long of aa toaster is placable at the given location.
:param row: the tile row (0-9)
:param col: the tile column (0-9)
“”“
return tilegrid[col, row] == EMPTY
def seed_toasters(number_of_toasters):
”“”Create the initial toasters so it doesn’t start empty“”“
for _ in range(number_of_toasters):
while True:
row = randint(0, 4)
col = randint(0, 4)
if evaluate_position(row, col):
break
tilegrid[col, row] = random_cell()
def next_sprite(sprite):
if ANIMATED[sprite]:
return (((sprite - FIRST_CELL) + 1) % NUMBER_OF_CELLS) + FIRST_CELL
return sprite
def advance_animation():
”“”Cycle through animation cells each time.“”“
for tile_number in range(25):
tilegrid[tile_number] = next_sprite(tilegrid[tile_number])
def slide_tiles():
”“”Move the tilegrid one pixel to the bottom-left.“”“
tilegrid.x -= 1
tilegrid.y += 1
def shift_tiles():
”“”Move tiles one spot to the left, and reset the tilegrid‘s position“”“
for row in range(4, 0, -1):
for col in range(4):
tilegrid[col, row] = tilegrid[col + 1, row - 1]
tilegrid[4, row] = EMPTY
for col in range(5):
tilegrid[col, 0] = EMPTY
tilegrid.x = 0
tilegrid.y = -64
def get_entry_row():
while True:
row = randint(0, 4)
if tilegrid[4, row] == EMPTY and tilegrid[3, row] == EMPTY:
return row
def get_entry_column():
while True:
col = randint(0, 3)
if tilegrid[col, 0] == EMPTY and tilegrid[col, 1] == EMPTY:
return col
def add_toaster_or_toast():
”“”Maybe add a new toaster or toast on the right and/or top at a randon open location“”“
if randint(1, 10) 《= CHANCE_OF_NEW_TOAST:
tile = TOAST
else:
tile = random_cell()
tilegrid[4, get_entry_row()] = tile
if randint(1, 10) 《= CHANCE_OF_NEW_TOAST:
tile = TOAST
else:
tile = random_cell()
tilegrid[get_entry_column(), 0] = tile
display = make_display()
tilegrid = make_tilegrid()
seed_toasters(INITIAL_NUMBER_OF_SPRITES)
display.refresh()
while True:
for _ in range(64):
display.refresh(target_frames_per_second=80)
advance_animation()
slide_tiles()
shift_tiles()
add_toaster_or_toast()
display.refresh(target_frames_per_second=120)
”“”
Continuously scroll randomly generated After Dark style toasters.
Designed for an ItsyBitsy M4 Express and a 1.3“ 240x240 TFT
Adafruit invests time and resources providing this open source code.
Please support Adafruit and open source hardware by purchasing
products from Adafruit!
Written by Dave Astels for Adafruit Industries
Copyright (c) 2019 Adafruit Industries
Licensed under the MIT license.
All text above must be included in any redistribution.
Requires CircuitPython 5.0 or later.
”“”
import time
from random import seed, randint
import board
import displayio
from adafruit_st7789 import ST7789
import adafruit_imageload
# Sprite cell values
EMPTY = 0
CELL_1 = EMPTY + 1
CELL_2 = CELL_1 + 1
CELL_3 = CELL_2 + 1
CELL_4 = CELL_3 + 1
TOAST = CELL_4 + 1
NUMBER_OF_SPRITES = TOAST + 1
# Animation support
FIRST_CELL = CELL_1
LAST_CELL = CELL_4
NUMBER_OF_CELLS = (LAST_CELL - FIRST_CELL) + 1
# A boolean array corresponding to the sprites, True if it’s part of the animation sequence.
ANIMATED = [_sprite 》= FIRST_CELL and _sprite 《= LAST_CELL for _sprite in range(NUMBER_OF_SPRITES)]
# The chance (out of 10) that toast will enter
CHANCE_OF_NEW_TOAST = 2
# How many sprites to styart with
INITIAL_NUMBER_OF_SPRITES = 4
# Global variables
display = None
tilegrid = None
seed(int(time.monotonic()))
def make_display():
“”“Set up the display support.
Return the Display object.
”“”
spi = board.SPI()
while not spi.try_lock():
pass
spi.configure(baudrate=24000000) # Configure SPI for 24MHz
spi.unlock()
displayio.release_displays()
display_bus = displayio.FourWire(spi, command=board.D7, chip_select=board.D10, reset=board.D9)
return ST7789(display_bus, width=240, height=240, rowstart=80, auto_refresh=True)
def make_tilegrid():
“”“Construct and return the tilegrid.”“”
group = displayio.Group(max_size=10)
sprite_sheet, palette = adafruit_imageload.load(“/spritesheet-2x.bmp”,
bitmap=displayio.Bitmap,
palette=displayio.Palette)
grid = displayio.TileGrid(sprite_sheet, pixel_shader=palette,
width=5, height=5,
tile_height=64, tile_width=64,
x=0, y=-64,
default_tile=EMPTY)
group.append(grid)
display.show(group)
return grid
def random_cell():
return randint(FIRST_CELL, LAST_CELL)
def evaluate_position(row, col):
“”“Return whether how long of aa toaster is placable at the given location.
:param row: the tile row (0-9)
:param col: the tile column (0-9)
”“”
return tilegrid[col, row] == EMPTY
def seed_toasters(number_of_toasters):
“”“Create the initial toasters so it doesn‘t start empty”“”
for _ in range(number_of_toasters):
while True:
row = randint(0, 4)
col = randint(0, 4)
if evaluate_position(row, col):
break
tilegrid[col, row] = random_cell()
def next_sprite(sprite):
if ANIMATED[sprite]:
return (((sprite - FIRST_CELL) + 1) % NUMBER_OF_CELLS) + FIRST_CELL
return sprite
def advance_animation():
“”“Cycle through animation cells each time.”“”
for tile_number in range(25):
tilegrid[tile_number] = next_sprite(tilegrid[tile_number])
def slide_tiles():
“”“Move the tilegrid one pixel to the bottom-left.”“”
tilegrid.x -= 1
tilegrid.y += 1
def shift_tiles():
“”“Move tiles one spot to the left, and reset the tilegrid’s position”“”
for row in range(4, 0, -1):
for col in range(4):
tilegrid[col, row] = tilegrid[col + 1, row - 1]
tilegrid[4, row] = EMPTY
for col in range(5):
tilegrid[col, 0] = EMPTY
tilegrid.x = 0
tilegrid.y = -64
def get_entry_row():
while True:
row = randint(0, 4)
if tilegrid[4, row] == EMPTY and tilegrid[3, row] == EMPTY:
return row
def get_entry_column():
while True:
col = randint(0, 3)
if tilegrid[col, 0] == EMPTY and tilegrid[col, 1] == EMPTY:
return col
def add_toaster_or_toast():
“”“Maybe add a new toaster or toast on the right and/or top at a randon open location”“”
if randint(1, 10) 《= CHANCE_OF_NEW_TOAST:
tile = TOAST
else:
tile = random_cell()
tilegrid[4, get_entry_row()] = tile
if randint(1, 10) 《= CHANCE_OF_NEW_TOAST:
tile = TOAST
else:
tile = random_cell()
tilegrid[get_entry_column(), 0] = tile
display = make_display()
tilegrid = make_tilegrid()
seed_toasters(INITIAL_NUMBER_OF_SPRITES)
display.refresh()
while True:
for _ in range(64):
display.refresh(target_frames_per_second=80)
advance_animation()
slide_tiles()
shift_tiles()
add_toaster_or_toast()
display.refresh(target_frames_per_second=120)
仔細檢查
查看上面列出的目錄,并仔細檢查是否列出了所有文件以使該項目起作用。如果缺少任何內容或在不正確的目錄中,請將它們移到正確的位置。
3D打印
該項目的零件被設計為用基于FDM的機器進行3D打印。 STL文件旨在按“原樣”打印。零件需要嚴格的公差,可能需要調整切片設置。請參考下面的建議設置。
CAD文件
可以將零件進一步分成小塊,以適合較小的打印機建立卷。注意:STEP文件包含在其他3D表面建模程序中,例如Onshape,Solidworks和Rhino。
用于1.3 Display的編輯工況
用于1.5 Display的編輯工況
下載按鈕STL
下載案例STL
設置
使用這些設置作為參考。列出的值在Cura切片軟件中使用。
0.2mm層高/0.4mm噴嘴
0.4mm線寬(內部和外部寬度)
50mm/s打印速度
10% infill
支持:否
裙子:3
組裝
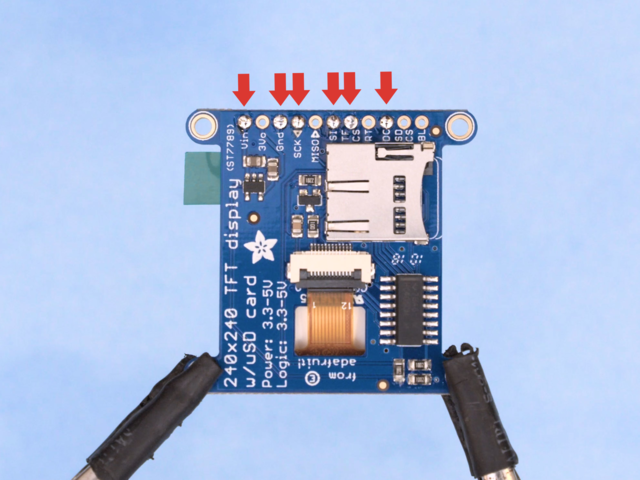

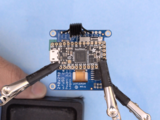
Tin顯示器連接
我用了第三只幫助手來穩(wěn)定顯示器。根據(jù)電路圖鍍錫連接。
焊錫絲
我剪斷了導線,使其足夠長,可以到達ItsyBitsy。硅膠帶狀電纜非常好,因此我們可以將電線束保持在機箱內整潔。
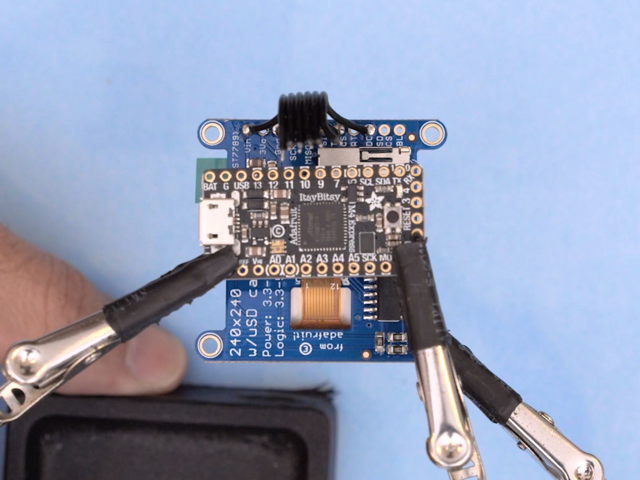
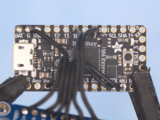
Tin ItsyBitsy
我用了第二對幫助手將ItsyBitsy固定在顯示屏上方。參照電路圖,并在ItsyBitsy上進行連接。
焊接ItsyBitsy以顯示
輕輕地拉開每根電線,使每根電線都能到達ItsyBitsy上的連接。請參考電路圖,并將ItsyBitsy焊接到顯示器上。


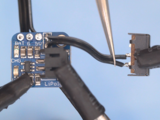
Prep Lipo充電器背包
現(xiàn)在,我們可以準備LiPoly充電器背包。電池輸出線是兩個0.1“孔,周圍有一個框,它們是電池輸出線。用一把小刀小心地切開它們之間的走線,并將兩根導線焊接到滑動開關上。
脂背包,為了更好地安裝機箱內的板,我們可以從底部焊接電線。

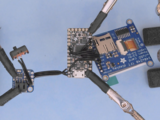

將Lipo背包裝到ItsyBitsy
然后用帶狀電纜將lipo背包焊接到ItsyBitsy。絕緣板
我們需要對板進行絕緣,以免它們一次接觸到外殼內。我用一條膠帶將ItyBitsy和lipo的底部覆蓋
將面板插入機箱中
將顯示板插入機箱中,使帶有連接的一面朝向面板的切口
布置ItsyBitsy,使USB端口與外殼上的USB切口對齊。
將脂質背包布置在JST端口面向滑動開關切口的情況下。
將脂電池連接到背包上的JST,并纏繞電池導線,并將導線插入機箱上滑動開關切口的壁下。
按入配合蓋子
對準蓋子,使切口適合外殼上的滑動開關壁。以一定角度插入蓋子,使電池位于中央,然后將蓋子輕輕按入外殼。
膠水按鈕
測試外殼上按鈕的布局,然后使用一小撮超級膠水將其粘附在適當?shù)奈恢谩?/p>
裂環(huán)和項鏈
開口環(huán)套在蓋子的環(huán)上。然后,項鏈或掛繩可以穿過開口環(huán),準備戴上!
就可以了!這樣便可以創(chuàng)建自己的復古風格可穿戴設備!
如果您要共享項目,請查看Adafruit的Show and Tell live流。
所有參與者都將獲得免費的乙烯基貼紙。
您還可以檢出Adafruit Discord服務器,以便與社區(qū)聊天!
責任編輯:wv
-
顯示屏
+關注
關注
28文章
4493瀏覽量
74409 -
microSD
+關注
關注
1文章
49瀏覽量
15879
發(fā)布評論請先 登錄
相關推薦
智慧安全用電產(chǎn)品-用電精靈
導線精靈是什么
導線精靈是什么
【核桃派ZeroW開發(fā)板體驗連載】小小氣象站 04 oled測試
【核桃派ZeroW開發(fā)板體驗連載】小小氣象站 03 aht10、bmp280測試
【xG24 Matter開發(fā)套件試用體驗】物聯(lián)網(wǎng)密碼柜之驅動矩陣鍵盤和OLED顯示器
OpenHarmony實戰(zhàn)開發(fā)-如何實現(xiàn)組件動畫。

智慧覆冰精靈監(jiān)測裝置
鴻蒙開發(fā)之發(fā)動畫篇
如何讓Adafruit 320x240 IPS TFT顯示屏在PSoC上運行?
導線精靈——導線覆冰智能識別監(jiān)測裝置


 如何使用Adafruit的CircuitPython創(chuàng)建動畫精靈



評論