概述
在本課程中,您將基于在第11課中學到的內容并使用LCD顯示屏顯示溫度和光強度。
使用第9課中使用的同一光電管測量光強度。
要測量溫度,您將使用溫度測量芯片。該設備只有3條導線,兩條分別用于5V和GND,第三條導線直接連接到Arduino上的模擬輸入。
零件
零件 數量
LCD顯示(16x2個字符)
1
1
1kΩ電阻(棕色,黑色,紅色條紋)
1
光電管(光敏電阻)
1
TMP36溫度傳感器
1
半面包板
1
Arduino Uno R3
1
跳線包
1
TMP36的外觀類似于PN2222晶體管,但是如果看封裝體的平坦側面,則應該看到它被標記為TMP36。
面包板布局
面包板布局基于第11課的布局,因此,如果您仍將其放在面包板上,它將大大簡化操作。
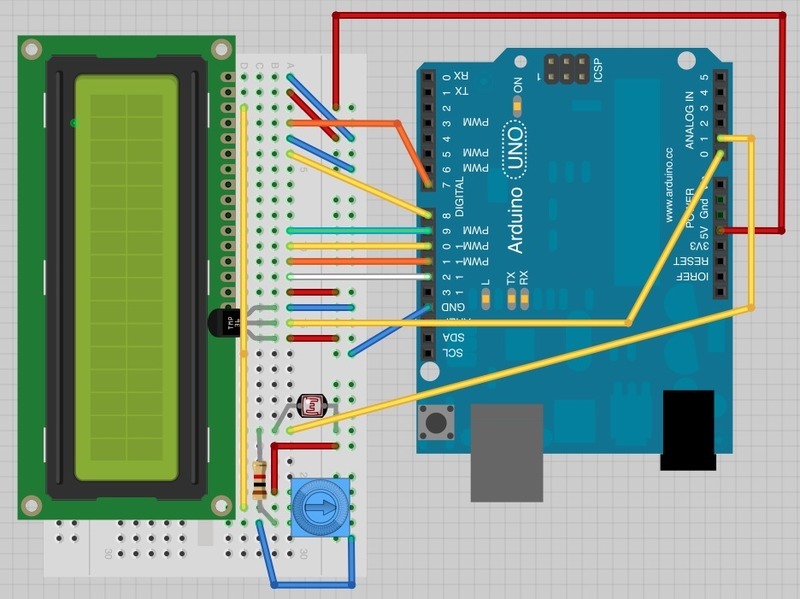
有一些跳線在此版式上已稍有移動。尤其是鍋底附近的那些。
光電管,1kΩ電阻和TMP36都是板子的新添加。 TMP36的曲面朝向顯示器。
Arduino代碼
此草圖基于第11課的草圖。將其加載到Arduino上,您應該發現將手指放在上面即可加熱溫度傳感器會增加溫度讀數。
此外,如果您將手放在光電管上,遮擋了一些光,讀數也會降低。
下載:文件
復制代碼
/*
Adafruit Arduino - Lesson 12. Light and Temperature
*/
#include
int tempPin = 0;
int lightPin = 1;
// BS E D4 D5 D6 D7
LiquidCrystal lcd(7, 8, 9, 10, 11, 12);
void setup()
{
lcd.begin(16, 2);
}
void loop()
{
// Display Temperature in C
int tempReading = analogRead(tempPin);
float tempVolts = tempReading * 5.0 / 1024.0;
float tempC = (tempVolts - 0.5) * 100.0;
float tempF = tempC * 9.0 / 5.0 + 32.0;
// ----------------
lcd.print(“Temp F ”);
lcd.print(tempF);
// Display Light on second row
int lightReading = analogRead(lightPin);
lcd.setCursor(0, 1);
// ----------------
lcd.print(“Light ”);
lcd.setCursor(6, 1);
lcd.print(lightReading);
delay(500);
} /*
Adafruit Arduino - Lesson 12. Light and Temperature
*/
#include
int tempPin = 0;
int lightPin = 1;
// BS E D4 D5 D6 D7
LiquidCrystal lcd(7, 8, 9, 10, 11, 12);
void setup()
{
lcd.begin(16, 2);
}
void loop()
{
// Display Temperature in C
int tempReading = analogRead(tempPin);
float tempVolts = tempReading * 5.0 / 1024.0;
float tempC = (tempVolts - 0.5) * 100.0;
float tempF = tempC * 9.0 / 5.0 + 32.0;
// ----------------
lcd.print(“Temp F ”);
lcd.setCursor(6, 0);
lcd.print(tempF);
// Display Light on second row
int lightReading = analogRead(lightPin);
lcd.setCursor(0, 1);
// ----------------
lcd.print(“Light ”);
lcd.setCursor(6, 1);
lcd.print(lightReading);
delay(500);
}
I
下載:文件
復制代碼
// BS E D4 D5 D6 D7
LiquidCrystal lcd(7, 8, 9, 10, 11, 12); // BS E D4 D5 D6 D7
LiquidCrystal lcd(7, 8, 9, 10, 11, 12);
如果您決定更改使用的引腳,這將使事情變得更容易。
在“循環”功能中,現在發生了兩個有趣的事情。首先,我們必須將溫度傳感器的模擬量轉換為實際溫度,其次,我們必須弄清楚如何顯示它們。
首先,讓我們看一下計算溫度。
下載:文件
復制代碼
int tempReading = analogRead(tempPin);
float tempVolts = tempReading * 5.0 / 1024.0;
float tempC = (tempVolts - 0.5) * 100.0;
float tempF = tempC * 9.0 / 5.0 + 32.0; int tempReading = analogRead(tempPin);
float tempVolts = tempReading * 5.0 / 1024.0;
float tempC = (tempVolts - 0.5) * 100.0;
float tempF = tempC * 9.0 / 5.0 + 32.0;
首先將溫度傳感器的原始讀數乘以5,然后除以1024,以得到‘tempPin處的電壓(0至5之間)模擬輸入。
要將TMP36的電壓轉換為攝氏度,必須從測量值中減去0.5V,然后乘以100。
要將其轉換為溫度。在華氏溫度下,您必須將其乘以9/5,然后再加上32。
在LCD顯示屏上顯示變化的讀數可能很棘手。主要的問題是讀數不一定總是相同的位數。因此,如果溫度從101.50變為99.00,則舊讀數的多余數字有留在顯示器上的危險。/p》
下載:文件
復制代碼
// ----------------
lcd.print(“Temp F ”);
lcd.setCursor(6, 0);
lcd.print(tempF); // ----------------
lcd.print(“Temp F ”);
lcd.setCursor(6, 0);
lcd.print(tempF);
一個相當奇怪的注釋用來提醒您顯示屏的16列。然后,您可以打印該長度的字符串,并在其中帶有實際讀數的空格。
要填充空格,請設置光標所在位置,然后顯示讀數。
完全相同的方法用于顯示光照水平。光線水平沒有單位,我們只顯示模擬讀數的原始讀數。
其他要做的事情
嘗試更改示例,使其以攝氏度而不是華氏度顯示溫度。
責任編輯:wv
-
溫度傳感器
+關注
關注
48文章
2972瀏覽量
156285 -
lcd
+關注
關注
34文章
4438瀏覽量
168100
發布評論請先 登錄
相關推薦

oled是什么顯示屏 OLED與LCD的區別
液晶顯示屏是什么材料做的
液晶顯示屏與led顯示屏的區別
lcd和led顯示屏有什么區別

vr顯示屏用電視還是led屏
Omdia:預計到2025年,Mini LED背光LCD顯示屏的出貨量將超過OLED顯示屏

LED顯示屏設計方案


 如何使用LCD顯示屏顯示溫度和光強度


評論