本次給大家分享一位大佬寫的應用于單片機內存管理模塊mem_malloc,這個mem_malloc的使用不會產生內存碎片,可以高效利用單片機ram空間。
mem_malloc代碼倉庫:
?
https://github.com/chenqy2018/mem_malloc
?mem_malloc介紹一般單片機的內存都比較小,而且沒有MMU,malloc 與free的使用容易造成內存碎片。而且可能因為空間不足而分配失敗,從而導致系統崩潰,因此應該慎用,或者自己實現內存管理。
mem_malloc就是一個不會產生內存碎片的、適合單片機使用的內存管理模塊。其與使用malloc的區別如。
「算法原理:」
定義一個數組作為動態分配的堆空間,低地址空間保存管理數據,高地址空間實際分配給用戶的緩存(類似堆棧使用,分配是往中間靠攏),free時移動高地址用戶空間(以時間換空間),使得未使用的空間都是連續的。
mem_malloc測試驗證下面以小熊派IOT開發板來做實驗。
實驗過程很簡單。準備一份開發板帶串口打印的工程,下載mem_malloc,把mem_malloc.c、mem_malloc.h復制到工程目錄下,并添加到工程里。
然后進行編譯,編譯過程可能會報錯:
。.Srcmem_malloc.c(119): error: #852: expression must be a pointer to a complete object type
這份代碼在不同編譯器下編譯情況不同。gcc下編譯不會報錯,在keil下編譯報如上錯誤。
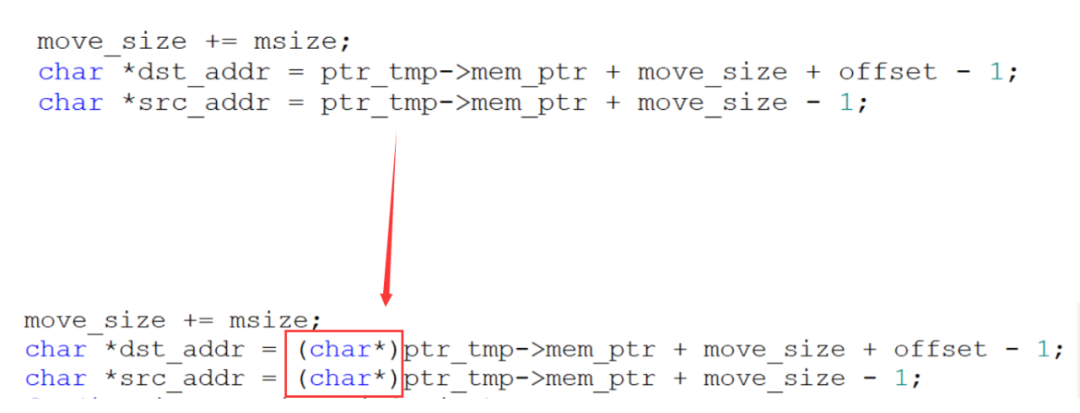
keil編譯器更嚴格些。報錯原因是對mem_block結構體的mem_ptr成員進行操作,而mem_ptr成員的類型是void*,而mem_ptr成員參與運算時的增、減偏移量取決于mem_ptr的類型,所以這里我們需要指定類型。
我們把相關報錯代碼修改如:

再次編譯就正常了。
下面簡單看一下mem_malloc的代碼。
「mem_malloc.h:」
#ifndef __MEM_MALLOC_H__#define __MEM_MALLOC_H__#ifdef __cplusplusextern “C” {
#endif#include 《stdio.h》 #include 《stdint.h》#include 《stdlib.h》#include 《string.h》#include 《stdarg.h》#pragma pack(1)typedef struct mem_block
{
void *mem_ptr;
unsigned int mem_size;
unsigned int mem_index;
}mem_block;
#pragma pack()#define MEM_SIZE 128void print_mem_info(void);
void print_hex(char *data, int len);
void print_mem_hex(int size);
int mem_malloc(unsigned int msize);
int mem_realloc(int id, unsigned int msize);
void *mem_buffer(int id);
int mem_free(int id);
#ifdef __cplusplus
}
#endif#endif
「mem_malloc.c:」
暫不貼出,感興趣的小伙伴可以在上面的倉庫地址自行下載閱讀。在本公眾號后臺回復:mem_malloc,進行獲取。
下面對mem_malloc進行測試驗證。
測試代碼作者也有給出,這里我們簡單測試即可,進行了一些刪減及增加了一些注釋:
#include “mem_malloc.h”char mem_id[10]={0}; // 10塊內存塊void test_malloc(int i, int size)
{
printf(“------test_malloc-------
”);
mem_id[i] = mem_malloc(size);
if(mem_id[i] == 0)
{
printf(“malloc --- fail
”);
printf(“size=%d
”, size);
}
else
{
char *p = mem_buffer(mem_id[i]);
memset(p, i, size);
printf(“p = 0x%x, i=%d, id=%d, size=%d
”, (int)p, i, mem_id[i], size);
}
print_mem_hex(MEM_SIZE);
}
void test_buffer(int i, int size)
{
printf(“------test_buffer-------
”);
printf(“i=%d, id = %d, size=%d
”, i, mem_id[i], size);
char *p = mem_buffer(mem_id[i]);
if(p != NULL)
{
memset(p, 0xf0+i, size);
print_mem_hex(MEM_SIZE);
}
else
{
printf(“test_buffer---fail
”);
}
}
void test_realloc(int i, int size)
{
printf(“------test_realloc-------
”);
printf(“i=%d, id = %d, size=%d
”, i, mem_id[i], size);
int ret = mem_realloc(mem_id[i], size);
if(ret)
{
char *p = mem_buffer(mem_id[i]);
memset(p, 0xa0+i, size);
print_mem_hex(MEM_SIZE);
}
else
{
printf(“test_realloc---fail
”);
}
}
void test_free(int i)
{
printf(“------test_free-------
”);
printf(“i=%d, id = %d
”, i, mem_id[i]);
if(mem_free(mem_id[i]))
print_mem_hex( MEM_SIZE);
}
void main(void)
{
print_mem_info(); // 打印內存信息
test_malloc(1, 10); // 給申請一塊10個字節的內存,標記內存塊id為1
test_malloc(2, 8); // 給申請一塊8個字節的內存,標記內存塊id為2
test_malloc(3, 20); // 給申請一塊20個字節的內存,標記內存塊id為2
test_free(2); // 釋放id為2的內存塊的內存
test_malloc(4, 70); // 申請一塊70個字節的內存
test_free(1); // 釋放id為1的內存塊內存
test_buffer(3, 20); // 獲取id為3的內存塊地址,并往這個內存塊重新寫入0xf0+i的數據
test_realloc(3, 10); // 重新分配內存,并往這個內存塊重新寫入0xa0+i的數據
for(int i=0; i《10; i++) // 釋放所有內存塊內存,已釋放的不再重新釋放
test_free(i);
}
這里設定一個128字節的數組作為堆空間使用。其中數組前面存放的是申請到的內存塊的信息,包括內存塊地址、大小、索引信息,這三個數據各占4個字節,共12個字節。這里有設計到一個大小端模式的問題,STM32平臺為小端模式,即數據的低位存儲在內存的低地址中。
申請的內存塊從128字節的尾部開始分配,再次申請的內存塊依次往前移,釋放的內存,則整體內存塊往后移動,內存塊之前不留空隙,即不產生內存碎片。
以上就是本次的分享,如有錯誤,歡迎指出,謝謝!
編輯:jq
-
串口
+關注
關注
14文章
1551瀏覽量
76428 -
代碼
+關注
關注
30文章
4779瀏覽量
68524 -
MMU
+關注
關注
0文章
91瀏覽量
18283 -
IOT
+關注
關注
187文章
4202瀏覽量
196692 -
malloc
+關注
關注
0文章
52瀏覽量
73
原文標題:干貨 | 分享一個實用的、可應用于單片機的內存管理模塊
文章出處:【微信號:zhuyandz,微信公眾號:FPGA之家】歡迎添加關注!文章轉載請注明出處。
發布評論請先 登錄
相關推薦
單片機怎么寫入程序
國產51單片機XD08M3232接近感應單片機出現啦,可替代合泰BS45F3232
單片機加wifi模塊可以做什么
單片機WiFi模塊怎樣連接手機APP
keil可以讀出單片機的程序嗎
藍牙模塊如何實現單片機和手機端數據互傳


 分享可應用于單片機的內存管理模塊mem_malloc


評論