本來計劃要做一個本地數據庫存儲相關的項目,但是官方的小伙伴給我說,ArkUI 數據庫目前不支持最新的模擬器,所以只能另想其他的。
想了大概一周,期間也在調研技術能否實現,最終定了這個項目,真正的敲代碼開發大概就用了一天,最難的就是想法和界面設計。
不得不感慨新框架真的方便、真的好用!期待下個版本能完善組件和 API 的細節。也希望 HarmonyOS 越來越好。
界面搭建基于 ArkUI 中 TS 擴展的聲明式開發范式,關于語法和概念直接看官網官方文檔地址。
基于 TS 擴展的聲明式開發范式 1:
https://developer.harmonyos.com/cn/docs/documentation/doc-guides/ui-ts-overview-0000001192705715基于 TS 擴展的聲明式開發范式 2:
https://developer.harmonyos.com/cn/docs/documentation/doc-references/ts-framework-directory-0000001111581264
項目說明
使用系統自帶的網絡請求框架,根據 Tab 的類型切換請求對應的數據。列表支持下拉刷新、上拉加載更多。
模擬登錄效果,根據輸入框來確定按鈕是否啟用,登錄成功后,顯示登錄頭像和用戶信息。
①數據請求:聚合免費 API-新聞頭條
https://www.juhe.cn/docs/api/id/235②網絡請求:1-官方文檔、2-ArkUI 開發基礎:網絡請求
https://developer.harmonyos.com/cn/docs/documentation/doc-references/js-apis-net-http-0000001168304341 https://developer.huawei.com/consumer/cn/forum/topic/0203723866728880326?fid=0101591351254000314③列表刷新:ArkUI(TS)聲明式開發:列表下拉刷新、上拉加載更多
https://developer.huawei.com/consumer/cn/forum/topic/0203729154661360497?fid=0101591351254000314
效果演示
在遠程模擬器錄制的,效果不佳:
功能解析
①首頁
首頁從上至下分為三個部分:
標題欄
Tab 標簽
數據列表
標題欄:布局很簡單,使用 Row 布局包裹:Image 和 Swiper(搜索框中文字上下切換)。
部分代碼:
......
//標題欄
@BuilderCustomTitleBar(){
Row(){
//頭像
Image(this.isLogin?$r('app.media.ic_ldd_headpic'):$r('app.media.ic_default_headpic'))
.width(30)
.height(30)
.borderRadius(15)
.margin({right:10})
.onClick(()=>{
this.openSideMenu()
})

//搜索框
Row(){
//搜索圖標
Image($r('app.media.ic_search'))
.width(15).height(15)
.margin({left:10})

//視圖上下切換
Swiper(){
ForEach(this.listSearch,item=>{
Text(item)
.height('100%')
.fontSize(12)
.fontColor('#505050')
.margin({left:10})
},item=>item)
}
.vertical(true)//方向:縱向
.autoPlay(true)//自動播放
.indicator(false)//隱藏指示器
.interval(3000)//切換間隔時間3秒
}
.layoutWeight(1)
.height('100%')
.backgroundColor('#F1F1F1')
.borderRadius(15)
}
.width('100%')
.height(50)
.backgroundColor(Color.White)
.padding({top:10,bottom:10,left:15,right:15})
}
......
Tab 標簽:這個也比較簡單,根據屏幕寬度、tab 標簽的總數量,就能得出 tabItem 的寬度。
底部設置的指示器,點擊 tab 根據 index(當前索引) * itemWithd(每個 tab 的寬度)設置屬性動畫,切換效果就可以了。
import{TabModel,getTabList}from'../../model/tabModel.ets';
importdisplayfrom'@ohos.display';
@Component
exportstructHomeTabs{
//Tab數據
privatelistTab=getTabList()
//tabItem平均寬度
@StatetabIndicatorWidth:number=152
//指示器
@StatetabIndex:number=0
//對外暴露的方法
privatetabClick:(item:TabModel)=>void

privateaboutToAppear(){
display.getDefaultDisplay((err,data)=>{
if(!err){
//獲取tabItem平均寬度
this.tabIndicatorWidth=data.width/this.listTab.length
}
})
}

build(){
Column(){
Stack({alignContent:Alignment.Bottom}){
//tab內容
Row(){
ForEach(this.listTab,item=>{
Button(){
Text(item.name)
.fontSize(this.tabIndex==item.id?15:13)//根據當前選中改變字體大小
.fontColor(this.tabIndex==item.id?$r('app.color.app_theme'):'#000000')//根據當前選中改變字體顏色
}
.layoutWeight(1)
.height(35)
.type(ButtonType.Normal)
.backgroundColor(Color.White)
.onClick(()=>{
this.tabIndex=item.id//更新索引
this.tabClick(item)//提供給外部調用
})
},item=>item.tabType)
}.height(35)

//指示器
Row(){
Divider()
.width(`${this.tabIndicatorWidth}px`)//平均寬度
.strokeWidth(3)
.color($r('app.color.app_theme'))
.lineCap(LineCapStyle.Round)//圓角
.padding({left:10,right:10})
.offset({x:`${this.tabIndex*this.tabIndicatorWidth}px`,y:0})//改變偏移量
.animation({duration:300})//屬性動畫
}.width('100%')
}.backgroundColor(Color.White)
Divider().color('#e8e8e8')
}
}
}
數據列表:根據數據的不同,展示的 item 的布局樣式也不同,分為兩種情況:單張圖片和多張圖片,下拉刷新和加載更多功能看我之前的寫的帖子。
部分代碼:
......
List(){
ForEach(this.listNews,(item:NewsData)=>{
ListItem(){
Column(){
//根據數據,展示不同的布局樣式
if(item.thumbnail_pic_s02==undefined){
//單張圖片樣式
this.ItemSinglePic(item)
}else{
//多張圖片樣式
this.ItemMorePic(item)
}
}.width('100%')
}.padding(10)
},item=>item.uniquekey)
}
.divider({strokeWidth:1,color:'#f5f5f5'})
......
②側邊欄
側邊欄沒有加入手勢控制,只是簡單的點擊頭像動畫打開、點擊陰影部分動畫關閉,默認關閉狀態。
從以下代碼看下,只需要設置值,設置屬性動畫之后,側邊欄動畫效果就出來了,也是很方便的。
@Entry
@Component
structMainPage{
//屏幕寬度
privatescreenWidth=0
//側邊欄的x位置
@StatesideBarX:number=-2000
//側邊欄背景的透明度
@StatesideBarBgopacity:number=0
//側邊欄背景顯示值
@StatesideBarBgVisibility:Visibility=Visibility.Hidden

privateaboutToAppear(){
display.getDefaultDisplay((err,data)=>{
if(!err){
//獲取屏幕寬度
this.screenWidth=data.width
//設置側邊欄偏移量:負屏幕寬度
this.sideBarX=-this.screenWidth
}
})
}

//打開側邊欄
privateopenSideMenu(){
this.sideBarX=0
this.sideBarBgopacity=1
this.sideBarBgVisibility=Visibility.Visible
}

//關閉側邊欄
privatecloseSideMenu(){
this.sideBarX=-this.screenWidth
this.sideBarBgopacity=0
}

build(){
Stack(){
Column(){
//主頁界面
}

//半透明背景
Stack()
.width('100%')
.height('100%')
.backgroundColor('#80000000')
.opacity(this.sideBarBgopacity)
.animation({//屬性動畫,當透明度為0,隱藏背景
duration:300,
onFinish:()=>{
if(this.sideBarBgopacity==0){
this.sideBarBgVisibility=Visibility.Hidden
}
}
})
.visibility(this.sideBarBgVisibility)

//側邊欄
Row(){
Column(){
SideMenu({isLogin:$isLogin,closeMenu:()=>{
this.closeSideMenu()//側邊欄布局
}})
}
.width('70%')
.height('100%')
.backgroundColor(Color.White)

Blank().onClick(()=>{
this.closeSideMenu()
})
}
.width('100%')
.height('100%')
.position({x:`${this.sideBarX}px`,y:0})//動態改變位置
.animation({duration:300})//屬性動畫
}
.width('100%')
.height('100%')
}
}
③登錄
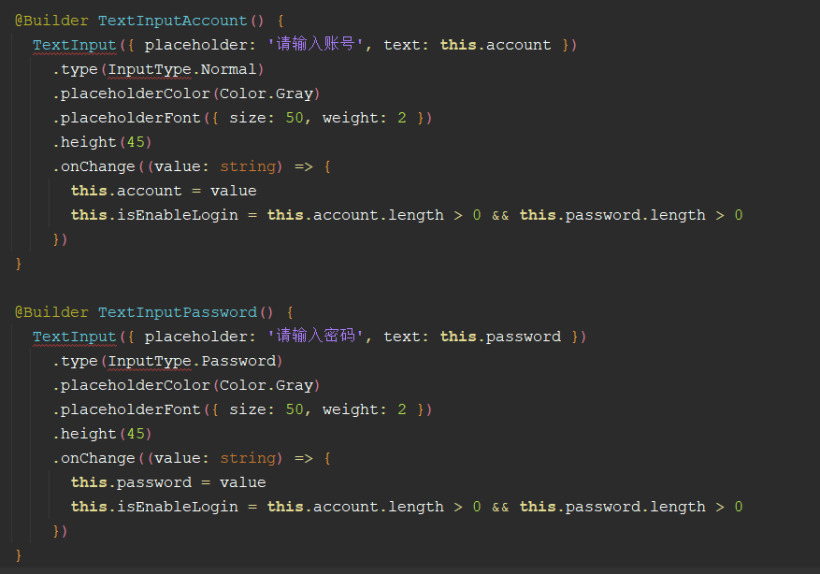
登錄也比較簡單,只不過目前官網沒有輸入框的文檔資料,這個輸入框還是我從Codelabs:流式布局(eTS)上面看到的。根據輸入框是否有內容判斷按鈕的啟用狀態。
雖然粘貼到編輯器中代碼提示有錯,但是可以正常運行和預覽。密碼框的類型還是我猜的!哈哈,就猜對了。

④保存登錄狀態
根據官網資料:輕量級存儲、官網示例還是有問題。
https://developer.harmonyos.com/cn/docs/documentation/doc-references/js-apis-data-storage-0000001117163542
我是問了華為的小伙伴,他給我說這個路徑需要在 /data/data/,但是目前模擬器對這塊功能還兼容的不完善,不能持久化,如果把程序后臺殺死,數據就沒了。
importdataStoragefrom'@ohos.data.storage';
//設置存儲的路徑,路徑必須在/data/data/下
constSTORAGE_PATH='/data/data/info'

exportclassInfoStorage{
//保存用戶ID
setUserId(userId:string){
letstore=dataStorage.getStorageSync(STORAGE_PATH)
store.putSync('userId',userId)
}

//獲取用戶ID
getUserId(){
letstore=dataStorage.getStorageSync(STORAGE_PATH)
returnstore.getSync('userId','').toString()
}

}
項目地址如下(需要登錄才能看到演示圖):
https://gitee.com/liangdidi/NewsDemo.git
作者:梁青松
原文標題:HarmonyOS版“新聞頭條”APP開發實戰
文章出處:【微信公眾號:HarmonyOS技術社區】歡迎添加關注!文章轉載請注明出處。
-
數據庫
+關注
關注
7文章
3818瀏覽量
64498 -
代碼
+關注
關注
30文章
4798瀏覽量
68714 -
HarmonyOS
+關注
關注
79文章
1979瀏覽量
30274
原文標題:HarmonyOS版“新聞頭條”APP開發實戰
文章出處:【微信號:gh_834c4b3d87fe,微信公眾號:OpenHarmony技術社區】歡迎添加關注!文章轉載請注明出處。
發布評論請先 登錄
相關推薦


 HarmonyOS基于 ArkUI 中 TS 擴展聲明式開發范式


評論