") i.MX6ULL嵌入式Linux開發(fā)1-uboot移植初探
i.MX6ULL嵌入式Linux開發(fā)1-uboot移植初探
本系列教程以i.MX6ULL處理器的ARM開發(fā)板為實驗基礎(chǔ),學(xué)習(xí)記錄嵌入式Linux開發(fā)的各種知識與經(jīng)驗,主要內(nèi)容包括嵌入式Linux移植,嵌入式Linux驅(qū)動開發(fā),嵌入式Linux應(yīng)用開發(fā)等。
本系列教程將以野火的i.MX6ULL eMMC開發(fā)板為硬件基礎(chǔ),以野火EBF6ULL Pro開發(fā)板教程和正點原子i.MX6ULL阿爾法開發(fā)板教程為參考,進行學(xué)習(xí)實踐。
1 嵌入式Linux移植概述
Linux 的移植主要包括3部分:
移植bootloader 代碼, Linux 系統(tǒng)要啟動就必須需要一個 bootloader 程序,也就說芯片上電以后先運行一段bootloader程序。 這段bootloader程序會先初始化DDR等外設(shè), 然后將Linux內(nèi)核從flash(NAND,NOR FLASH,SD,MMC 等)拷貝到 DDR 中,最后啟動 Linux 內(nèi)核。 bootloader 有很多,常用的就是 U-Boot。
bootloader 和 Linux 內(nèi)核的關(guān)系就跟 PC 上的 BIOS 和 Windows 的關(guān)系一樣,bootloader 就相當(dāng)于 BIOS。
移植Linux 內(nèi)核,Linux內(nèi)核由一系列程序組成,包括負責(zé)響應(yīng)中斷的中斷服務(wù)程序、負責(zé)管理多個進程從而分享處理器時間的調(diào)度程序、負責(zé)管理地址空間的內(nèi)存管理程序、網(wǎng)絡(luò)、進程間通信的系統(tǒng)服務(wù)程序等。內(nèi)核負責(zé)管理系統(tǒng)的硬件設(shè)備。
移植根文件系統(tǒng)(rootfs),Linux 中的根文件系統(tǒng)更像是一個文件夾或者叫做目錄,在這個目錄里面會有很多的子目錄。根目錄下和子目錄中會有很多的文件,這些文件是 Linux 運行所必須的,比如庫、常用的軟件和命令、設(shè)備文件、配置文件等等。根文件系統(tǒng)里面包含了一些最常用的命令和文件。
U-Boot、Linux kernel 和 rootfs這三者一起構(gòu)成了一個完整的 Linux 系統(tǒng),一個可以正常使用、功能完善的 Linux 系統(tǒng)。
2 實驗開發(fā)板簡介
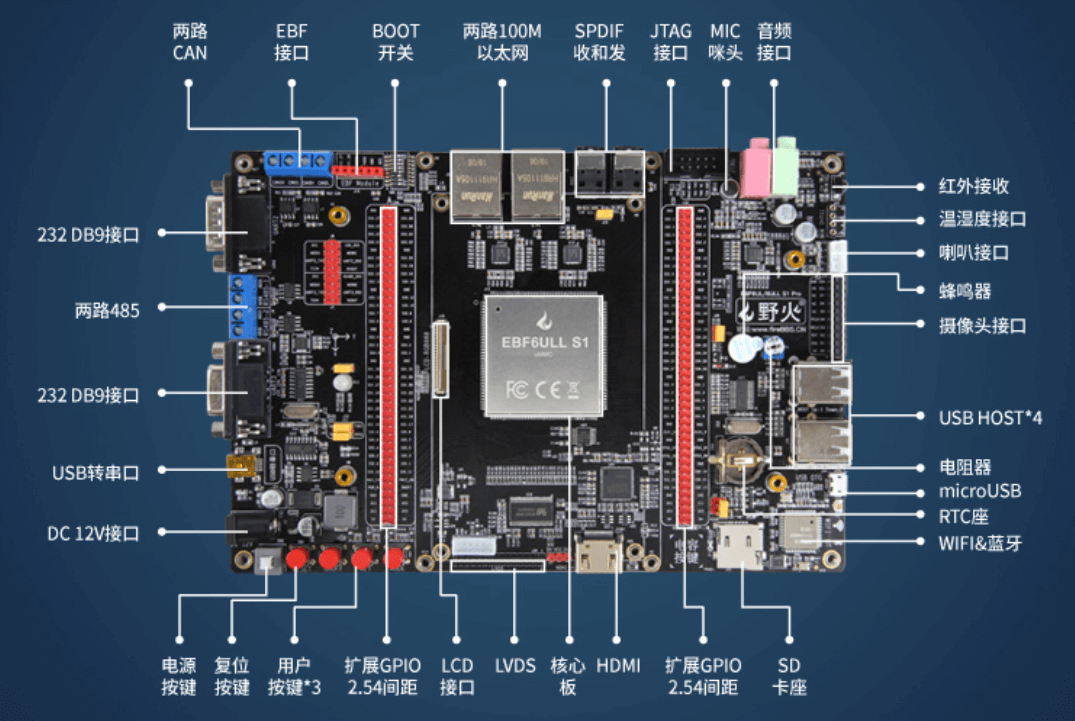
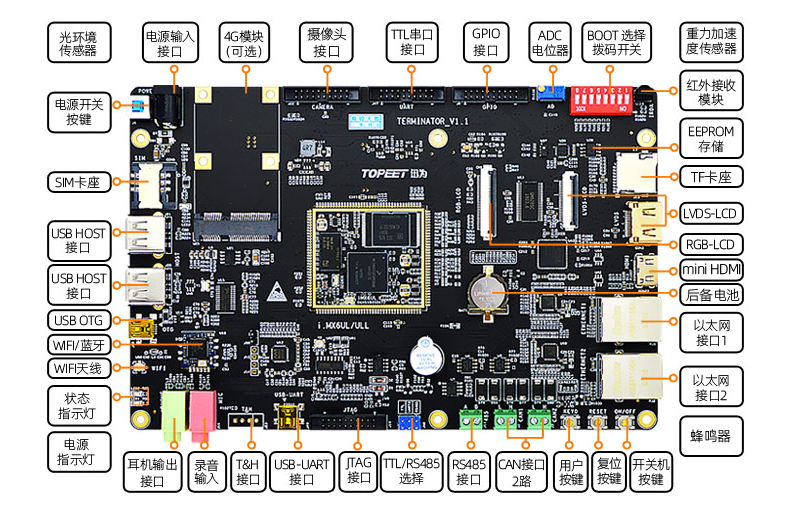
本測試使用的開發(fā)板為野火的i.MX6ULL eMMC開發(fā)板。
3 U-Boot簡介
uboot 的全稱是Universal Boot Loader,遵循 GPL 協(xié)議的開源軟件。
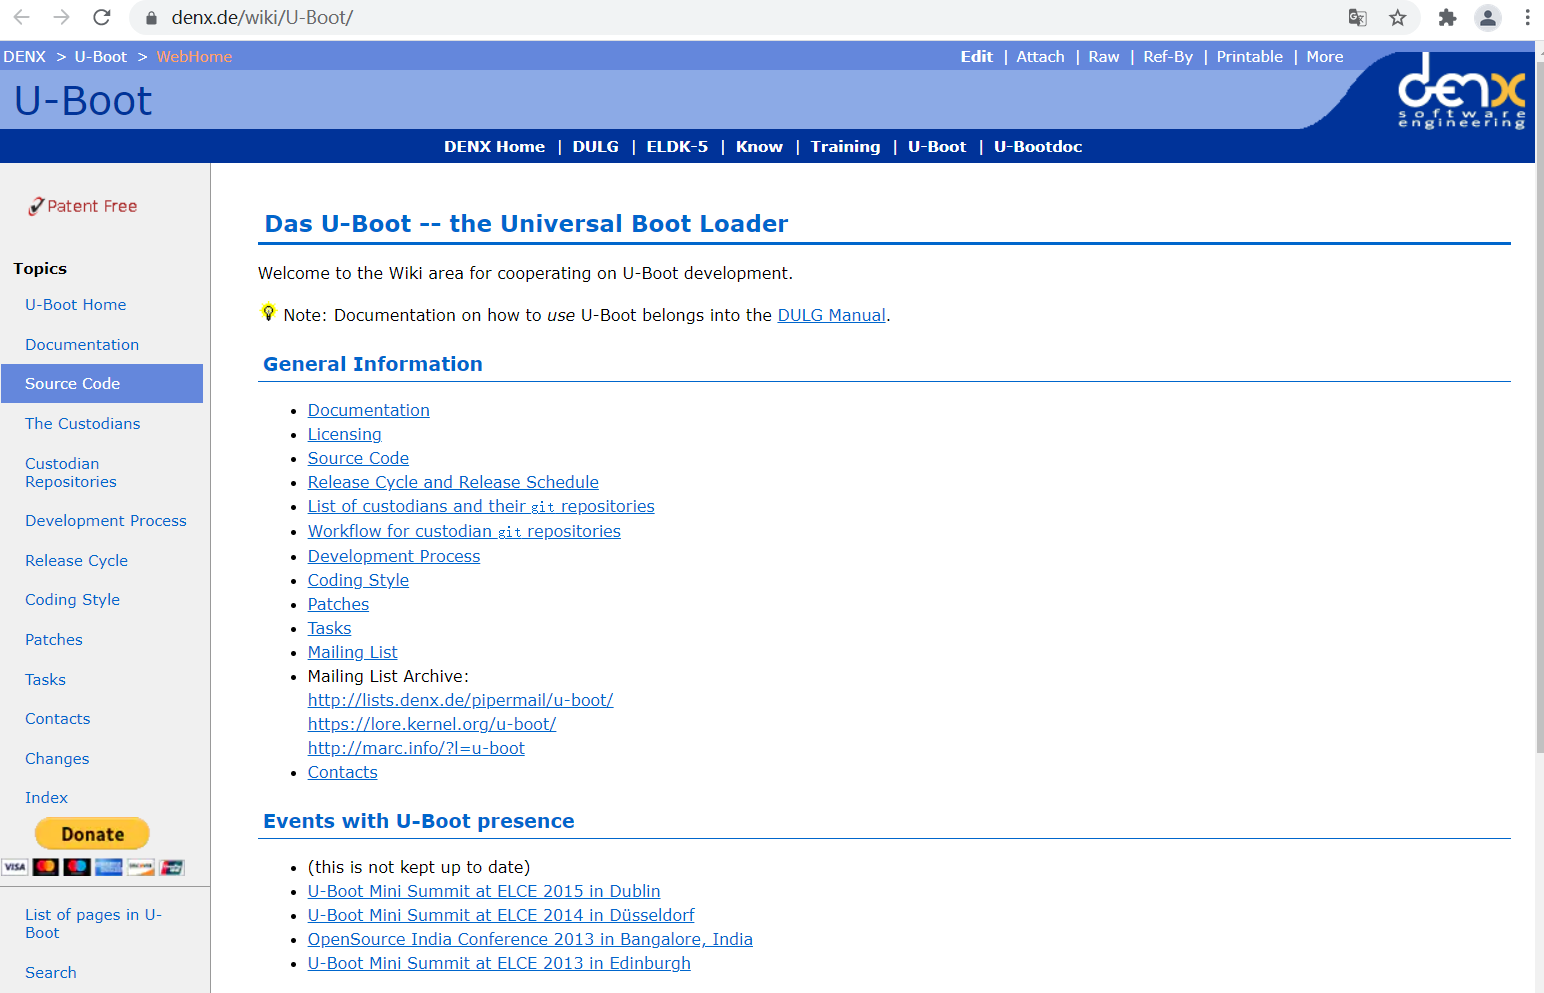
uboot 是一個裸機代碼,可以看作是一個裸機綜合例程。現(xiàn)在的 uboot 已經(jīng)支持液晶屏、網(wǎng)絡(luò)、USB 等高級功能。uboot 官網(wǎng)為 https://www.denx.de/wiki/U-Boot/
可以在uboot官網(wǎng)下載uboot源碼,點擊左側(cè) Topics 中的“Source Code”,然后點擊的“FTP Server” ,進入其 FTP 服務(wù)器即可看到 uboot 源碼。
但我們移植uboot時一般不會直接用 uboot 官方的源碼的,官方的源碼是給半導(dǎo)體廠商準備的,半導(dǎo) 體廠商會根據(jù)自家的芯片,維護自己芯片對應(yīng)的uboot。
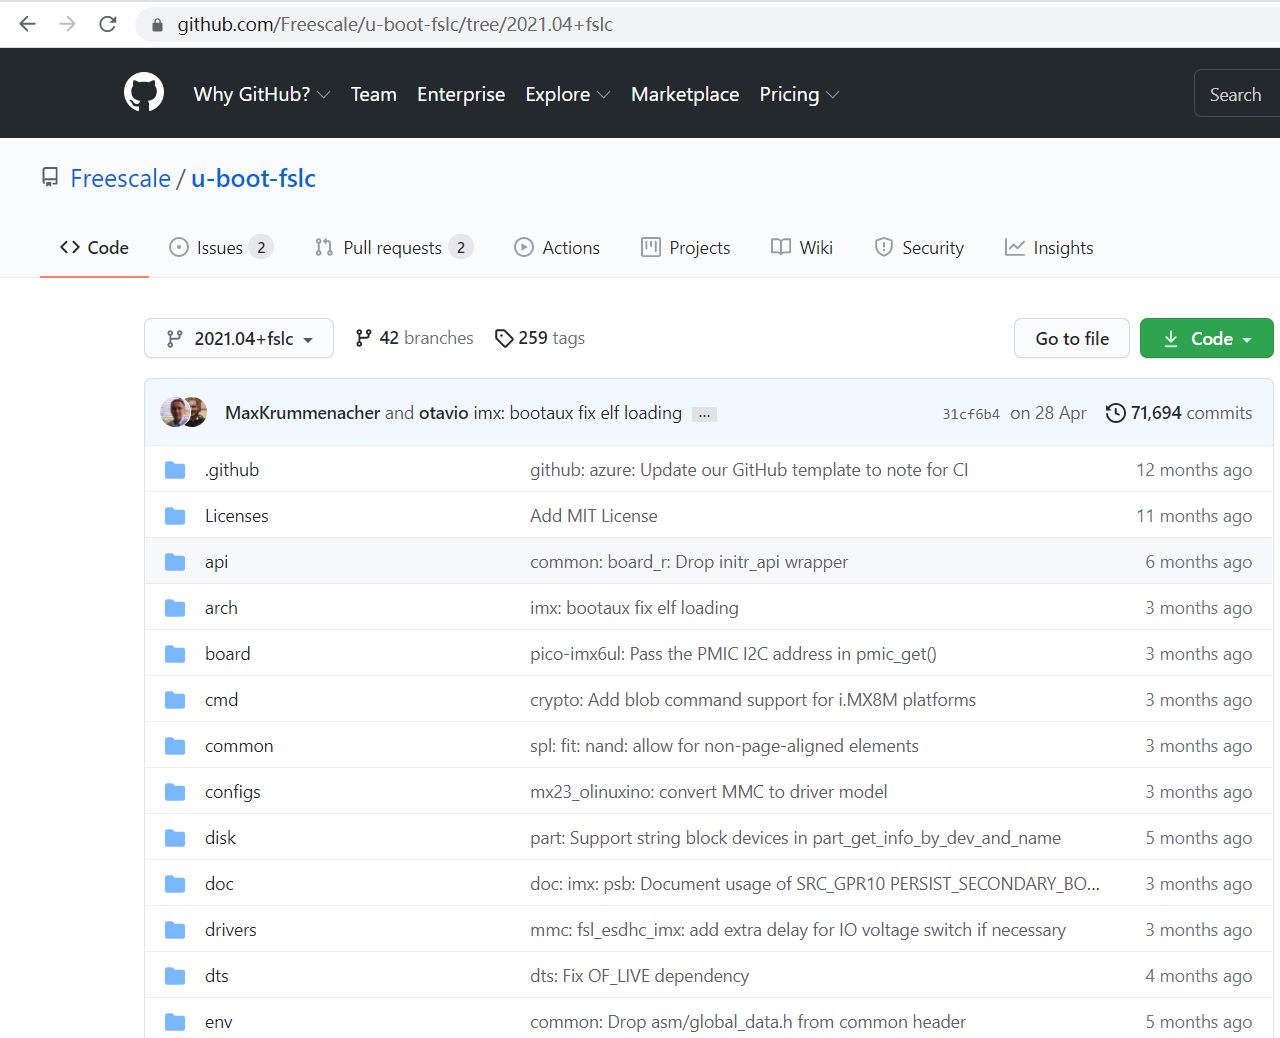
NXP(freescale)維護的的uboot地址: https://github.com/Freescale/u-boot-fslc
4 NXP uboot測試
uboot移植并不需要從零開始將 uboot 移植到我們現(xiàn)在所使用的開發(fā)板上。因為半導(dǎo)體廠商通常都會自己做一個開發(fā)板(原廠開發(fā)板), 將uboot移植到他們自己的原廠開發(fā)板上,再將這個uboot(原廠BSP 包)發(fā)布出去。
市面上的開發(fā)板,通常會參考原廠的開發(fā)板做硬件,然后在原廠提供的 BSP 包上做修改,如正點原子和野火的 I.MX6ULL 開發(fā)板參考的就是NXP官方的 I.MX6ULL EVK 開發(fā)板做的硬件:

4.1 編譯環(huán)境搭建
4.1.1 交叉編譯器下載
嵌入式Linux開發(fā),程序編譯通常在電腦端的Linux(如虛擬機中的Ubuntu)下進行編譯,Ubuntu 自帶gcc 編譯器,但該編譯器是針對 X86 架構(gòu)的!而嵌入式Linux是ARM架構(gòu)的, 所以需要一個在 X86 架構(gòu)上可以編譯 ARM 架構(gòu)代碼的 gcc編譯器,即交叉編譯器。
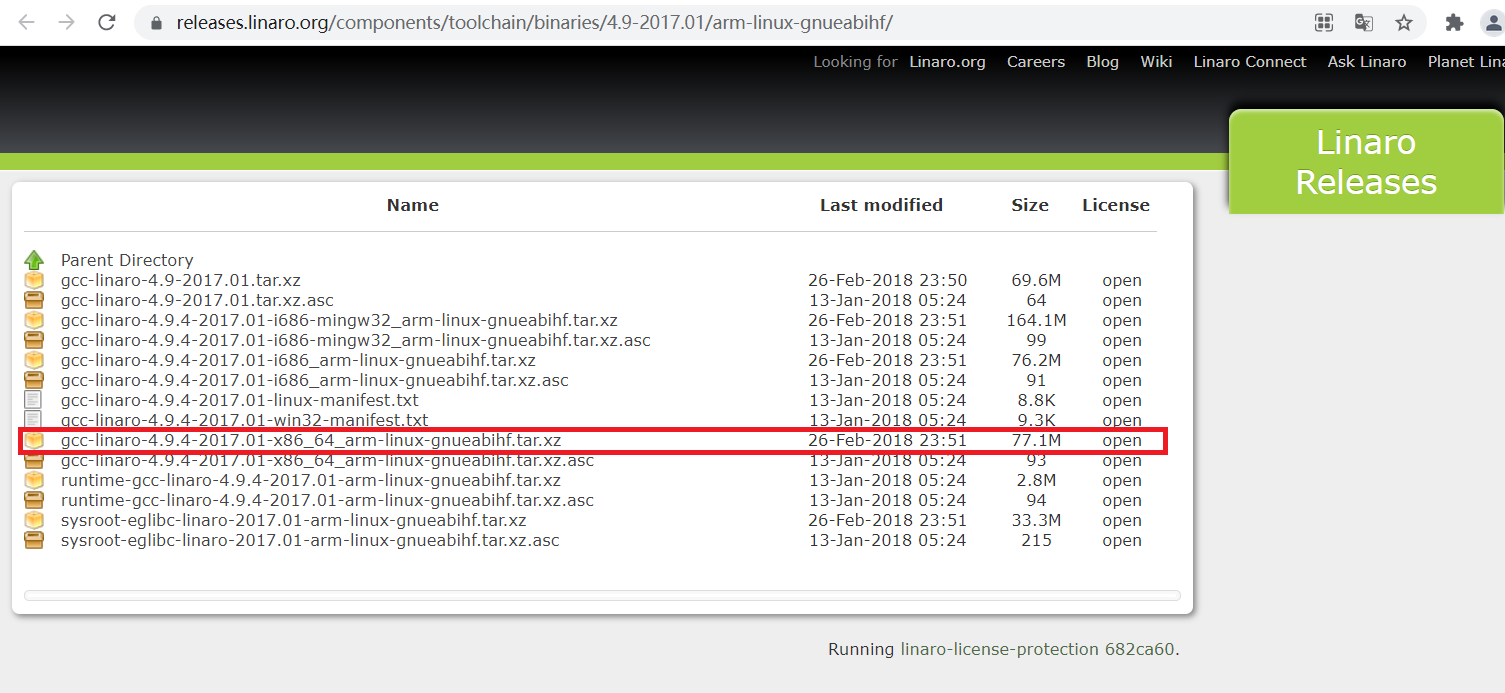
交叉編譯器有很多,本實驗使用 Linaro 出品的交叉編譯器,下載地址:
https://releases.linaro.org/components/toolchain/binaries/4.9-2017.01/arm-linux-gnueabihf/
4.1.2 交叉編譯器安裝
在Ubuntu中創(chuàng)建目錄:/usr/local/arm,并將下載的gcc-linaro-4.9.4-2017.01-x86_64_arm-linux-gnueabihf.tar.xz復(fù)制到此文件中,然后解壓,解壓命令如下:
sudo tar -vxf gcc-linaro-4.9.4-2017.01-x86_64_arm-linux-gnueabihf.tar.xz
解壓完成以后會生成一個名為“gcc-linaro-4.9.4-2017.01-x86_64_arm-linux-gnueabihf”的文件夾,這個文件夾里面就是我們的交叉編譯工具鏈。
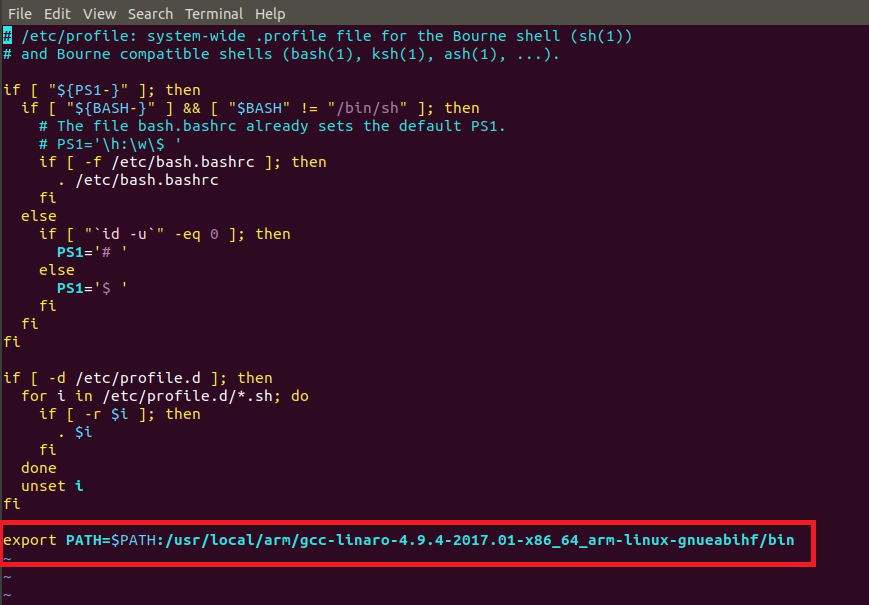
然后,需要將該目錄添加到環(huán)境變量中。打開/etc/profile 以后,在最后面輸入如下所示內(nèi)容:
export PATH=$PATH:/usr/local/arm/gcc-linaro-4.9.4-2017.01-x86_64_arm-linux-gnueabihf/bin
使用交叉編譯器之前還需要安裝其它的庫,命令如下:
sudo apt-get install lsb-core lib32stdc++
安裝完之后,可以查看交叉編譯工具的版本號,輸入如下命令:
arm-linux-gnueabihf-gcc -v
可以看到類似如下打印
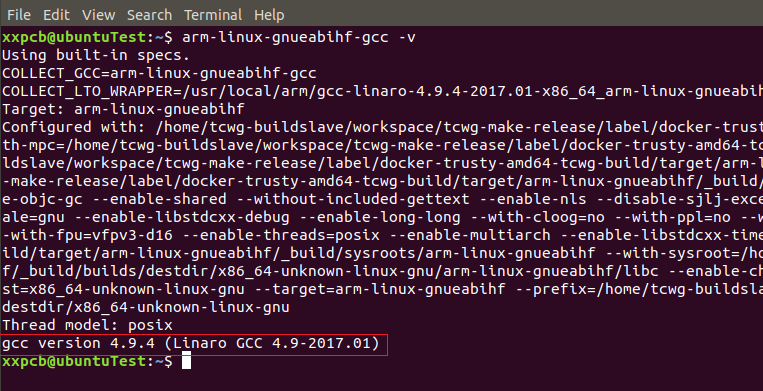
以看出當(dāng)前交叉編譯器的版本號為 4.9.4,說明交叉編譯工具鏈安裝成功。
4.2 編譯原廠uboot
編譯前還要在Ubuntu 中安裝ncurses 庫,安裝命令如下:
sudo apt-get install libncurses5-dev
在Ubuntu中創(chuàng)建存放uboot的目錄,如我的目錄是:/home/xxpcb/myTest/imx6ull/uboot/nxp_uboot
然后,將NXP(freescale)的uboot源碼復(fù)制進來,這里使用的是正點原子提供的NXP官方原版Uboot源碼包( uboot-imx-rel_imx_4.1.15_2.1.0_ga.tar.bz2)
然后進行解壓:
tar -vxjf uboot-imx-rel_imx_4.1.15_2.1.0_ga.tar.bz2
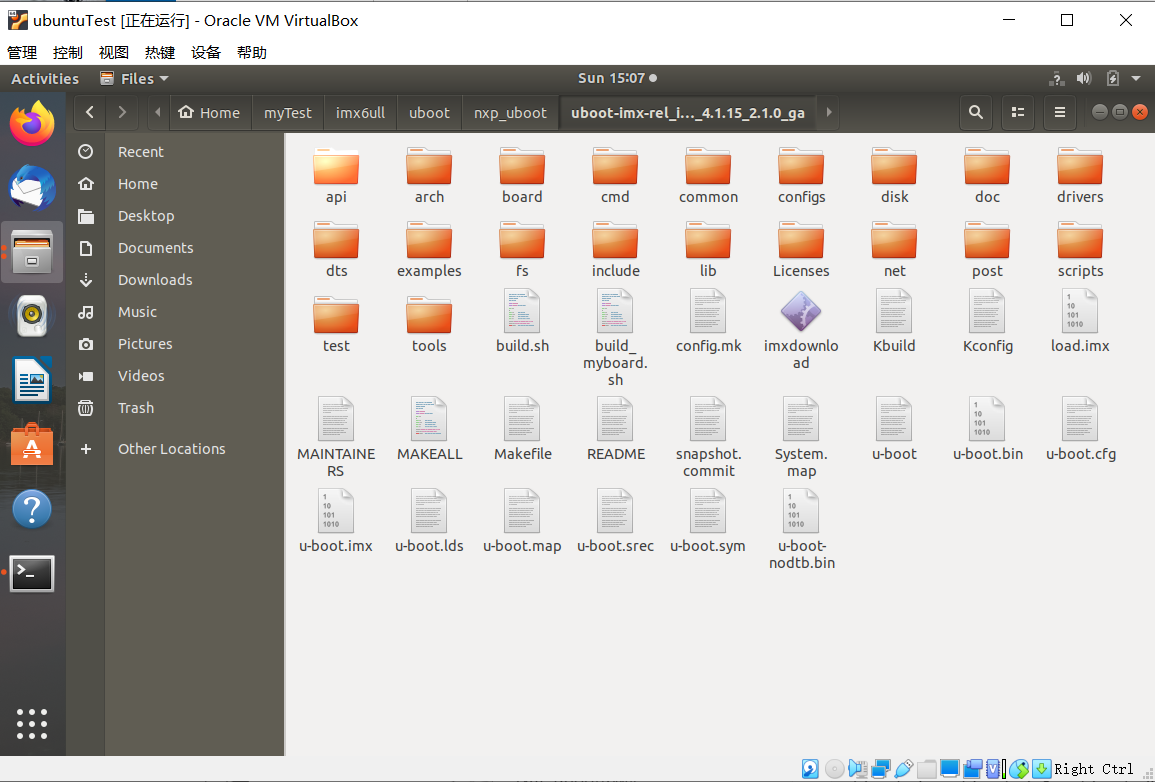
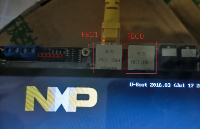
解壓后的源碼文件如下:
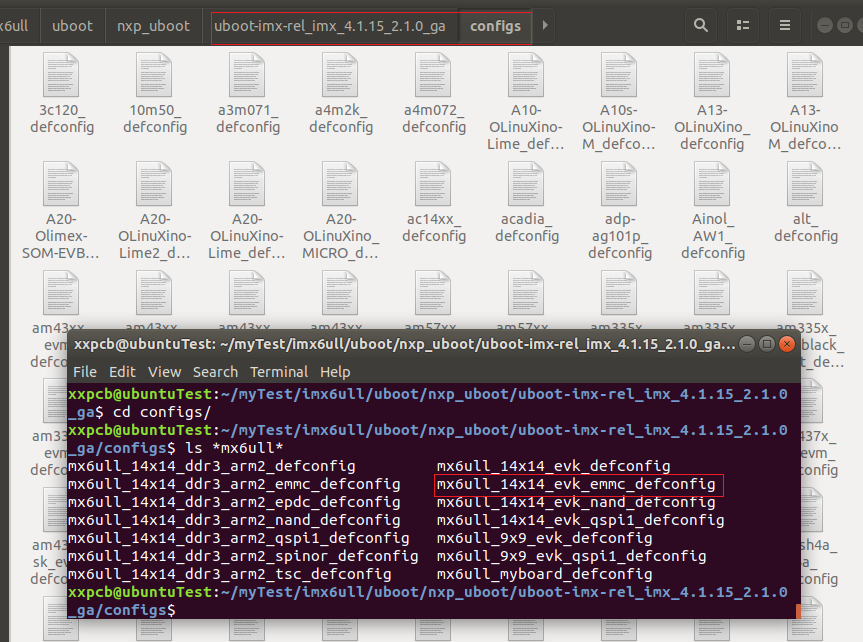
首先看下uboot的配置,configs 目錄下有很多跟 I.MX6UL/6ULL 有關(guān)的配置,找到與mx6ull相同的,如下圖。
因為我這個開發(fā)板是emmc版本的,所有就使用這個mx6ull_14x14_evk_emmc_defconfig。
編譯uboot使用下面3條指令:
make ARCH=arm CROSS_COMPILE=arm-linux-gnueabihf- distclean
make ARCH=arm CROSS_COMPILE=arm-linux-gnueabihf- mx6ull_14x14_evk_emmc_defconfig
make V=1 ARCH=arm CROSS_COMPILE=arm-linux-gnueabihf- -j8
這3條命令中 :
ARCH=arm 設(shè)置目標(biāo)為 arm 架構(gòu)
CROSS_COMPILE 指定所使用的交叉編譯器。
第1條命令相當(dāng)于make distclean,目的是清除工程,一般在第一次編譯的時候最好清理一下工程。
第2條指令相當(dāng)于make mx6ull_14x14_evk_emmc_defconfig ,用于配置 uboot,配置文件為 mx6ull_14x14_evk_emmc_defconfig。
第3條指令相當(dāng)于make -j8,也就是使用8核來編譯uboot。
為了方便的執(zhí)行著3條指令,可以將這些指令寫成shell腳本,比如在uboot源碼目錄下新建一個build.sh文件,寫入如下內(nèi)容:
#!/bin/bash
?
make ARCH=arm CROSS_COMPILE=arm-linux-gnueabihf- distclean

make ARCH=arm CROSS_COMPILE=arm-linux-gnueabihf- mx6ull_14x14_evk_emmc_defconfig

make V=1 ARCH=arm CROSS_COMPILE=arm-linux-gnueabihf- -j8
然后進行編譯:
./build.sh
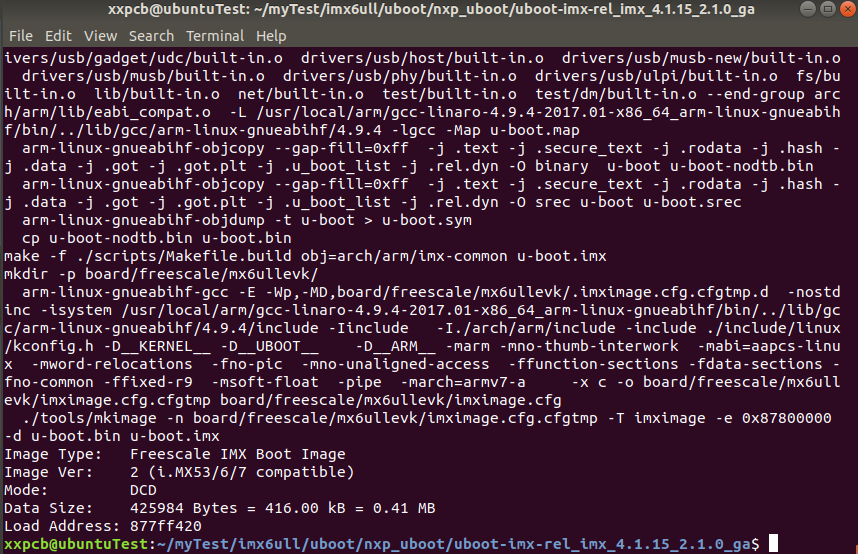
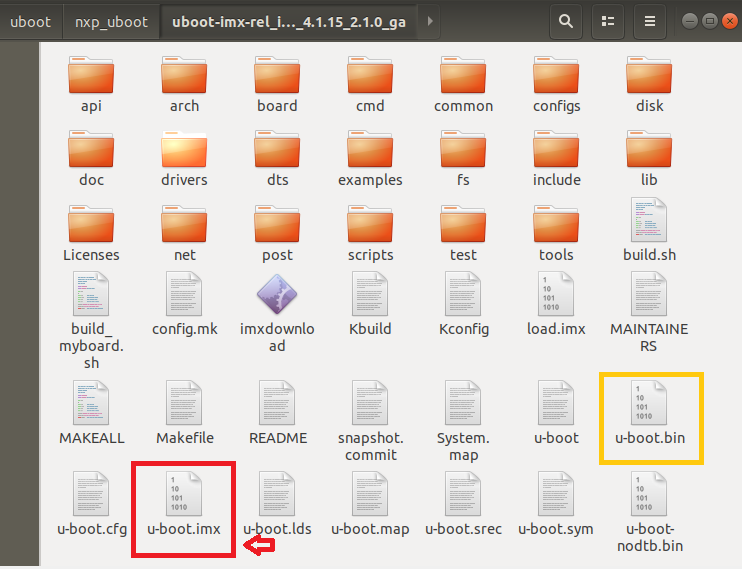
編譯完成以后uboot 源碼多了一些文件,其中u-boot.bin就是編譯出來的 uboot二進制文件。 uboot是個裸機程序, 因此需要在其前面
加上頭部(IVT、 DCD等數(shù)據(jù))才能在I.MX6U上執(zhí)行,u-boot.imx文件就是添加頭部以后的 u-boot.bin。
u-boot.imx 就是我們最終要燒寫到開發(fā)板中的 uboot 鏡像文件。
4.3 燒錄開發(fā)板
這是的燒錄開發(fā)板,實際是要燒錄到SD卡中,然后將SD卡插入開發(fā)板,讓開發(fā)板從SD卡啟動(需要在開發(fā)板上設(shè)置撥碼開關(guān)來選擇啟動方式)。
4.3.1 燒錄到SD卡
正點原子專門編寫了一個小軟件用來將編譯出來的.bin 文件燒寫到 SD 卡中,這個軟件叫做“imxdownload”
將imxdownload 復(fù)制到 Ubuntu 中的uboot源碼文件夾,再使用如下指令,給予 imxdownload 可執(zhí)行權(quán)限:
chmod 777 imxdownload
然后電腦USB中插入SD卡(讀卡器),并在虛擬機中設(shè)置usb加載(VMware或VirtualBox虛擬機需要先安裝增強功能才能使用)
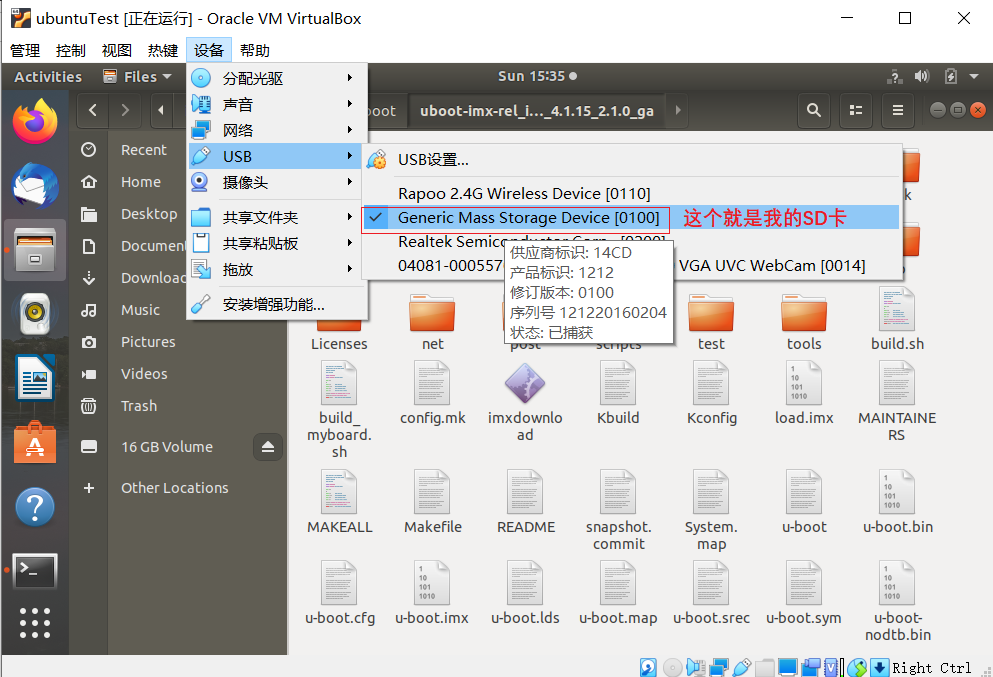
然后可以使用如下指令來查看SD卡的掛載標(biāo)識符:
ls /dev/sd*
查看輸出結(jié)果:

這里的/dev/sdb就是我的SD卡。
注:我第一次使用SD卡燒錄時,只多出了/dev/sdb,但不知什么情況,用了幾次后,再插入SD卡,就會同時多出來/dev/sdb和/dev/sdb1,但實際測試,仍然把程序燒錄到/dev/sdb也能用)。
imxdownload向SD卡燒寫led.bin文件,命令格式如下:
./imxdownload u-boot.bin /dev/sdb
注意不能燒寫到
/dev/sda或sda1設(shè)備里面!那是系統(tǒng)磁盤。
燒寫過程會輸入如下信息:
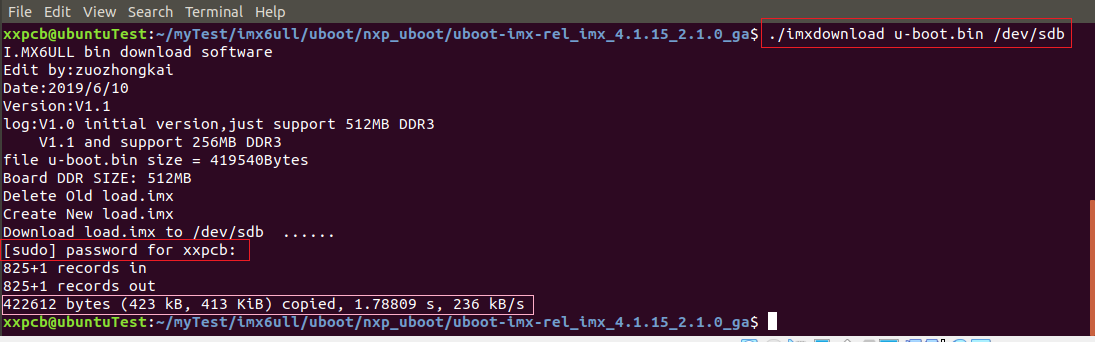
燒寫的最后一行會顯示燒寫大小、用時和速度,比如u-boot.bin燒寫到SD卡中的大小是 423KB,用時 1.7s,燒寫速度是 236KB/s。
注意這個燒寫速度,如果這個燒寫速度在幾百KB/s 以下那么就是正常燒寫。 如果這個燒寫速度大于幾十MB/s、甚至幾百MB/s那么肯定是燒寫失敗了! 重新插拔/格式化SD卡或重啟ubuntu再試。
燒寫完成以后會在當(dāng)前工程目錄下生成一個load.imx的文件,這個文件就是軟件 imxdownload 根據(jù) NXP 官方啟動方式介紹的內(nèi)容, 在 bin 文件前面添加了一些數(shù)據(jù)頭以后生成的。最終燒寫到 SD卡里面的就是這個imx文件。
4.3.2 啟動開發(fā)板
燒錄完之后,將SD卡插入開發(fā)板啟動,使用串口連接電腦,查看uboot啟動信息。
設(shè)置好串口參數(shù)(波特率115200)并打開,按鍵復(fù)位開發(fā)板。
當(dāng)串口打印上出現(xiàn)“Hit any key to stop autoboot”倒計時的時候按下鍵盤上的回車鍵,默認是 3 秒倒計時,在 3 秒倒計時結(jié)束以后如果沒有按下回車鍵的話 uboot 就會使用默認參數(shù)來啟動 Linux 內(nèi)核了。
如果在 3 秒倒計時結(jié)束之前按下回車鍵,那么就會進入 uboot 的命令行模式:
解讀一下這些信息的含義:
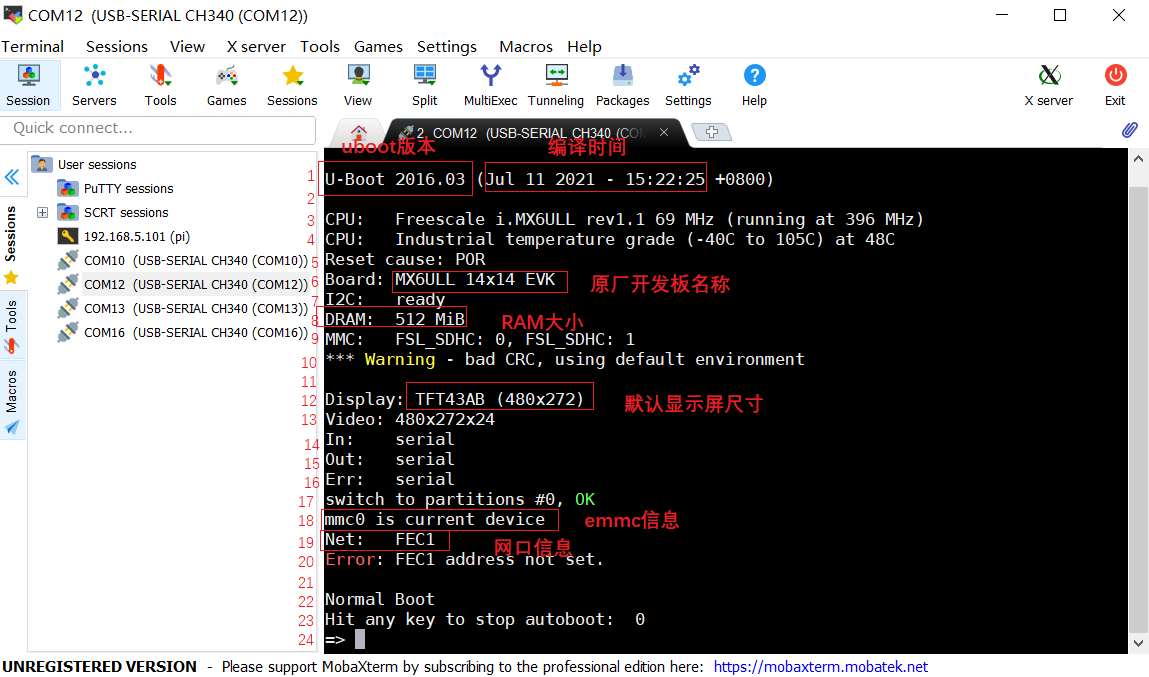
第1行是 uboot 版本號和編譯時間:當(dāng)前的 uboot 版本號是 2016.03,編譯時間是 2021/7 /11/15:22:25
第3、4 行是 CPU 信息:當(dāng)前使用的 CPU 是飛思卡爾(屬于NXP)的 I.MX6ULL (頻率為 792MHz),此時運行在 396MHz。這顆芯片是工業(yè)級的,結(jié)溫為-40°C~105°C
第 5 行是復(fù)位原因:I.MX6ULL 芯片上有個 POR_B 引腳,將這個引腳拉低即可復(fù)位 I.MX6ULL。
第 6 行是板子名字,“MX6ULL 14x14 EVK”即NXP原廠開發(fā)板的名字 。
第 7 行提示 I2C 準備就緒。
第 8 行提示當(dāng)前板子的DRAM(內(nèi)存) 為 512MB
第 9 行提示當(dāng)前有兩個MMC/SD 卡控制器:FSL_SDHC(0)和 FSL_SDHC(1)。I.MX6ULL支持兩個 MMC/SD,正點原子的 I.MX6ULL EMMC 核心板上 FSL_SDHC(0)接的 SD(TF)卡,F(xiàn)SL_SDHC(1)接的 EMMC。
第10行是一條警告信息,先忽略。
第 12、13 行是 LCD 型號,原廠默認的是TFT43AB (480x272)。
第 14~16 是標(biāo)準輸入、標(biāo)準輸出和標(biāo)準錯誤所使用的終端,這里都使用串口(serial)作為終端。
第 17 、18行是切換到emmc的第0個分區(qū)上,因為當(dāng)前的 uboot 是 emmc 版本的,也就是從 emmc 啟動的。我們只是為了方便將其燒寫到了 SD 卡上,但是它的“內(nèi)心”還是 EMMC的。所以 uboot 啟動以后會將 emmc 作為默認存儲器 。
第 19行是網(wǎng)口信息,提示我們當(dāng)前使用的 FEC1 這個網(wǎng)口,I.MX6ULL 支持兩個網(wǎng)口。
第 20行提示 FEC1 網(wǎng)卡地址沒有設(shè)置(后面我們會講解如何在uboot 里面設(shè)置網(wǎng)卡地址)。
第 22行提示正常啟動, 也就是說 uboot要從emmc里面讀取環(huán)境變量和參數(shù)信息啟動 Linux內(nèi)核了。
第23行是倒計時提示,默認倒計時 3 秒,倒計時結(jié)束之前按下回車鍵就會進入 Linux 命令行模式。如果在倒計時結(jié)束以后沒有按下回車鍵,那么 Linux 內(nèi)核就會啟動,Linux 內(nèi)核一旦啟動,uboot 就運行結(jié)束了。
第23行是在倒計時 3 秒內(nèi)按了回車鍵,符號=>表示可以繼續(xù)與uboot進行命令交互。
看過了串口的uboot信息,再來看一下板子是實際運行情況:
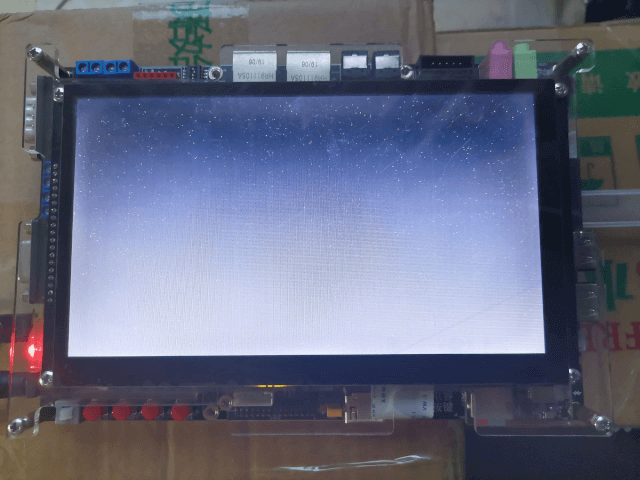
由于原廠的uboot驅(qū)動的屏幕是TFT43AB (480x272),與我這里屏幕不一樣,所以屏幕沒有正常顯示(現(xiàn)在的屏幕看起來有許多彩色的小點點),接下來,就是對uboot進行屏幕驅(qū)動的修改。
在本篇結(jié)束之前,再來研究一下uboot的串口指令。
4.4 uboot命令初探
上面說道,在uboot啟動的3 秒倒計時內(nèi),串口界面如果按下了回車鍵,uboot就會輸出符號=>,則可以繼續(xù)與uboot進行命令交互。那可以輸入哪些命令呢?
4.4.1 help命令查看所有指令
輸入help或者? ,然后按下回車即可查看當(dāng)前 uboot 所支持的命令:
=> help
?       - alias for 'help'
base    - print or set address offset
bdinfo  - print Board Info structure
bmode   - sd1|sd2|qspi1|normal|usb|sata|ecspi1:0|ecspi1:1|ecspi1:2|ecspi1:3|esdhc1|esdhc2|esdhc3|esdhc4 [noreset]
bmp     - manipulate BMP image data
boot    - boot default, i.e., run 'bootcmd'
bootd   - boot default, i.e., run 'bootcmd'
bootelf - Boot from an ELF image in memory
bootm   - boot application image from memory
bootp   - boot image via network using BOOTP/TFTP protocol
bootvx  - Boot vxWorks from an ELF image
bootz   - boot Linux zImage image from memory
clocks  - display clocks
clrlogo - fill the boot logo area with black
cmp     - memory compare
coninfo - print console devices and information
cp      - memory copy
crc32   - checksum calculation
dcache  - enable or disable data cache
dhcp    - boot image via network using DHCP/TFTP protocol
dm      - Driver model low level access
echo    - echo args to console
editenv - edit environment variable
env     - environment handling commands
erase   - erase FLASH memory
exit    - exit script
ext2load- load binary file from a Ext2 filesystem
ext2ls  - list files in a directory (default /)
ext4load- load binary file from a Ext4 filesystem
ext4ls  - list files in a directory (default /)
ext4size- determine a file's size
ext4write- create a file in the root directory
false   - do nothing, unsuccessfully
fatinfo - print information about filesystem
fatload - load binary file from a dos filesystem
fatls   - list files in a directory (default /)
fatsize - determine a file's size
fdt     - flattened device tree utility commands
flinfo  - print FLASH memory information
fstype  - Look up a filesystem type
fuse    - Fuse sub-system
go      - start application at address 'addr'
gpio    - query and control gpio pins
help    - print command description/usage
i2c     - I2C sub-system
icache  - enable or disable instruction cache
iminfo  - print header information for application image
imxtract- extract a part of a multi-image
itest   - return true/false on integer compare
load    - load binary file from a filesystem
loadb   - load binary file over serial line (kermit mode)
loads   - load S-Record file over serial line
loadx   - load binary file over serial line (xmodem mode)
loady   - load binary file over serial line (ymodem mode)
loop    - infinite loop on address range
ls      - list files in a directory (default /)
md      - memory display
mdio    - MDIO utility commands
mii     - MII utility commands
mm      - memory modify (auto-incrementing address)
mmc     - MMC sub system
mmcinfo - display MMC info
mtest   - simple RAM read/write test
mw      - memory write (fill)
nfs     - boot image via network using NFS protocol
nm      - memory modify (constant address)
ping    - send ICMP ECHO_REQUEST to network host
pmic    - PMIC
printenv- print environment variables
protect - enable or disable FLASH write protection
reset   - Perform RESET of the CPU
run     - run commands in an environment variable
save    - save file to a filesystem
saveenv - save environment variables to persistent storage
setenv  - set environment variables
setexpr - set environment variable as the result of eval expression
sf      - SPI flash sub-system
showvar - print local hushshell variables
size    - determine a file's size
sleep   - delay execution for some time
source  - run script from memory
test    - minimal test like /bin/sh
tftpboot- boot image via network using TFTP protocol
true    - do nothing, successfully
usb     - USB sub-system
usbboot - boot from USB device
version - print monitor, compiler and linker version
=>
4.4.2 查看指令的使用說明
命令的具體使用方法,可以輸入help 命令名或? 命令名查看,以“bootz”這個命令為例:
=> help bootz
bootz - boot Linux zImage image from memory

Usage:
bootz [addr [initrd[:size]] [fdt]]
    - boot Linux zImage stored in memory
        The argument 'initrd' is optional and specifies the address
        of the initrd in memory. The optional argument ':size' allows
        specifying the size of RAW initrd.
        When booting a Linux kernel which requires a flat device-tree
        a third argument is required which is the address of the
        device-tree blob. To boot that kernel without an initrd image,
        use a '-' for the second argument. If you do not pass a third
        a bd_info struct will be passed instead

=>
4.4.3 信息查詢命令
常用的和信息查詢有關(guān)的命令有 3 個:bdinfo、printenv和 version。
bdinfo 板子信息
=> bdinfo
arch_number = 0x00000000
boot_params = 0x80000100
DRAM bank   = 0x00000000
-> start    = 0x80000000
-> size     = 0x20000000
eth0name    = FEC1
ethaddr     = (not set)
current eth = FEC1
ip_addr     =
baudrate    = 115200 bps
TLB addr    = 0x9FFF0000
relocaddr   = 0x9FF47000
reloc off   = 0x18747000
irq_sp      = 0x9EF44EA0
sp start    = 0x9EF44E90
FB base     = 0x00000000
=>
從打印信息可以得出 DRAM 的起始地址和大小、啟動參數(shù)保存起始地址、波特率、sp(堆棧指針)起始地址等信息.
printenv 打印環(huán)境變量
=> printenv
baudrate=115200
board_name=EVK
board_rev=14X14
boot_fdt=try
bootcmd=run findfdt;mmc dev ${mmcdev};mmc dev ${mmcdev}; if mmc rescan; then if run loadbootscript; then run bootscript; else if run loadimage; thn run mmcboot; else run netboot; fi; fi; else run netboot; fi
bootcmd_mfg=run mfgtool_args;bootz ${loadaddr} ${initrd_addr} ${fdt_addr};
bootdelay=3
bootscript=echo Running bootscript from mmc ...; source
console=ttymxc0
ethact=FEC1
ethprime=FEC
fdt_addr=0x83000000
fdt_file=undefined
fdt_high=0xffffffff
findfdt=if test $fdt_file = undefined; then if test $board_name = EVK && test $board_rev = 9X9; then setenv fdt_file imx6ull-9x9-evk.dtb; fi; if tst $board_name = EVK && test $board_rev = 14X14; then setenv fdt_file imx6ull-14x14-evk.dtb; fi; if test $fdt_file = undefined; then echo WARNING:Could not determine dtb to use; fi; fi;
image=zImage
initrd_addr=0x83800000
initrd_high=0xffffffff
ip_dyn=yes
loadaddr=0x80800000
loadbootscript=fatload mmc ${mmcdev}:${mmcpart} ${loadaddr} ${script};
loadfdt=fatload mmc ${mmcdev}:${mmcpart} ${fdt_addr} ${fdt_file}
loadimage=fatload mmc ${mmcdev}:${mmcpart} ${loadaddr} ${image}
mfgtool_args=setenv bootargs console=${console},${baudrate} rdinit=/linuxrc g_mass_storage.stall=0 g_mass_storage.removable=1 g_mass_storage.file=fat g_mass_storage.ro=1 g_mass_storage.idVendor=0x066F g_mass_storage.idProduct=0x37FF g_mass_storage.iSerialNumber="" clk_ignore_unused
mmcargs=setenv bootargs console=${console},${baudrate} root=${mmcroot}
mmcautodetect=yes
mmcboot=echo Booting from mmc ...; run mmcargs; if test ${boot_fdt} = yes || test ${boot_fdt} = try; then if run loadfdt; then bootz ${loadaddr} -${fdt_addr}; else if test ${boot_fdt} = try; then bootz; else echo WARN: Cannot load the DT; fi; fi; else bootz; fi;
mmcdev=0
mmcpart=1
mmcroot=/dev/mmcblk0p2 rootwait rw
netargs=setenv bootargs console=${console},${baudrate} root=/dev/nfs ip=dhcp nfsroot=${serverip}:${nfsroot},v3,tcp
netboot=echo Booting from net ...; run netargs; if test ${ip_dyn} = yes; then setenv get_cmd dhcp; else setenv get_cmd tftp; fi; ${get_cmd} ${imag}; if test ${boot_fdt} = yes || test ${boot_fdt} = try; then if ${get_cmd} ${fdt_addr} ${fdt_file}; then bootz ${loadaddr} - ${fdt_addr}; else if est ${boot_fdt} = try; then bootz; else echo WARN: Cannot load the DT; fi; fi; else bootz; fi;
panel=TFT43AB
script=boot.scr

Environment size: 2431/8188 bytes
=>
這里有很多的環(huán)境變量, 比如baudrate、 board_name、 board_rec、 boot_fdt、 bootcmd等。比如 bootdelay 這個環(huán)境變量就表示 uboot 啟動延時時間,默認 bootdelay=3,也就默認延時 3秒。前面說的 3 秒倒計時就是由 bootdelay 定義的。另外uboot 中的環(huán)境變量都是字符串。
version 版本信息
=> version

U-Boot 2016.03 (Jul 11 2021 - 15:22:25 +0800)
arm-linux-gnueabihf-gcc (Linaro GCC 4.9-2017.01) 4.9.4
GNU ld (Linaro_Binutils-2017.01) 2.24.0.20141017 Linaro 2014_11-3-git
=>
當(dāng)前uboot 版本號為 2016.03,編譯日期2021/7/11,編譯器為arm-linux-gnueabihf-gcc。
本篇uboot移植初探(原廠uboot燒錄測試)就到這里,下一篇進行實際的uboot移植,使得uboot與所用的開發(fā)板匹配。
-
嵌入式
+關(guān)注
關(guān)注
5103文章
19268瀏覽量
310018 -
Linux
+關(guān)注
關(guān)注
87文章
11373瀏覽量
211294 -
開發(fā)板
+關(guān)注
關(guān)注
25文章
5210瀏覽量
99120 -
Uboot
+關(guān)注
關(guān)注
4文章
126瀏覽量
28477 -
i.MX6
+關(guān)注
關(guān)注
1文章
37瀏覽量
16399
發(fā)布評論請先 登錄
相關(guān)推薦
i.MX6ULL嵌入式Linux開發(fā)2-uboot移植實踐
如何在嵌入式Linux開發(fā)板上配置Qt運行環(huán)境
使用i.MX6ULL開發(fā)板進行Linux根文件系統(tǒng)的完善
移植NXP官方linux 5.4內(nèi)核到i.MX6ULL開發(fā)板
【i.MX6UL/i.MX6ULL開發(fā)常見問題】單獨編譯內(nèi)核,uboot生成很多文件,具體用哪一個?
移植5.4內(nèi)核到迅為I.MX6ULL開發(fā)板
i.MX6ULL開發(fā)板硬件資源
初識 i.MX6ULL 寄存器
如何選擇嵌入式Linux開發(fā)電腦
飛凌i.MX6ULL開發(fā)板的評測,再次進階擁有更高的性價比
【北京迅為】i.MX6ULL開發(fā)板移植 Debian 文件系統(tǒng)
入門級嵌入式板卡的視頻工具FFmpeg移植與測試開發(fā)——米爾i.MX6UL/i.MX6ULL開發(fā)板

【北京迅為】i.mx8mm嵌入式linux開發(fā)指南第四篇 嵌入式Linux系統(tǒng)移植篇第六十九章uboot移植

【新品】i.MX6ULL工業(yè)嵌入式核心板!NXP低功耗MPU,LCD顯示

【迅為電子】i.MX6UL和i.MX6ULL芯片區(qū)別與開發(fā)板對比


 工商網(wǎng)監(jiān)
評論