本期我們將一起學(xué)習(xí)如何使用計算機(jī)視覺技術(shù)識別棋子及其在棋盤上的位置
我們利用計算機(jī)視覺技術(shù)和卷積神經(jīng)網(wǎng)絡(luò)(CNN)為這個項目創(chuàng)建分類算法,并確定棋子在棋盤上的位置。最終的應(yīng)用程序會保存整個圖像并可視化的表現(xiàn)出來,同時輸出棋盤的2D圖像以查看結(jié)果。
01. 數(shù)據(jù)
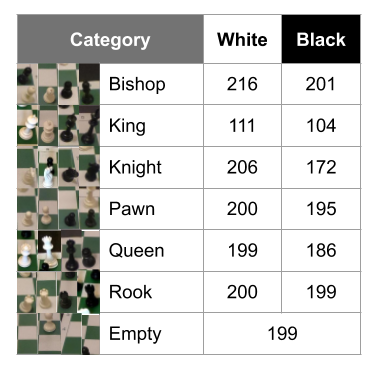
我們對該項目的數(shù)據(jù)集有很高的要求,因為它最終會影響我們的實驗結(jié)果。我們在網(wǎng)上能找到的國際象棋數(shù)據(jù)集是使用不同的國際象棋集、不同的攝影機(jī)拍攝得到的,這導(dǎo)致我們創(chuàng)建了自己的數(shù)據(jù)集。我使用國際象棋和攝像機(jī)(GoPro Hero6 Black以“第一人稱視角”角度)生成了自定義數(shù)據(jù)集,這使我的模型更加精確。該數(shù)據(jù)集包含2406張圖像,分為13類(請參閱下文)。總結(jié):這花費了我們很多時間,但是這使得訓(xùn)練圖像盡可能地接近在應(yīng)用程序中使用時所看到的圖像。

自定義數(shù)據(jù)集的細(xì)分
為了構(gòu)建該數(shù)據(jù)集,我首先創(chuàng)建了capture_data.py,當(dāng)單擊S鍵時,該視頻從視頻流中獲取一幀并將其保存。這個程序使我能夠無縫地更改棋盤上的棋子并一遍又一遍地捕獲棋盤的圖像,直到我建立了大量不同的棋盤配置為止。接下來,我創(chuàng)建了create_data.py,以使用下一部分中討論的檢測技術(shù)將其裁剪為單獨小塊。最后,我通過將裁剪后的圖像分成帶標(biāo)簽的文件夾來對它們進(jìn)行分類。
02. 棋盤檢測
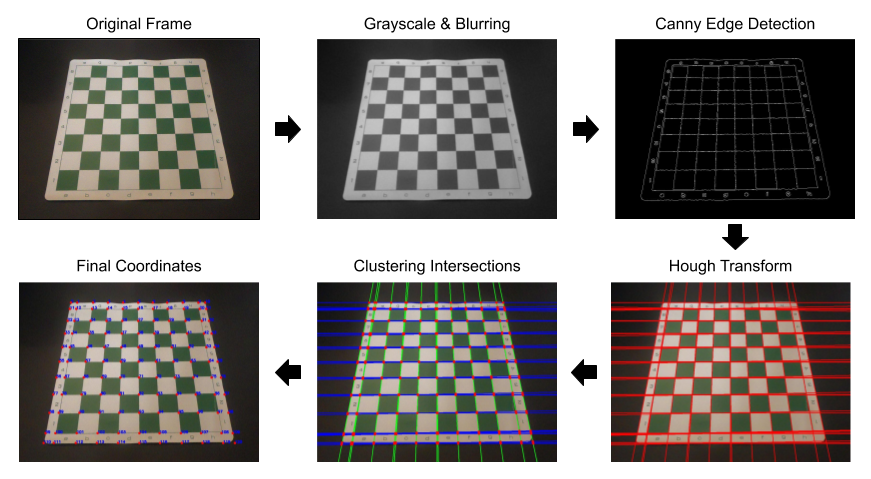
對于棋盤檢測,我想做的事情比使用OpenCV函數(shù)findChessboardCorners復(fù)雜的多,但又不像CNN那樣高級。使用低級和中級計算機(jī)視覺技術(shù)來查找棋盤的特征,然后將這些特征轉(zhuǎn)換為外邊界和64個獨立正方形的坐標(biāo)。該過程以Canny邊緣檢測和Hough變換生成的相交水平線、垂直線的交點為中心。層次聚類用于按距離對交叉點進(jìn)行分組,并對各組取平均值以創(chuàng)建最終坐標(biāo)(請參見下文)。

完整的棋盤檢測過程
03. 棋盤分類
項目伊始,我們想使用Keras / TensorFlow創(chuàng)建CNN模型并對棋子進(jìn)行分類。但是,在創(chuàng)建數(shù)據(jù)集之后,僅考慮CNN的大小,單靠CNN就無法獲得想要的結(jié)果。為了克服這一障礙,我利用了ImageDataGenerator和transfer learning,它增加了我的數(shù)據(jù)并使用了其他預(yù)訓(xùn)練的模型作為基礎(chǔ)。
創(chuàng)建CNN模型
為了使用GPU,我在云中創(chuàng)建并訓(xùn)練了CNN模型,從而大大減少了訓(xùn)練時間。快速提示:Google Colab是使用GPU快速入門的簡便方法。為了提高數(shù)據(jù)的有效性,我使用了ImageDataGenerator來擴(kuò)展原始圖像并將模型暴露給不同版本的數(shù)據(jù)。ImageDataGenerator函數(shù)針對每個時期隨機(jī)旋轉(zhuǎn),重新縮放和翻轉(zhuǎn)(水平)訓(xùn)練數(shù)據(jù),從本質(zhì)上創(chuàng)建了更多數(shù)據(jù)。盡管還有更多的轉(zhuǎn)換選項,但這些轉(zhuǎn)換選項對該項目最有效。
from keras.preprocessing.image import ImageDataGeneratordatagen = ImageDataGenerator(rotation_range=5,rescale=1./255,horizontal_flip=True,fill_mode='nearest')test_datagen = ImageDataGenerator(rescale=1./255)train_gen = datagen.flow_from_directory(folder + '/train',target_size = image_size,batch_size = batch_size,class_mode = 'categorical',color_mode = 'rgb',shuffle=True)test_gen = test_datagen.flow_from_directory(folder + '/test',target_size = image_size,batch_size = batch_size,class_mode = 'categorical',color_mode = 'rgb',shuffle=False)
我們沒有從頭開始訓(xùn)練模型,而是通過利用預(yù)先訓(xùn)練的模型并添加了使用我的自定義數(shù)據(jù)集訓(xùn)練的頂層模型來實現(xiàn)轉(zhuǎn)移學(xué)習(xí)。我遵循了典型的轉(zhuǎn)移學(xué)習(xí)工作流程:
1.從先前訓(xùn)練的模型(VGG16)中獲取圖層。
from keras.applications.vgg16 import VGG16model = VGG16(weights='imagenet')model.summary()
2.凍結(jié)他們,以避免破壞他們在訓(xùn)練回合中包含的任何信息。
3.在凍結(jié)層的頂部添加了新的可訓(xùn)練層。
from keras.models import Sequentialfrom keras.layers import Dense, Conv2D, MaxPooling2D, Flattenfrom keras.models import Modelbase_model = VGG16(weights='imagenet', include_top=False, input_shape=(224,224,3))# Freeze convolutional layers from VGG16for layer in base_model.layers:layer.trainable = False# Establish new fully connected blockx = base_model.outputx = Flatten()(x)x = Dense(500, activation='relu')(x)x = Dense(500, activation='relu')(x)predictions = Dense(13, activation='softmax')(x)# This is the model we will trainmodel = Model(inputs=base_model.input, outputs=predictions)model.compile(optimizer='adam', loss='categorical_crossentropy', metrics=['categorical_accuracy'])
4.在自定義數(shù)據(jù)集上訓(xùn)練新層。
epochs = 10history = model.fit(epochs=epochs,verbose = 1,validation_data=test_gen)model.save_weights('model_VGG16.h5')
當(dāng)我們使用VGG16或VGG19作為預(yù)訓(xùn)練模型創(chuàng)建模型時,由于驗證精度更高,因此選擇了使用VGG16的模型。另外,最佳epochs 是10。任何大于10的數(shù)均不會使驗證準(zhǔn)確性的提高,也不會增加訓(xùn)練與驗證準(zhǔn)確性之間的差異。總結(jié):轉(zhuǎn)移學(xué)習(xí)使我們可以充分利用深度學(xué)習(xí)在圖像分類中的優(yōu)勢,而無需大型數(shù)據(jù)集。
04. 結(jié)果
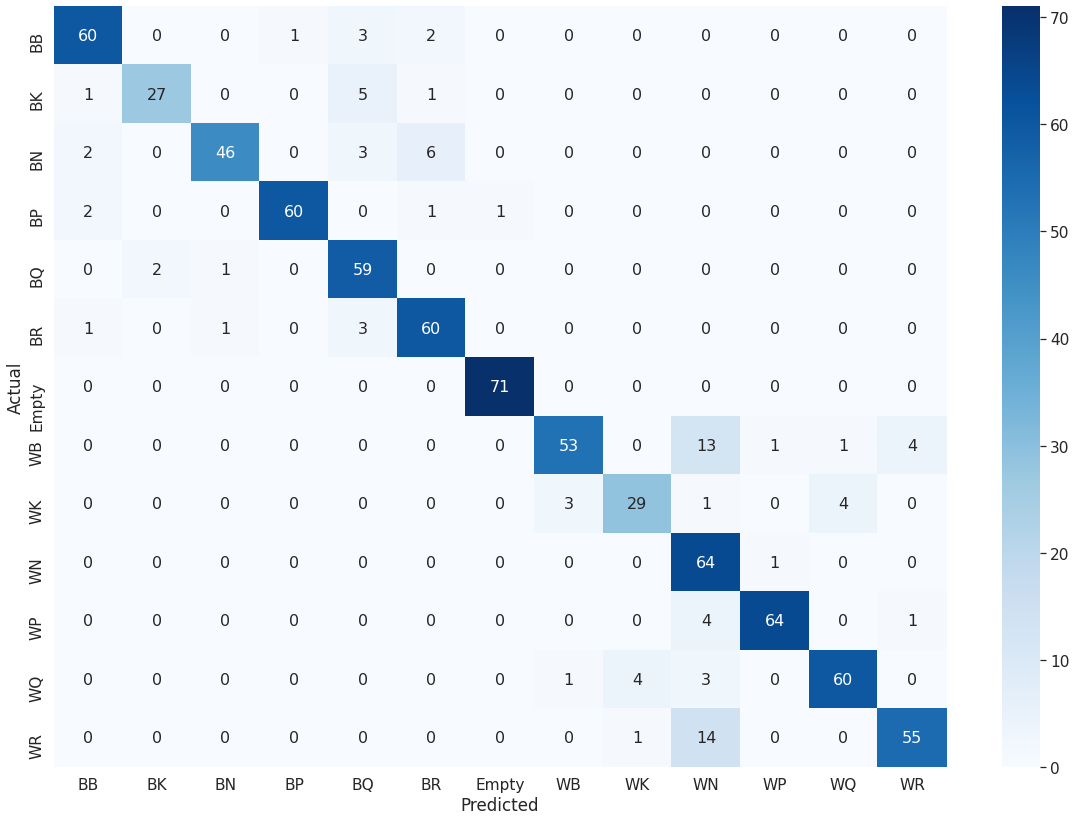
為了更好地可視化驗證準(zhǔn)確性,我創(chuàng)建了模型預(yù)測的混淆矩陣。通過此圖表,可以輕松評估模型的優(yōu)缺點。優(yōu)點:空-準(zhǔn)確率為99%,召回率為100%;白棋和黑棋(WP和BP)-F1得分約為95%。劣勢:白騎士(WN)-召回率高(98%),但準(zhǔn)確性卻很低(65%);白主教(WB)-召回率最低,為74%。

測試數(shù)據(jù)的混淆矩陣
05. 應(yīng)用
該應(yīng)用程序的目標(biāo)是使用CNN模型并可視化每個步驟的性能。我們創(chuàng)建了cv_chess.py,它清楚地顯示了步驟,并創(chuàng)建了cv_chess_functions.py,它顯示了每個步驟的詳細(xì)信息。此應(yīng)用程序保存實時視頻流中的原始幀,每個正方形的64個裁剪圖像以及棋盤的最終2D圖像。
print('Working...')# Save the frame to be analyzedcv2.imwrite('frame.jpeg', frame)# Low-level CV techniques (grayscale & blur)img, gray_blur = read_img('frame.jpeg')# Canny algorithmedges = canny_edge(gray_blur)# Hough Transformlines = hough_line(edges)# Separate the lines into vertical and horizontal lines h_lines, v_lines = h_v_lines(lines)# Find and cluster the intersectingintersection_points = line_intersections(h_lines, v_lines) points = cluster_points(intersection_points)# Final coordinates of the boardpoints = augment_points(points)# Crop the squares of the board a organize into a sorted list x_list = write_crop_images(img, points, 0)img_filename_list = grab_cell_files() img_filename_list.sort(key=natural_keys)# Classify each square and output the board in Forsyth-Edwards Notation (FEN)fen = classify_cells(model, img_filename_list)# Create and save the board image from the FENboard = fen_to_image(fen)# Display the board in ASCIIprint(board)# Display and save the chessboard imageboard_image = cv2.imread('current_board.png') cv2.imshow('current board', board_image)print('Completed!')
-
數(shù)據(jù)
+關(guān)注
關(guān)注
8文章
7002瀏覽量
88943 -
計算機(jī)
+關(guān)注
關(guān)注
19文章
7488瀏覽量
87852 -
圖像
+關(guān)注
關(guān)注
2文章
1083瀏覽量
40449
原文標(biāo)題:基于計算機(jī)視覺的棋盤圖像識別
文章出處:【微信號:vision263com,微信公眾號:新機(jī)器視覺】歡迎添加關(guān)注!文章轉(zhuǎn)載請注明出處。
發(fā)布評論請先 登錄
相關(guān)推薦
讓機(jī)器“看見”—計算機(jī)視覺入門及實戰(zhàn) 第二期基礎(chǔ)技術(shù)篇
單片機(jī)控制的13*13路棋盤能夠自動感知棋子位置及棋盤棋子走勢
計算機(jī)視覺及其在焊接中的應(yīng)用
基于OpenCV的計算機(jī)視覺技術(shù)實現(xiàn)

計算機(jī)視覺講義
計算機(jī)視覺與機(jī)器視覺區(qū)別
為什么說現(xiàn)在是計算機(jī)視覺最好的時代?
使用計算機(jī)視覺和人工智能來識別X射線中的計算機(jī)模型
計算機(jī)視覺技術(shù)簡介
剖析計算機(jī)視覺識別簡史

計算機(jī)視覺識別是如何工作的?
使用計算機(jī)視覺進(jìn)行電梯乘客計數(shù)


 如何使用計算機(jī)視覺技術(shù)識別棋子及其在棋盤上的位置


評論