什么是minio
引用官網(wǎng):
MinIO是根據(jù)GNU Affero通用公共許可證v3.0發(fā)布的高性能對象存儲。它與Amazon S3云存儲服務(wù)兼容。使用MinIO構(gòu)建用于機器學(xué)習(xí),分析和應(yīng)用程序數(shù)據(jù)工作負載的高性能基礎(chǔ)架構(gòu)。
官網(wǎng)地址:
https://min.io/
文檔地址:
https://docs.min.io/
基于 Spring Boot + MyBatis Plus + Vue & Element 實現(xiàn)的后臺管理系統(tǒng) + 用戶小程序,支持 RBAC 動態(tài)權(quán)限、多租戶、數(shù)據(jù)權(quán)限、工作流、三方登錄、支付、短信、商城等功能
一. 使用docker 搭建minio 服務(wù)。
GNU / Linux和macOS
dockerrun-p9000:9000
--nameminio1
-v/mnt/data:/data
-e"MINIO_ROOT_USER=AKIAIOSFODNN7EXAMPLE"
-e"MINIO_ROOT_PASSWORD=wJalrXUtnFEMI/K7MDENG/bPxRfiCYEXAMPLEKEY"
minio/minioserver/data
windows
dockerrun-p9000:9000
--nameminio1
-vD:data:/data
-e"MINIO_ROOT_USER=AKIAIOSFODNN7EXAMPLE"
-e"MINIO_ROOT_PASSWORD=wJalrXUtnFEMI/K7MDENG/bPxRfiCYEXAMPLEKEY"
minio/minioserver/data
-
MINIO_ROOT_USER:為用戶key -
MINIO_ROOT_PASSWORD:為用戶密鑰
以上搭建的都是單機版的。想要了解分布式 的方式請查看官網(wǎng)文檔。

這就是在win的docker上運行的。
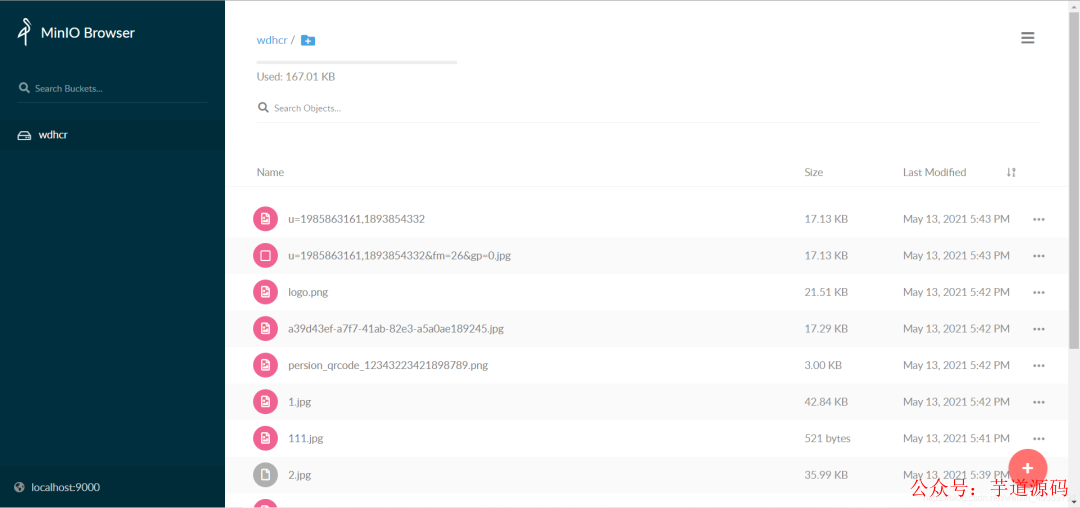
當啟動后在瀏覽器訪問http://localhost:9000就可以訪問minio的圖形化界面了,如圖所示:

基于 Spring Cloud Alibaba + Gateway + Nacos + RocketMQ + Vue & Element 實現(xiàn)的后臺管理系統(tǒng) + 用戶小程序,支持 RBAC 動態(tài)權(quán)限、多租戶、數(shù)據(jù)權(quán)限、工作流、三方登錄、支付、短信、商城等功能
二. 下面開始搭建springboot 環(huán)境
初始化一個springboot項目大家都會,這里不多做介紹。
主要是介紹需要引入的依賴:
<dependency>
<groupId>org.springframework.bootgroupId>
<artifactId>spring-boot-starter-thymeleafartifactId>
dependency>

<dependency>
<groupId>io.miniogroupId>
<artifactId>minioartifactId>
<version>8.2.1version>
dependency>

<dependency>
<groupId>org.projectlombokgroupId>
<artifactId>lombokartifactId>
<optional>trueoptional>
dependency>
依賴可以官方文檔里找:https://docs.min.io/docs/java-client-quickstart-guide.html
下面介紹配置文件:
spring:
servlet:
multipart:
max-file-size:10MB
max-request-size:10MB
#minio配置
minio:
access-key:AKIAIOSFODNN7EXAMPLE#key就是docker初始化是設(shè)置的,密鑰相同
secret-key:wJalrXUtnFEMI/K7MDENG/bPxRfiCYEXAMPLEKEY
url:http://localhost:9000
bucket-name:wdhcr
thymeleaf:
cache:false
創(chuàng)建minio的配置類:
@Configuration
@ConfigurationProperties(prefix="spring.minio")
@Data
publicclassMinioConfiguration{
privateStringaccessKey;

privateStringsecretKey;

privateStringurl;

privateStringbucketName;

@Bean
publicMinioClientminioClient(){
returnMinioClient.builder()
.endpoint(url)
.credentials(accessKey,secretKey)
.build();
}
}
使用配置屬性綁定進行參數(shù)綁定,并初始化一個minio client對象放入容器中。
下面就是我封裝的minio client 操作minio的簡單方法的組件。
@Component
publicclassMinioComp{

@Autowired
privateMinioClientminioClient;

@Autowired
privateMinioConfigurationconfiguration;

/**
*@description:獲取上傳臨時簽名
*@dateTime:2021/5/1314:12
*/
publicMapgetPolicy(StringfileName,ZonedDateTimetime){
PostPolicypostPolicy=newPostPolicy(configuration.getBucketName(),time);
postPolicy.addEqualsCondition("key",fileName);
try{
Mapmap=minioClient.getPresignedPostFormData(postPolicy);
HashMapmap1=newHashMap<>();
map.forEach((k,v)->{
map1.put(k.replaceAll("-",""),v);
});
map1.put("host",configuration.getUrl()+"/"+configuration.getBucketName());
returnmap1;
}catch(ErrorResponseExceptione){
e.printStackTrace();
}catch(InsufficientDataExceptione){
e.printStackTrace();
}catch(InternalExceptione){
e.printStackTrace();
}catch(InvalidKeyExceptione){
e.printStackTrace();
}catch(InvalidResponseExceptione){
e.printStackTrace();
}catch(IOExceptione){
e.printStackTrace();
}catch(NoSuchAlgorithmExceptione){
e.printStackTrace();
}catch(ServerExceptione){
e.printStackTrace();
}catch(XmlParserExceptione){
e.printStackTrace();
}
returnnull;
}

/**
*@description:獲取上傳文件的url
*@dateTime:2021/5/1314:15
*/
publicStringgetPolicyUrl(StringobjectName,Methodmethod,inttime,TimeUnittimeUnit){
try{
returnminioClient.getPresignedObjectUrl(GetPresignedObjectUrlArgs.builder()
.method(method)
.bucket(configuration.getBucketName())
.object(objectName)
.expiry(time,timeUnit).build());
}catch(ErrorResponseExceptione){
e.printStackTrace();
}catch(InsufficientDataExceptione){
e.printStackTrace();
}catch(InternalExceptione){
e.printStackTrace();
}catch(InvalidKeyExceptione){
e.printStackTrace();
}catch(InvalidResponseExceptione){
e.printStackTrace();
}catch(IOExceptione){
e.printStackTrace();
}catch(NoSuchAlgorithmExceptione){
e.printStackTrace();
}catch(XmlParserExceptione){
e.printStackTrace();
}catch(ServerExceptione){
e.printStackTrace();
}
returnnull;
}


/**
*@description:上傳文件
*@dateTime:2021/5/1314:17
*/
publicvoidupload(MultipartFilefile,StringfileName){
//使用putObject上傳一個文件到存儲桶中。
try{
InputStreaminputStream=file.getInputStream();
minioClient.putObject(PutObjectArgs.builder()
.bucket(configuration.getBucketName())
.object(fileName)
.stream(inputStream,file.getSize(),-1)
.contentType(file.getContentType())
.build());
}catch(ErrorResponseExceptione){
e.printStackTrace();
}catch(InsufficientDataExceptione){
e.printStackTrace();
}catch(InternalExceptione){
e.printStackTrace();
}catch(InvalidKeyExceptione){
e.printStackTrace();
}catch(InvalidResponseExceptione){
e.printStackTrace();
}catch(IOExceptione){
e.printStackTrace();
}catch(NoSuchAlgorithmExceptione){
e.printStackTrace();
}catch(ServerExceptione){
e.printStackTrace();
}catch(XmlParserExceptione){
e.printStackTrace();
}
}
/**
*@description:根據(jù)filename獲取文件訪問地址
*@dateTime:2021/5/1711:28
*/
publicStringgetUrl(StringobjectName,inttime,TimeUnittimeUnit){
Stringurl=null;
try{
url=minioClient.getPresignedObjectUrl(GetPresignedObjectUrlArgs.builder()
.method(Method.GET)
.bucket(configuration.getBucketName())
.object(objectName)
.expiry(time,timeUnit).build());
}catch(ErrorResponseExceptione){
e.printStackTrace();
}catch(InsufficientDataExceptione){
e.printStackTrace();
}catch(InternalExceptione){
e.printStackTrace();
}catch(InvalidKeyExceptione){
e.printStackTrace();
}catch(InvalidResponseExceptione){
e.printStackTrace();
}catch(IOExceptione){
e.printStackTrace();
}catch(NoSuchAlgorithmExceptione){
e.printStackTrace();
}catch(XmlParserExceptione){
e.printStackTrace();
}catch(ServerExceptione){
e.printStackTrace();
}
returnurl;
}
}
簡單說明:
- 使用MultipartFile接收前端文件流,再上傳到minio。
- 構(gòu)建一個formData的簽名數(shù)據(jù),給前端,讓前端之前上傳到minio。
- 構(gòu)建一個可以上傳的臨時URL給前端,前端通過攜帶文件請求該URL進行上傳。
- 使用filename請求服務(wù)端獲取臨時訪問文件的URL。(最長時間為7 天,想要永久性訪問,需要其他設(shè)置,這里不做說明。)
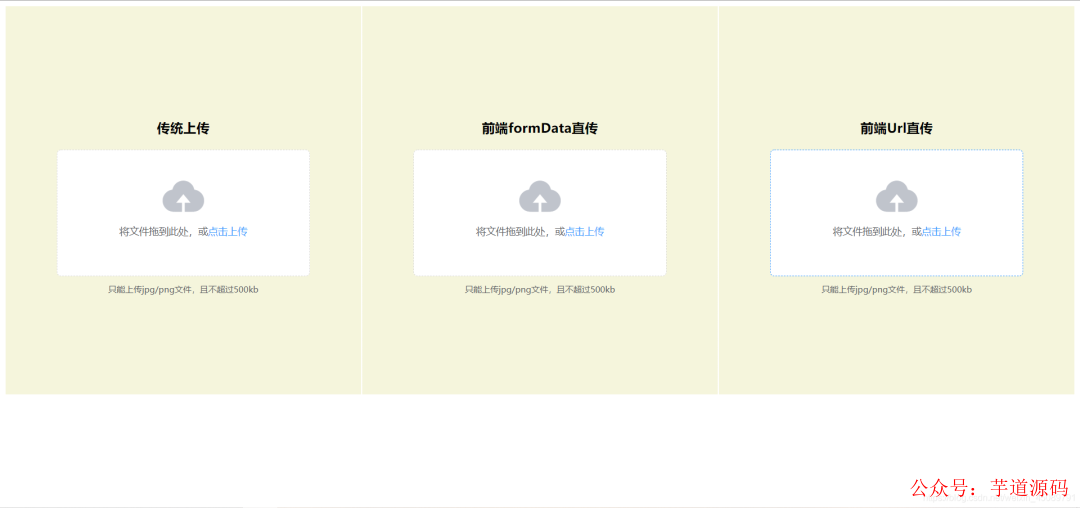
下面展示頁面html,使用的是VUE+element-ui進行渲染。
html>
<html>
<head>
<metacharset="UTF-8">

<linkrel="stylesheet"href="https://unpkg.com/element-ui/lib/theme-chalk/index.css">
<title>上傳圖片title>
head>
<body>
<divid="app">

<el-row:gutter="2">
<el-col:span="8">
<divclass="div-center-class">
<divclass="">
<center><h3>傳統(tǒng)上傳h3>center>
<el-upload
class="upload-demo"
action="#"
drag
:http-request="uploadHandle">
<iclass="el-icon-upload">i>
<divclass="el-upload__text">將文件拖到此處,或<em>點擊上傳em>div>
<divclass="el-upload__tip"slot="tip">只能上傳jpg/png文件,且不超過500kbdiv>
el-upload>
<divv-if="imgUrl">
<img:src="imgUrl"style="width:40px;height:40px">img>
div>
div>
div>
el-col>
<el-col:span="8">
<divclass="div-center-class">
<divclass="">
<center><h3>前端formData直傳h3>center>
<el-upload
class="upload-demo"
action="#"
drag
:http-request="httpRequestHandle">
<iclass="el-icon-upload">i>
<divclass="el-upload__text">將文件拖到此處,或<em>點擊上傳em>div>
<divclass="el-upload__tip"slot="tip">只能上傳jpg/png文件,且不超過500kbdiv>
el-upload>
<divv-if="directUrl">
<img:src="directUrl"style="width:40px;height:40px">img>
div>
div>
div>
el-col>
<el-col:span="8">
<divclass="div-center-class">
<divclass="">
<center><h3>前端Url直傳h3>center>
<el-upload
class="upload-demo"
action="#"
drag
:http-request="UrlUploadHandle">
<iclass="el-icon-upload">i>
<divclass="el-upload__text">將文件拖到此處,或<em>點擊上傳em>div>
<divclass="el-upload__tip"slot="tip">只能上傳jpg/png文件,且不超過500kbdiv>
el-upload>
<divv-if="uploadUrl">
<img:src="uploadUrl"style="width:40px;height:40px">img>
div>
div>
div>
el-col>
el-row>
div>
body>

<scriptsrc="https://unpkg.com/vue/dist/vue.js">script>

<scriptsrc="https://unpkg.com/element-ui/lib/index.js">script>

<scriptsrc="https://unpkg.com/axios/dist/axios.min.js">script>
<script>
newVue({
el:'#app',
data:function(){
return{
imgUrl:'',
directUrl:'',
uploadUrl:''
}
},
methods:{

uploadHandle(options){
let{file}=options;
this.traditionPost(file);
},
traditionPost(file){
_that=this
constform=newFormData();
form.append("fileName",file.name);
form.append("file",file);
this.axiosPost("post","/upload",form).then(function(res){
if(res.status===200){
_that.imgUrl=res.data.data
}else{
alert("上傳失敗!")
}
})
},
getpolicy(file){
_that=this
axios.get('policy?fileName='+file.name)
.then(function(response){
let{xamzalgorithm,xamzcredential,policy,xamzsignature,xamzdate,host}=response.data.data;
letformData=newFormData();
formData.append("key",file.name);
formData.append("x-amz-algorithm",xamzalgorithm);//讓服務(wù)端返回200,不設(shè)置則默認返回204。
formData.append("x-amz-credential",xamzcredential);
formData.append("policy",policy);
formData.append("x-amz-signature",xamzsignature);
formData.append("x-amz-date",xamzdate);
formData.append("file",file);
//發(fā)送POST請求
_that.axiosPost("post",host,formData).then(function(res){
if(res.status===204){
axios.get('url?fileName='+file.name).then(function(res){
_that.directUrl=res.data.data;
})
}else{
alert("上傳失敗!")
}
})
})
},
httpRequestHandle(options){
let{file}=options;
this.getpolicy(file);
},

UrlUploadHandle(options){
let{file}=options;
this.getUploadUrl(file);
},
getUploadUrl(file){
_that=this
console.log(file)
axios.get('uploadUrl?fileName='+file.name)
.then(function(response){
leturl=response.data.data;
//發(fā)送put請求
letconfig={'Content-Type':file.type}
_that.axiosPost("put",url,file,config).then(function(res){
if(res.status===200){
axios.get('url?fileName='+file.name).then(function(res){
_that.uploadUrl=res.data.data;
})
}else{
alert("上傳失敗!")
}
})
})
},
//封裝
//axios封裝post請求
axiosPost(method,url,data,config){
letresult=axios({
method:method,
url:url,
data:data,
headers:config
}).then(resp=>{
returnresp
}).catch(error=>{
return"exception="+error;
});
returnresult;
}

}
})
script>
<style>
.div-center-class{
padding:28%0%;
text-align:center;
background:beige;
}
style>
html>
可以分別體驗不同的實現(xiàn)效果。
以上就是使用springboot搭建基于minio的高性能存儲服務(wù)的全部步驟了。
項目地址是:
https://gitee.com/jack_whh/minio-upload
審核編輯 :李倩
-
云存儲
+關(guān)注
關(guān)注
7文章
756瀏覽量
46069 -
機器學(xué)習(xí)
+關(guān)注
關(guān)注
66文章
8424瀏覽量
132765 -
Docker
+關(guān)注
關(guān)注
0文章
478瀏覽量
11873
原文標題:Spring Boot + minio 實現(xiàn)高性能存儲服務(wù),So Easy~!
文章出處:【微信號:芋道源碼,微信公眾號:芋道源碼】歡迎添加關(guān)注!文章轉(zhuǎn)載請注明出處。
發(fā)布評論請先 登錄
相關(guān)推薦
docker的基本命令和使用示例
Flexus 云服務(wù)器 X 實例:在 Docker 環(huán)境下搭建 java 開發(fā)環(huán)境
企業(yè)云服務(wù)器平臺設(shè)計與搭建
docker-compose配置文件內(nèi)容詳解以及常用命令介紹

搭建開源大語言模型服務(wù)的方法
云服務(wù)器搭建步驟
ARM平臺實現(xiàn)Docker容器技術(shù)
ARM平臺實現(xiàn)Docker容器技術(shù)
寶塔面板Docker一鍵安裝:部署GPTAcademic,開發(fā)私有GPT學(xué)術(shù)優(yōu)化工具
關(guān)于Docker 的清理命令集錦
ARM平臺實現(xiàn)Docker容器技術(shù)


 使用docker搭建minio服務(wù)



評論