本文來源電子發燒友社區,作者:碼農愛學習, 帖子地址:https://bbs.elecfans.com/jishu_2307434_1_1.html
EASY EAI Nano屏幕顯示攝像頭測試(附上體驗視頻,詳見作者原貼)
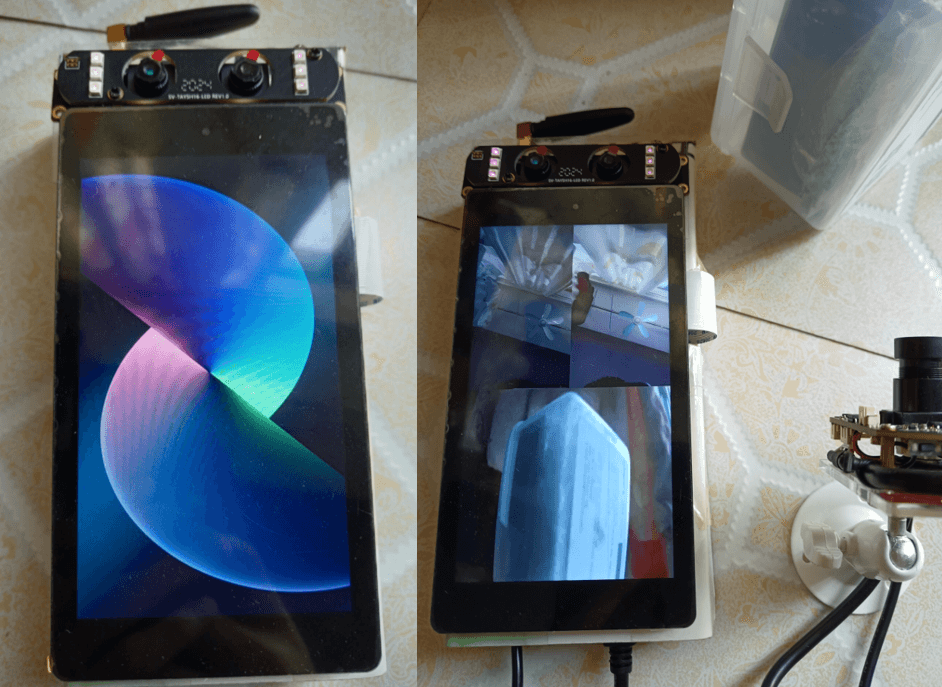
本篇進行EASY EAI Nano的屏幕顯示與攝像頭顯示測試,先來看下最終的測試效果:
本篇測評參考了官方文檔的一些內容:https://www.easy-eai.com/document_details/3/129
1 攝像頭
1.1 MIPI CSI-2接口簡介
MIPI CSI-2接口是由MIPI聯盟下的Camera工作組指定的CSI(Camera Serial Interface)的第2版接口標準,主要由應用層、協議層、物理層組成,最大支持4個虛擬通道傳輸數據。
EASY EAI Nano的雙面攝像頭,包括一個RGB攝像頭和一個紅外攝像頭,都是MIPI CSI-2接口。
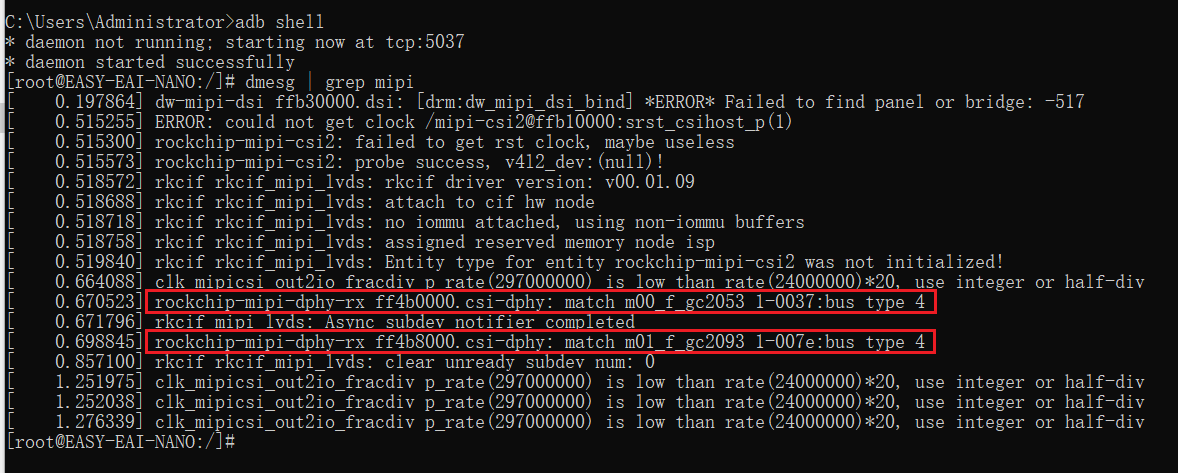
通過指令檢查EASY EAI nano的MIPI-CSI2接口模塊是否正常工作
dmesg | grep mipi
1.2 三種類型的攝像頭
1.2.1 RGB攝像頭與IR攝像頭
MIPI CSI-2的RGB攝像頭在EASY EAI Nano套件下的位置定義如下所示,占用J3的bit1~18
MIPI CSI-2的紅外攝像頭在EASY EAI Nano套件下的位置定義如下所示,占用J3的bit22~37

1.2.2 USB攝像頭
USB攝像頭是基于UVC驅動工作的,
USB設備具有熱插拔、易擴展等特性,故應用場合十分廣泛。
在Linux系統通過sysfs管理USB設備。
EASY EAI nano評估套件上集成了多路USB接口,其中有2路USB2.0 Host、1路USB2.0 Device。
1.3 攝像頭操作的API介紹
EASY EAI nano已庫文件+頭文件的形式提供了攝像頭的使用,攝像頭的底層操作邏輯看不到,我們只需要關系頭文件中API接口的使用方法即可。
| 選項 | 描述 |
|---|---|
| 頭文件目錄 | -I easyeai-api/peripheral_api/camera |
| 庫文件目錄 | -L easyeai-api/ peripheral_api/camera |
| 庫連接參數 | -lcamera |
easyeai-api/peripheral_api/camera/camera.h中的主要接口
/* usb camera */
int usbcamera_init(int bus, int port, int width, int height, int rot);
void usbcamera_exit(int bus, int port);
int usbcamera_getframe(int bus, int port, char *pbuf);
void usbcamera_preset_fps(int fps);
?
/* rgb camera */
int rgbcamera_init(int width, int height, int rot);
void rgbcamera_exit(void);
int rgbcamera_getframe(char *pbuf);
void rgbcamera_set_format(int format);
?
/* ir camera */
int ircamera_init(int width, int height, int rot);
void ircamera_exit(void);
int ircamera_getframe(char *pbuf);
void ircamera_set_format(int format);
1.4 測試例程
三種攝像頭的使用方式類似,RGB攝像頭IR攝像頭的使用方式幾乎一樣
RGB/IR攝像頭的使用:
// 打開攝像頭
#define CAMERA_WIDTH 720
#define CAMERA_HEIGHT 1280
ret = rgbcamera_init(CAMERA_WIDTH, CAMERA_HEIGHT, 90);
?
//獲取圖片
ret = rgbcamera_getframe(pbuf);
?
//保存圖片
fp = fopen("/tmp/photo", "w");
fwrite(pbuf, 1, IMAGE_SIZE, fp);
fclose(fp);
?
//釋放攝像頭
rgbcamera_exit();
USB攝像頭的使用:
// 打開攝像頭
#define CAMERA_WIDTH 720
#define CAMERA_HEIGHT 1280
ret = usbcamera_init(USB2_0, USB_DIRECT, CAMERA_WIDTH, CAMERA_HEIGHT, 90);
?
//獲取圖片
ret = usbcamera_getframe(USB2_0, USB_DIRECT, pbuf);
?
//保存圖片
fp = fopen("/tmp/photo", "w");
fwrite(pbuf, 1, IMAGE_SIZE, fp);
fclose(fp);
?
//釋放USB攝像頭
usbcamera_exit(USB2_0, USB_DIRECT);
以上測試函數,會用攝像頭拍一張照片,并保存到/tmp目錄中。
2 顯示屏
2.1 DRM驅動框架介紹
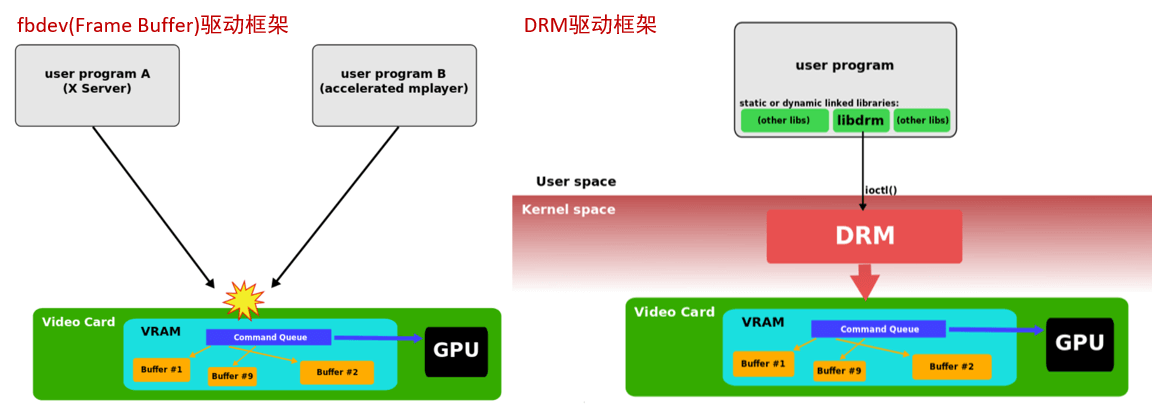
EASY EAI nano評估板上默認支持5寸顯示屏(帶電容觸摸屏),分辨率為720x1280,EASY EAI nano產品使用DRM(Direct Rendering Manager)驅動框架實現多應用同時使用同一個顯示器的目的,而EASY-EAI-Toolkit的display庫則是對DRM的封裝。
2.2 顯示屏操作的API介紹
頭文件與庫文件
| 選項 | 描述 |
|---|---|
| 頭文件目錄 | -I easyeai-api/peripheral_api/display |
| 庫文件目錄 | -L easyeai-api/ peripheral_api/display |
| 庫鏈接參數 | -ldisplay |
easyeai-api/peripheral_api/display/disp.h中的主要接口
/* 公共api */
void disp_preset_uiLayer(int enable);
?
/* 適合初次使用 */
int disp_init(int width, int height); //默認輸入RGB888
void disp_exit(void);
void disp_commit(void *ptr, int data_len);
?
/* pro, 顯示多路視頻時,或旋轉輸入圖像角度,或裁切圖像*/
int disp_init_pro(disp_screen_t *screen);
void disp_exit_pro(void);
void disp_commit_pro(void *ptr, int chn, int data_len);
一些參數的含義:
- width:顯示區域寬度
- height:顯示區域高度
- ptr:用戶空間的顯示內容空間
- data_len:輸入圖像數據內存長度
- screen:顯示屏屬性,包含顯示區域大小、子窗口的描述等
- chn:目標窗口索引號
結構體定義
typedef struct disp_win {
int enable;
int win_x;
int win_y;
int win_w;
int win_h;
int rotation;//順時針旋轉輸入圖像角度,支持90、180、270、0度
IMAGE_TYPE_E in_fmt;
int in_w;//輸入圖像寬度
int in_h;//輸入圖像高度
int HorStride;//輸入圖像水平步長
int VirStride;//輸入圖像垂直步長
/* 如果不設置crop系列參數,則默認拉伸原圖鋪滿整個win ;
*設置crop則先裁切再把裁切后的圖像鋪滿整個win,以便保持圖像寬高比例
*/
int crop_x;//裁切起始X坐標(基于旋轉前圖像的坐標系)
int crop_y;//裁切起始Y坐標(基于旋轉前圖像的坐標系)
int crop_w;//裁切后的圖像寬度(以旋轉前的圖像為參考)
int crop_h;//裁切后的圖像高度(以旋轉前的圖像為參考)
} disp_win_t;
?
typedef struct disp_screen {
int screen_width;
int screen_height;
disp_win_t wins[VMIX_MAX_CHN_NUM];
} disp_screen_t;
2.3 測試例程
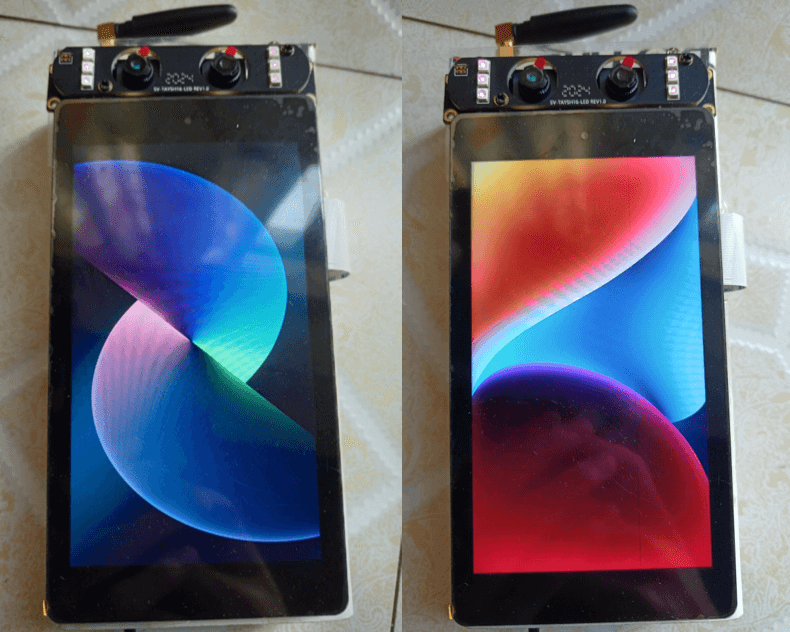
參考官方給的例程,進行修改,增加通過參數顯示指定圖片的功能,測試不同圖片顯示到屏幕的效果。
my-display.c的主程序如下:
int main(int argc, char *argv[])
{
char *img_path = IMAGE_PATH;
if (argc == 2)
{
img_path = argv[1];
printf("recv:%sn", img_path);
}
int ret = 0;
char *pbuf = NULL;
FILE *fp = NULL;
disp_screen_t screen = {0};
?
signal(SIGINT, sigterm_handler);
?
/* 1、準備圖像數據 */
pbuf = (char *)malloc(IMAGE_SIZE);
if (!pbuf) {
printf("malloc error: %s, %dn", __func__, __LINE__);
return -1;
}
fp = fopen(img_path, "r");
if (!fp) {
printf("fopen error: %s, %dn", __func__, __LINE__);
return -1;
}
ret = fread(pbuf, 1, IMAGE_SIZE, fp);
fclose(fp);
if (ret != IMAGE_SIZE) {
printf("fread error: %s, %dn", __func__, __LINE__);
free(pbuf);
return -1;
}
?
/* 2、初始化顯示 */
screen.screen_width = DISP_WIDTH;
screen.screen_height = DISP_HEIGHT;
screen.wins[0].enable = 1;
screen.wins[0].win_x = 0;
screen.wins[0].win_y = 0;
screen.wins[0].win_w = 720;
screen.wins[0].win_h = 1280;
screen.wins[0].rotation = 0;
screen.wins[0].in_fmt = IMAGE_TYPE_RGB888;
screen.wins[0].in_w = DISP_WIDTH;
screen.wins[0].in_h = DISP_HEIGHT;
screen.wins[0].HorStride = DISP_WIDTH;
screen.wins[0].VirStride = DISP_HEIGHT;
?
ret = disp_init_pro(&screen);
if (ret) {
printf("error func:%s, line:%dn", __func__, __LINE__);
goto exit1;
}
?
/* 3、提交顯示 */
g_run = 1;
disp_commit_pro(pbuf, 0, IMAGE_SIZE);
while(g_run) {
sleep(1);
}
?
disp_exit_pro();
exit1:
free(pbuf);
pbuf = NULL;
return ret;
}
修改CMakeLists.txt,增加如下內容:
#--------------------------
# my-display
#--------------------------
link_directories(${toolkit_root}/peripheral_api/display)#-L
add_executable(my-display my-display.c)#-o
target_link_libraries(my-display pthread easymedia display)#-l
target_include_directories(my-display PRIVATE ${api_inc})#-I
在執行函數時,附加一個圖片的路徑參數,可以顯示指定的圖片:
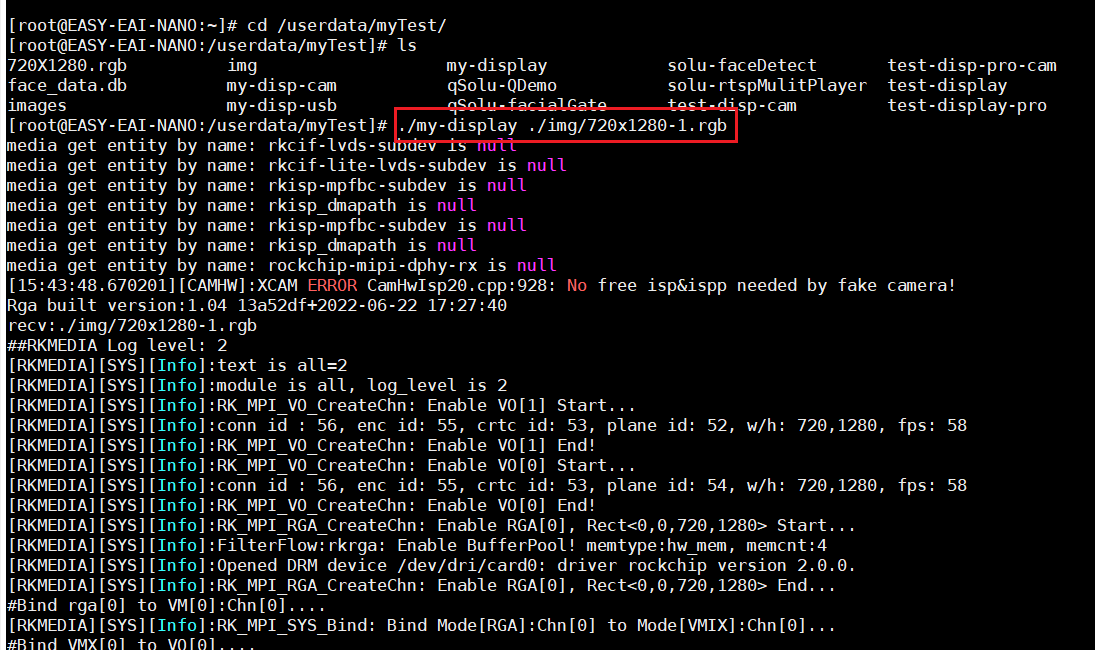
準備一些測試圖片,格式為RGB888,分辨率720x1280,測試顯示兩張不同圖片的效果:
3 攝像頭+屏幕程序代碼分析
參考官方的攝像頭顯示例程,將紅外攝像頭、RGB攝像頭和USB攝像頭采集的畫面同時顯示到屏幕中,改寫的測試代碼如下。
my-disp-cam.c的主程序如下:
int main()
{
char *prgb = NULL;
char *pir = NULL;
char *pusb = NULL;
int ret = 0;
disp_screen_t screen = {0};
bool bHasUSBCamear = false;
signal(SIGINT, sigterm_handler);
/* camera init */
ret = rgbcamera_init(CAMERA_WIDTH, CAMERA_HEIGHT, 90);
if (ret) {
printf("error func:%s, line:%dn", __func__, __LINE__);
goto exit_donothing;
}
ret = ircamera_init(CAMERA_WIDTH, CAMERA_HEIGHT, 270); //此角度由攝像頭模組決定
if (ret) {
printf("error func:%s, line:%dn", __func__, __LINE__);
goto exit_freergb;
}
ret = usbcamera_init(USB2_0, USB_DIRECT, CAMERA_WIDTH, CAMERA_HEIGHT, 180);
if (ret) {
printf("error func:%s, line:%dn", __func__, __LINE__);
}
else
{
bHasUSBCamear = true;
}
/* display init */
screen.screen_width = DISP_WIDTH;
screen.screen_height = DISP_HEIGHT;
screen.wins[0].enable = 1;
screen.wins[0].in_fmt = IMAGE_TYPE_RGB888;
screen.wins[0].in_w = CAMERA_WIDTH;
screen.wins[0].in_h = CAMERA_HEIGHT;
screen.wins[0].rotation = 0;
screen.wins[0].win_x = 0;
screen.wins[0].win_y = 0;
screen.wins[0].win_w = 360;
screen.wins[0].win_h = 640;
screen.wins[1].enable = 1;
screen.wins[1].in_fmt = IMAGE_TYPE_RGB888;
screen.wins[1].in_w = CAMERA_WIDTH;
screen.wins[1].in_h = CAMERA_HEIGHT;
screen.wins[1].rotation = 0;
screen.wins[1].win_x = 360;
screen.wins[1].win_y = 0;
screen.wins[1].win_w = 360;
screen.wins[1].win_h = 640;
if (bHasUSBCamear)
{
screen.wins[2].enable = 1;
screen.wins[2].in_fmt = IMAGE_TYPE_RGB888;
screen.wins[2].in_w = CAMERA_WIDTH;
screen.wins[2].in_h = CAMERA_HEIGHT;
screen.wins[2].rotation = 0;
screen.wins[2].win_x = 0;
screen.wins[2].win_y = 640;
screen.wins[2].win_w = 720;
screen.wins[2].win_h = 640;
}
ret = disp_init_pro(&screen);
if (ret) {
printf("error func:%s, line:%dn", __func__, __LINE__);
goto exit_freergb_freeir;
}
/* alloc buffer for cap data */
prgb = (char *)malloc(IMAGE_SIZE);
if (!prgb) {
printf("error: %s, %dn", __func__, __LINE__);
ret = -1;
goto exit_freergb_freeir_freedisp;
}
pir = (char *)malloc(IMAGE_SIZE);
if (!pir) {
printf("error: %s, %dn", __func__, __LINE__);
ret = -1;
goto exit_freergb_freeir_freedisp_freeprgb;
}
if (bHasUSBCamear)
{
pusb = (char *)malloc(IMAGE_SIZE);
if (!pusb) {
printf("error: %s, %dn", __func__, __LINE__);
}
}
g_run = 1;
while(g_run) {
ret = ircamera_getframe(pir);
if (!ret) {
disp_commit_pro(pir, 0, IMAGE_SIZE);
}
ret = rgbcamera_getframe(prgb);
if (!ret) {
disp_commit_pro(prgb, 1, IMAGE_SIZE);
}
if (bHasUSBCamear)
{
ret = usbcamera_getframe(USB2_0, USB_DIRECT, pusb);
if (!ret) {
disp_commit_pro(pusb, 2, IMAGE_SIZE);
}
}
}
if (bHasUSBCamear)
{
free(pusb);
pusb = NULL;
usbcamera_exit(USB2_0, USB_DIRECT);
}
free(pir);
pir = NULL;
exit_freergb_freeir_freedisp_freeprgb:
free(prgb);
prgb = NULL;
exit_freergb_freeir_freedisp:
disp_exit_pro();
exit_freergb_freeir:
ircamera_exit();
exit_freergb:
rgbcamera_exit();
exit_donothing:
return ret;
}
修改CMakeLists.txt,增加如下內容:
#--------------------------
# my-disp-cam
#--------------------------
link_directories(${toolkit_root}/peripheral_api/display) #-L
link_directories(${toolkit_root}/peripheral_api/camera) #-L
add_executable(my-disp-cam my-disp-cam.c) #-o
target_link_libraries(my-disp-cam pthread rkaiq rkfacial rga easymedia display camera) #-l
target_include_directories(my-disp-cam PRIVATE ${api_inc}) #-I
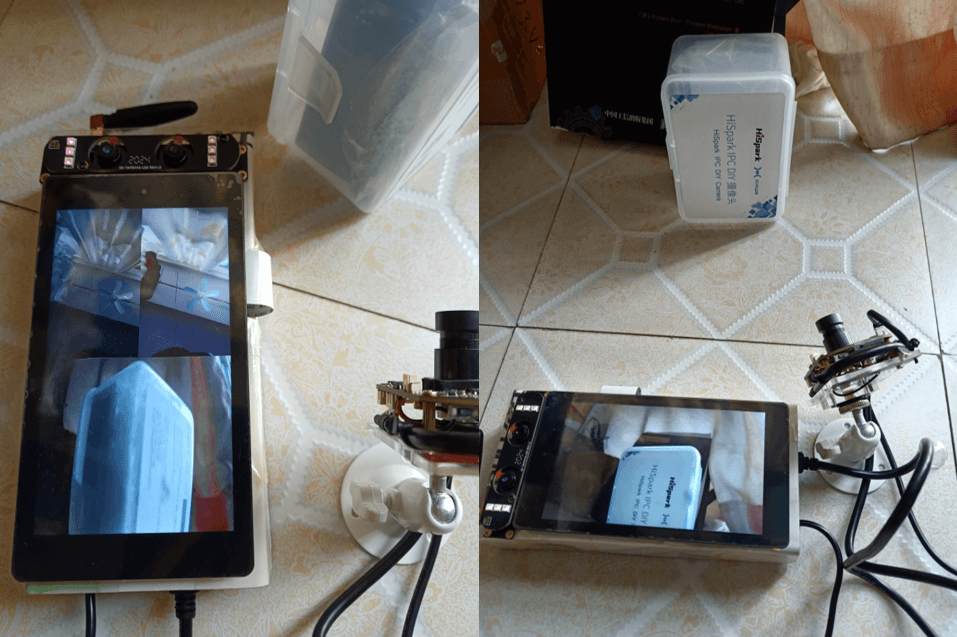
測試效果如下圖左圖,3個攝像頭可以同時顯示到屏幕,實測當攝像頭運動時,屏幕顯示的畫面也十分流暢。
另外,還可以修改攝像頭和屏幕的顯示方向,如下圖右圖,就是將USB攝像頭橫屏顯示的效果。
4 總結
本篇對EASY EAI Nano的屏幕和攝像頭的顯示功能進行測評,測試了屏幕顯示不同的圖片,屏幕顯示不同的攝像頭(MIPI紅外攝像頭、MIPI RGB攝像頭、外接USB攝像頭),以及多個攝像頭的同時顯示與屏幕顯示方向的測試。
-
開發板
+關注
關注
25文章
5707瀏覽量
105199 -
靈眸
+關注
關注
0文章
20瀏覽量
3314
發布評論請先 登錄
【EASY EAI Orin Nano開發板試用體驗】使用Linux posix文件讀取接口和LVGL的animimg(圖像動畫)控件實現動畫播放以及
【EASY EAI Orin Nano開發板試用體驗】EASY-EAI-Toolkit人臉識別
【EASY EAI Orin Nano開發板試用體驗】--USB攝像頭使用
【EASY EAI Orin Nano開發板試用體驗】人臉識別提升
【EASY EAI Orin Nano開發板試用體驗】EASY-EAI-Toolkit通用組件體驗
【EASY EAI Orin Nano開發板試用體驗】EASY-EAI-Toolkit初體驗
【EASY EAI Orin Nano開發板試用體驗】開箱和固件燒錄更新體驗
【EASY EAI Orin Nano開發板試用體驗】人臉識別體驗
【EASY EAI Orin Nano開發板試用體驗】--開發板開箱了解
【EASY EAI Orin Nano開發板試用體驗】安裝nfs服務器
【EASY EAI Orin Nano開發板試用體驗】開發環境準備
基于RK3576開發板的網絡攝像頭方案
【幸狐Omni3576邊緣計算套件試用體驗】測試USB 攝像頭
使用myAGV、Jetson Nano主板和3D攝像頭,實現了RTAB-Map的三維建圖功能!


評論