本文來源電子發燒友社區,作者:HonestQiao, 帖子地址:https://bbs.elecfans.com/jishu_2289947_1_1.html
CF3310開發板是國產首創RISC-V安全微控制器,從官方資料可以了解到其所支持的安全功能:
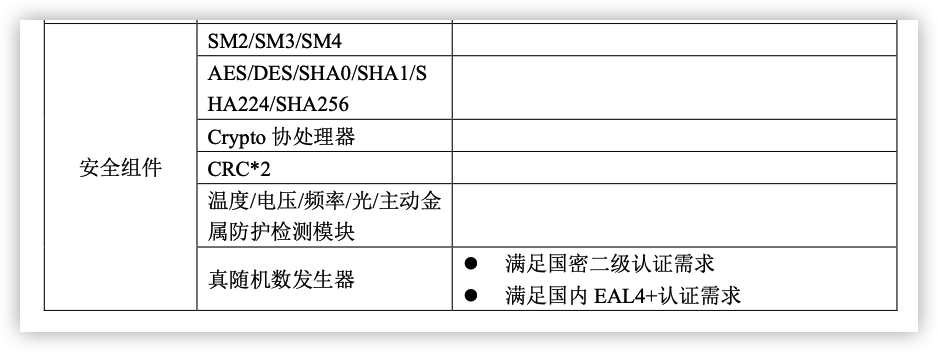
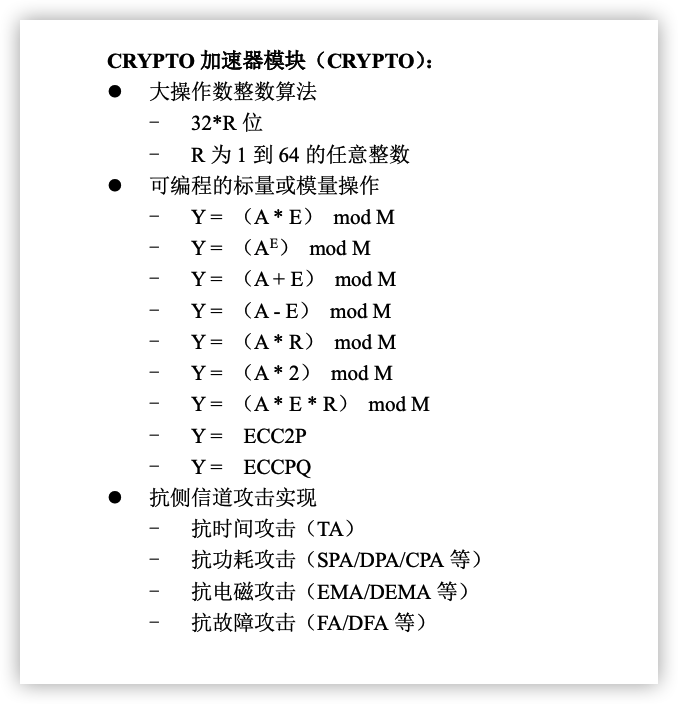
其在硬件上,對加密功能進行了針對性的加強:
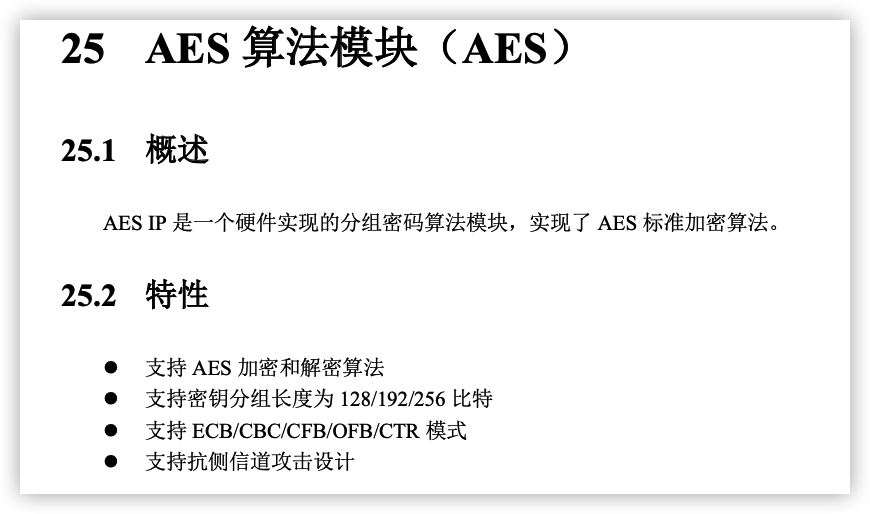
并在硬件級別提供了多種加密算法:
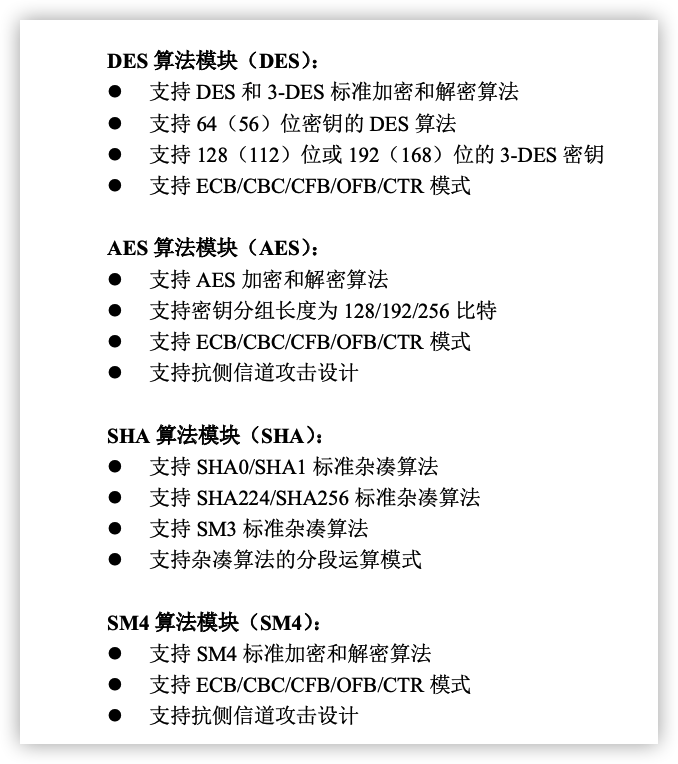
在經過學習官方資料包中提供的demo,以及經過官方技術人員手把手的指導,結合自己所了解的Python加密知識,實現了串口加密通信。
這篇分享中,演示的是從開發板發送經過加密處理的數據;
然后在上位機上,接收并解密對應的數據。
在開始之前,請先閱讀我的上一篇分享【CF3310開發板的串口使用】?,了解串口的使用。
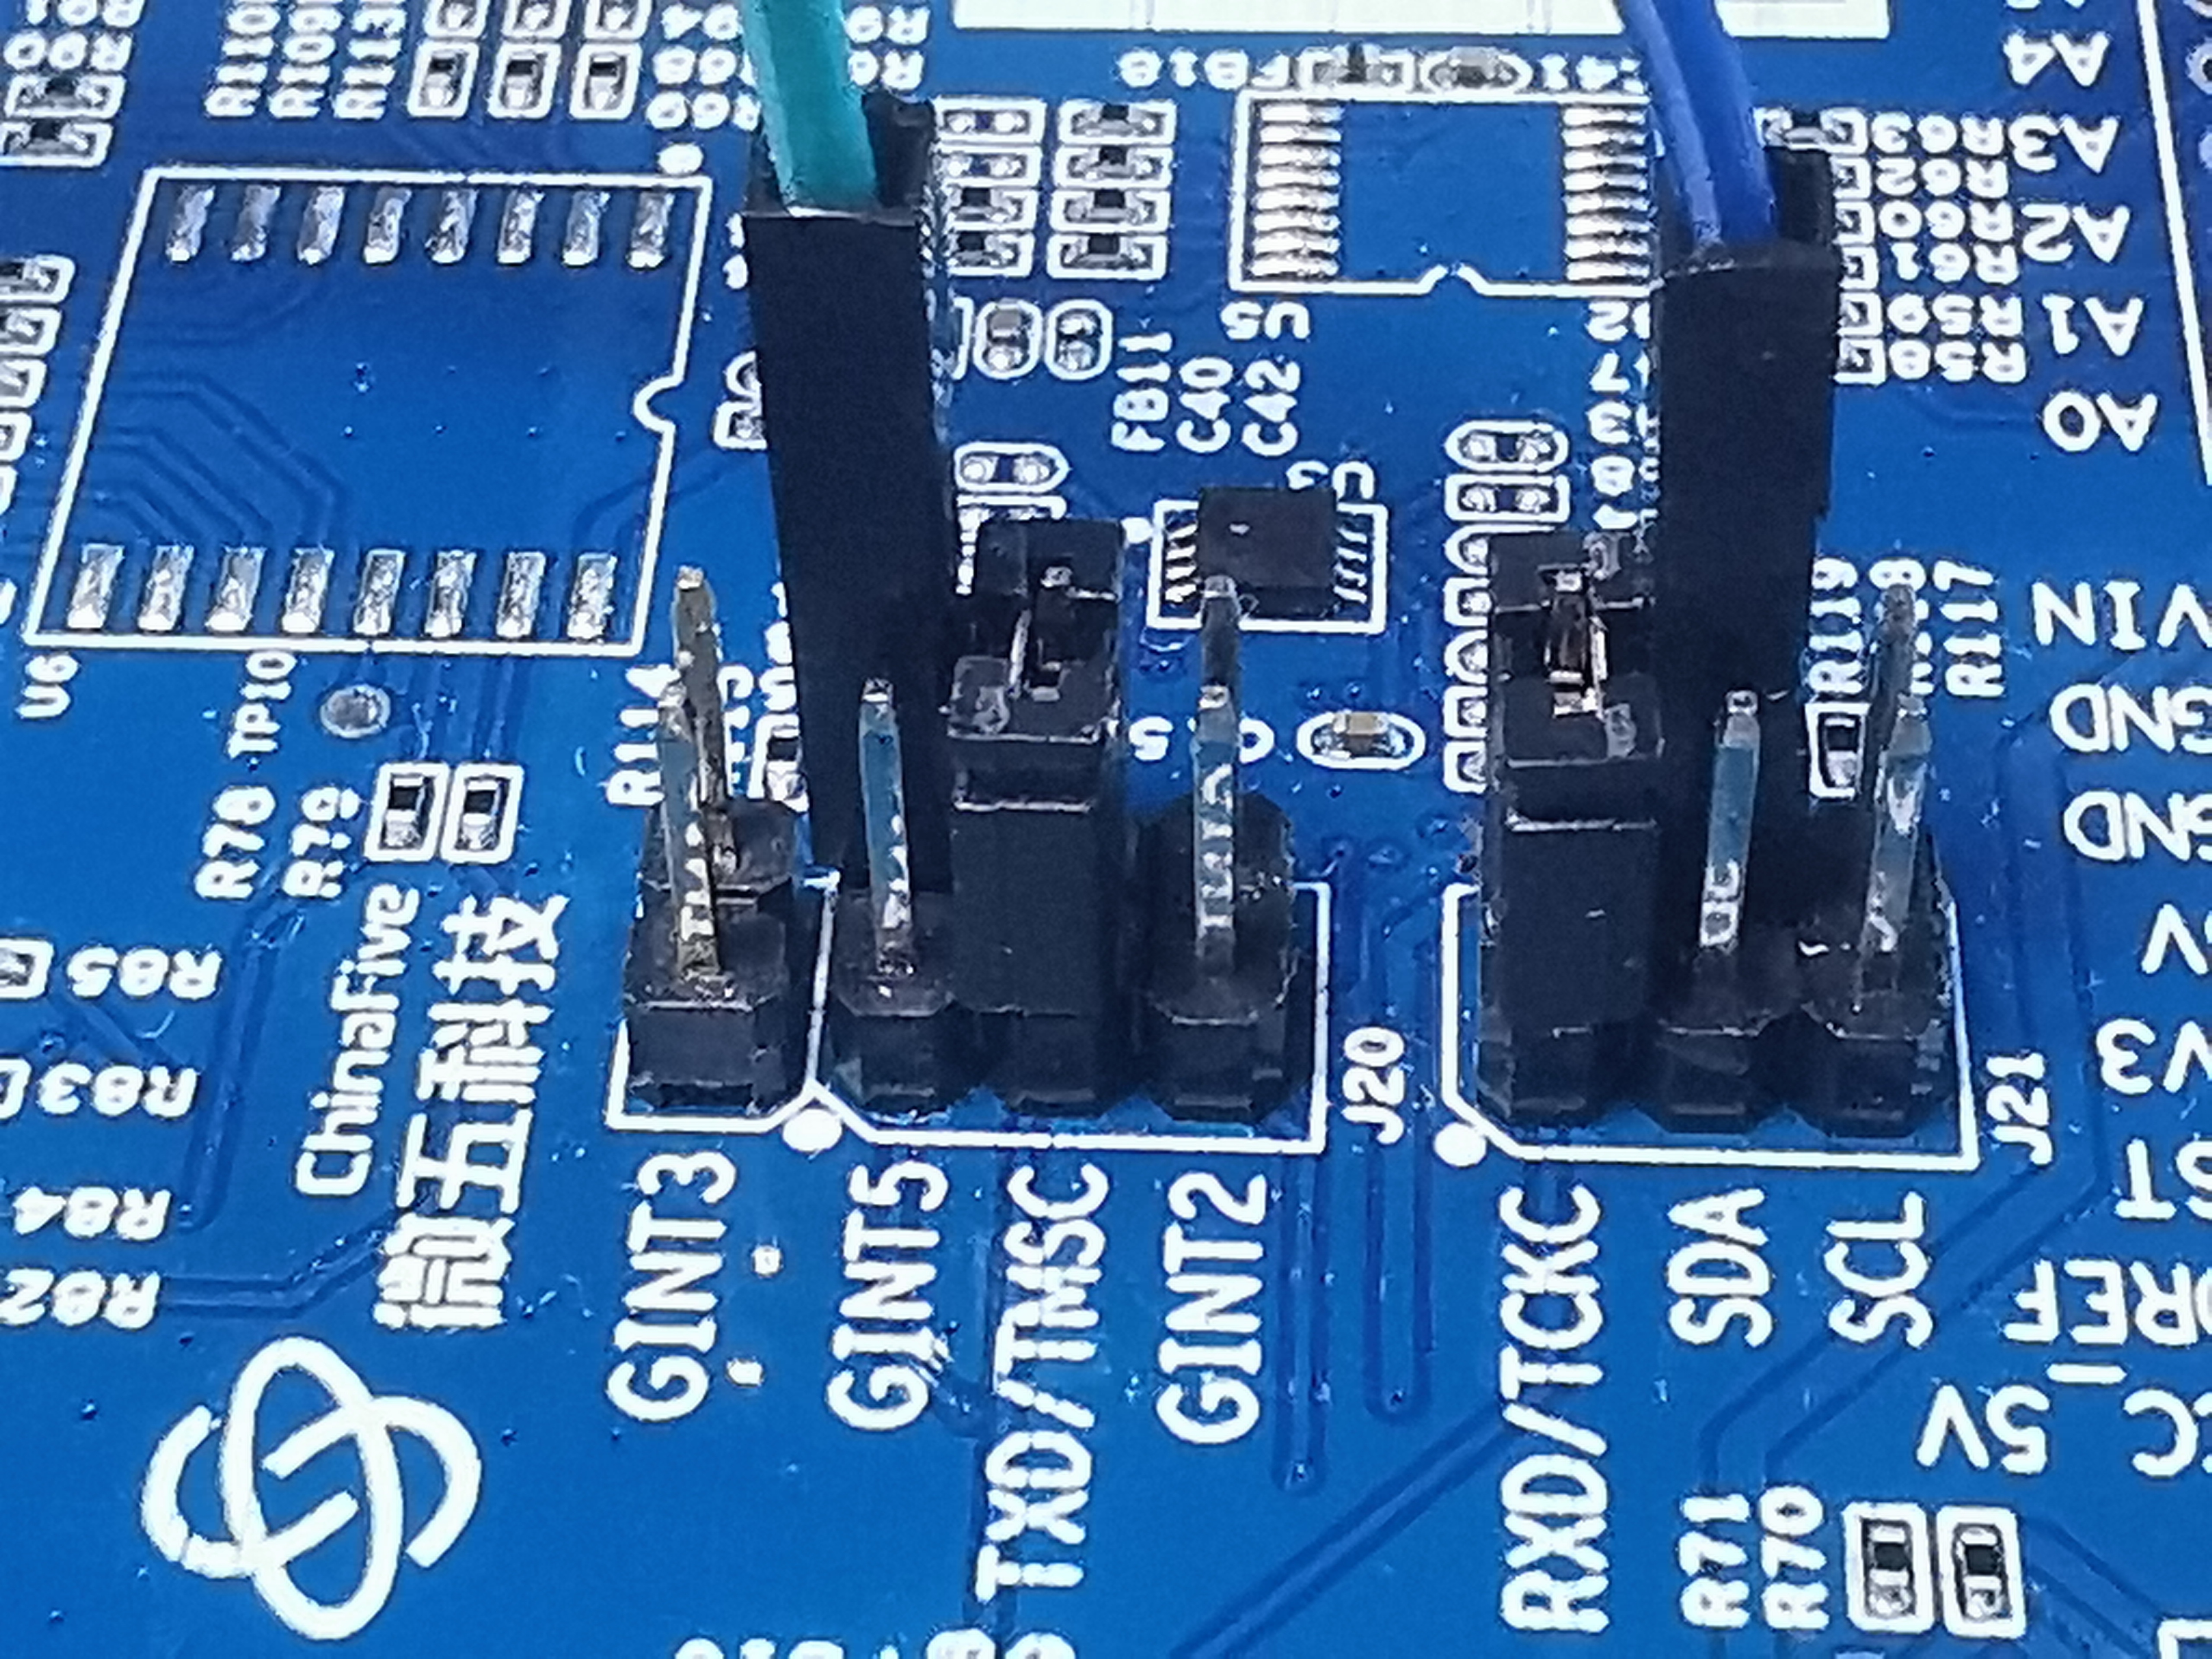
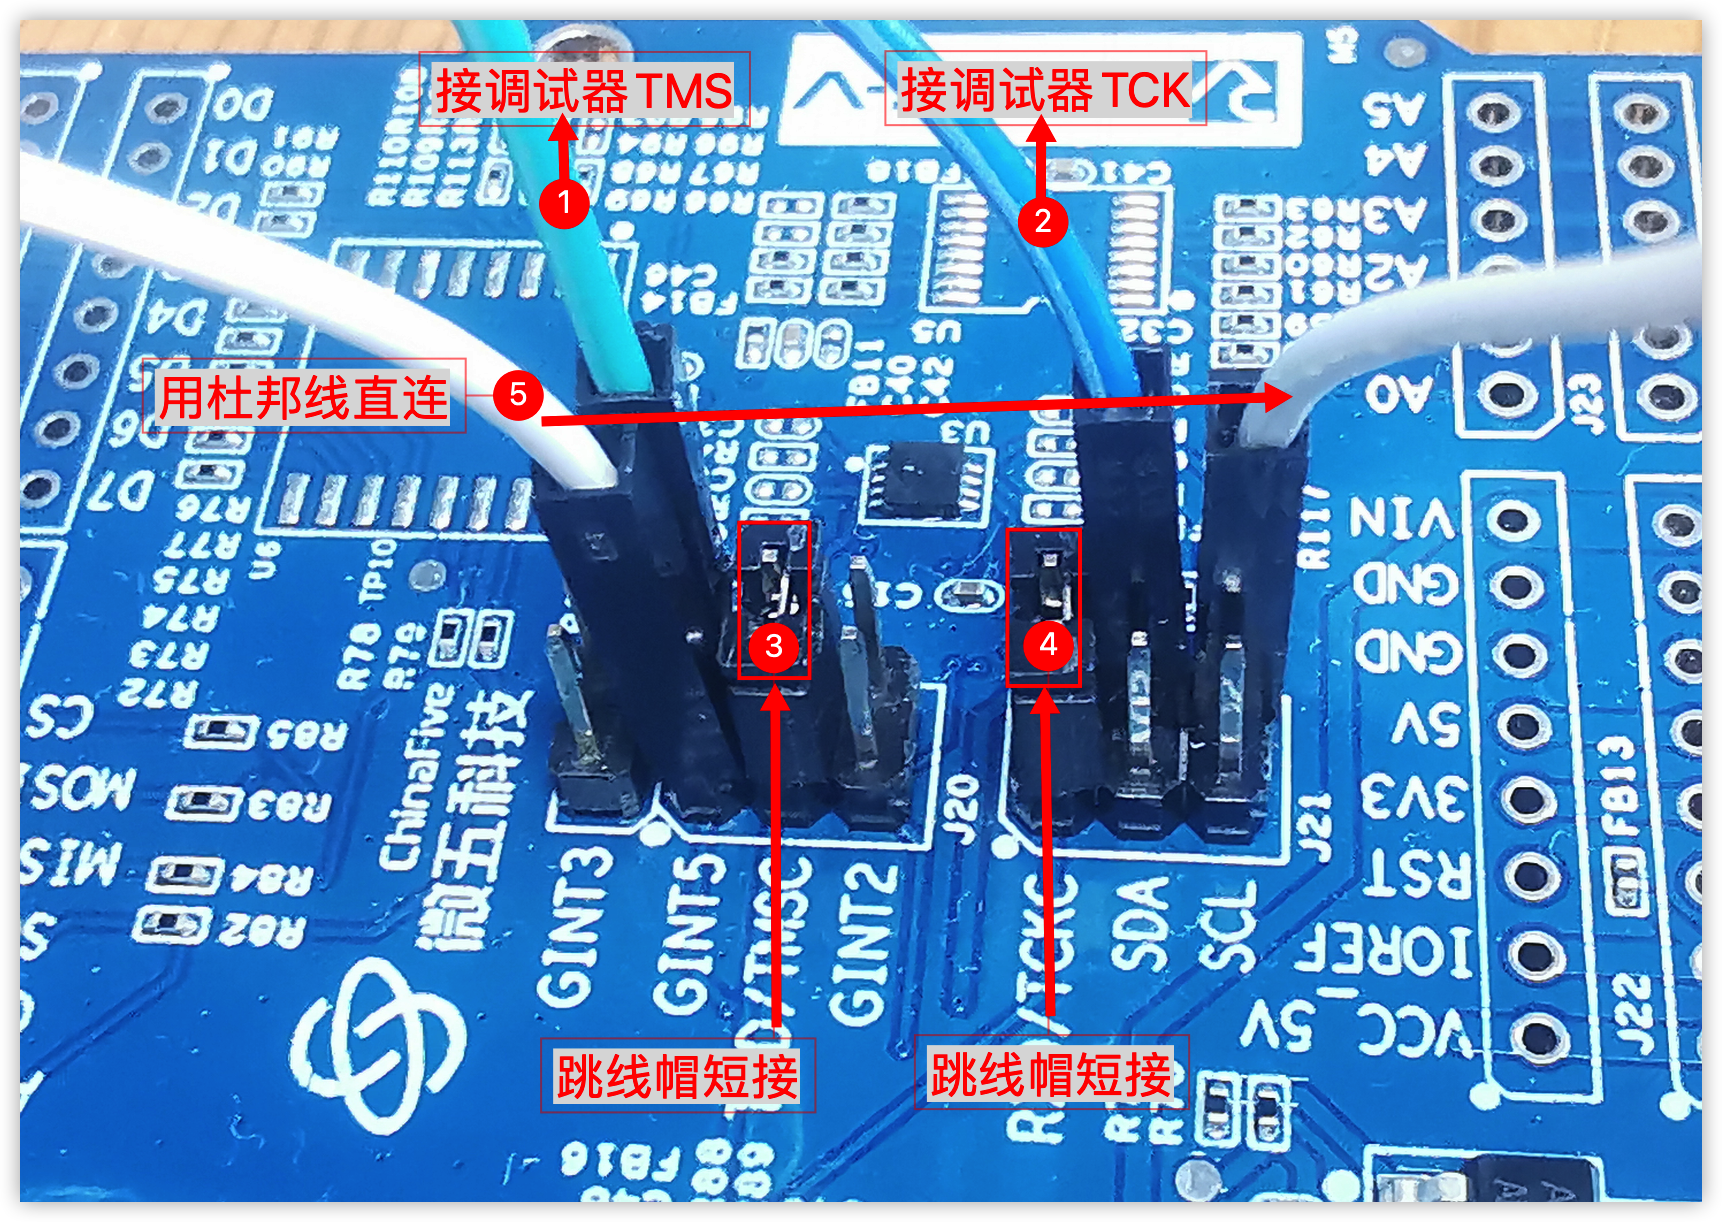
可以直接使用跳線帽,按照如圖所示短接對應的引腳,這樣Type-C口連接到電腦后,就能直接使用串口工具連接其對應的串口進行調試了:
然后,我選擇的加密方式為AES_CBC:
先查看官方演示代碼的src/demo/algo_demo.c中AES部分的代碼,來了解加密解密的具體處理。
因為要使用AES_CBC加密,所以重點關注其中:aes.type = ALG_ECB、aes.KBits = ALG_KEY128部分的代碼:
aes.mode = ALG_ENCRYPT;
	aes.type = ALG_ECB;

	aes.KBits = ALG_KEY128;

	HAL_AES_SetSecurityLevel(&aes);

	if(HAL_AES_Cryptographic(&aes,(uint8_t *)key,(uint8_t *)iv,(uint8_t *)plain,temp,32))
	{
		RETERR();
	}

	if(memcmp((uint8_t *)cipher_aes128_ecb,temp,32) != 0)
	{
		RETERR();
	}

	printf("	通過
");
上述代碼中,重點是加密函數:
uint8_t HAL_AES_Cryptographic(AES_ConfigTypeDef *hcfg,uint8_t *pKey,uint8_t *pIV,uint8_t *srcBuffer,uint8_t *destBuffer,uint32_t length)
官方提供的各種加密算法,都通過該函數進行調用,來獲取加密后的結果。
其參數分別為:
- hcfg:AES加密定義
- pKey:加密密鑰
- pIV:加密偏移向量
- srcBuffer:明文
- destBuffer:加密結果
- length:塊大小
最終,實際實現的代碼如下:
/**
 * [url=home.php?mod=space&uid=1455510]@file[/url]    uart_sec.c
 * [url=home.php?mod=space&uid=40524]@author[/url]  HonestQiao
 * [url=home.php?mod=space&uid=644434]@version[/url] V1.0
 * @date    2022.6.28
 * [url=home.php?mod=space&uid=2666770]@Brief[/url]   uart sec test
 *
 */
// eport
#include "eport_hal.h"

// uart
#include "uart_hal.h"

// algo
#include "algo_demo.h"
#include "algo_hal.h"
#include "trng_hal.h"

#include "cpm_hal.h"
#include "hal.h"

#include "delay.h"
#include "debug.h"

uint8_t uart_tx_buf[128];
uint8_t uart_rx_buf[128];
UART_HandleTypeDef UART_Handle;

int32_t counter = 0;

void AES_SEND_TEST(void)
{
    AES_ConfigTypeDef aes;

    uint8_t len = 0;
    uint8_t loop = 0;

    uint8_t key[32] = "1234567890654321";   // 加加密密鑰
    uint8_t iv[] = "9876543210123456";      // AES_ECB實際不用
    uint8_t plain[32];                      // 非存放明文
    uint8_t temp[32];                       // 臨時存放加密后的結果

    len = strlen(key);
    memset(key + len, 0x00, 32 - len);      // 將加密密鑰用 0x00 填充到32位
    memset(plain, 0x00, 32);                // 明文清空
    memset(temp, 0x00, 32);                 // 加密結果存放清空

    counter++;                              // 計數器遞增
    if (counter > 999999)                   // 最大6位數
    {
        counter = 1;
    }
    sprintf(plain, "%06d", counter);        // 將要被加密的明文信息

    // printf("key=%s len=%d
", key, sizeof(key) / sizeof(key[0]));
    // printf("plain=%s len=%d
", plain, sizeof(plain) / sizeof(plain[0]));

    // 設置AES_ECB128加密
    aes.level = dpa_disable;
    aes.type = ALG_ECB;
    aes.KBits = ALG_KEY128;
    aes.mode = ALG_ENCRYPT;
    HAL_AES_SetSecurityLevel(&aes);

    // 加密處理
    if (HAL_AES_Cryptographic(&aes, (uint8_t *)key, (uint8_t *)iv, (uint8_t *)plain, temp, 32))
    {
        memset(uart_tx_buf, 0x00, 256);
        sprintf(uart_tx_buf, "ERROR:AES_256_ECB crypt error.
");
        HAL_UART_Transmit(&UART_Handle,
                          uart_tx_buf,
                          sizeof(uart_tx_buf) / sizeof(uart_tx_buf[0]),
                          1000000);
        return;
    }

    // 將加密結果轉換為需要發送的ASCII字符串
    memset(uart_tx_buf, 0x00, 256);
    sprintf(uart_tx_buf, "DATA:%06d:", counter);    // 測試階段,將明文也發送過去
    len = strlen(uart_tx_buf);
    for (loop = 0; loop < 32; loop++)
    {
        uart_tx_buf[len + loop * 3 + 0] = "0123456789ABCDEF"[(temp[loop] >> 4) & 0x0F];     // 高位轉換為ASCII字符
        uart_tx_buf[len + loop * 3 + 1] = "0123456789ABCDEF"[temp[loop] & 0x0F];            // 低位轉換為ASCII字符
        uart_tx_buf[len + loop * 3 + 2] = ' ';                                              // 空格
    }
    uart_tx_buf[len + loop * 3] = '
';                                                     // 結尾

    len = len + loop * 3 + 1;                                                               // 計算發送長度

    // 通過串口發送數據
    HAL_UART_Transmit(&UART_Handle,
                      uart_tx_buf,
                      len,
                      1000000);
}

// 串口初始化
void Bsp_UARTInit1(UART_HandleTypeDef *huart, UART_TypeDef *puart)
{
    huart->Init.BaudRate = 115200;
    huart->Init.IPSFreq = g_ips_clk;
    huart->Init.Parity = UART_PARITY_MODE_NONE;
    huart->Init.WordLength = UART_WORDLENGTH_8B;
    huart->Instance = puart;

    HAL_UART_Init(huart);
}

// 實際測試主體邏輯
void UART_CPU_SEC_RxTxTest(void)
{
    // LED引腳設置
    EPORT_InitTypeDef eport;
    EPORT_PinDef pin_num;
    EPORT_TypeDef *eport_base;

    pin_num = EPORT_PIN4;
    eport_base = EPORT;

    eport.pin = pin_num;
    eport.func = GPIO_FUN;
    eport.dir = GPIO_DIR_OUT;
    eport.output_mode = EPORT_OUTPUT_MODE_CMOS;
    eport.pull_mode = EPORT_PULL_UP;
    HAL_EPORT_Init(eport_base, &eport);

    // algo設置
    TRNG_HandleTypeDef htrng;
    htrng.instance = TRNG;
    htrng.dividor = 59;
    HAL_CPM_ModuleClkCmd(MODULE_CLK_CRYPTO, ENABLE);
    HAL_TRNG_Init(&htrng);

    int8_t status = 0;
    uint16_t loop = 0;

    HAL_StatusTypeDef tmp_status;

    /* init */
    Bsp_UARTInit1((UART_HandleTypeDef *)(&UART_Handle), UART);

    while (1)
    {
        HAL_UART_DisItTcie(&UART_Handle);
        HAL_UART_DisItTie(&UART_Handle);
        HAL_UART_DisItRe(&UART_Handle);

        while (1)
        {
            // 讓LED交替閃亮,以示程序正在運行
            HAL_EPORT_TogglePin(eport_base, pin_num);
            if (!status)
            {
                HAL_EPORT_WritePin(eport_base, pin_num, BIT_RESET);
            }
            else
            {
                HAL_EPORT_WritePin(eport_base, pin_num, BIT_SET);
            }
            status = !status;

            // AES串口加密數據發送測試
            AES_SEND_TEST();

            DelayMS(1000);
        }
    }
}

// 測試入口函數
void UART_SEC_Run(void)
{
    UART_CPU_SEC_RxTxTest();
}
將上述代碼覆蓋掉src/demo/uart_demo.c,然后在src/inc/demo.h中開啟UART,就能編譯下載了。
以上的代碼,整合了EPORT控制PIN4,UART數據發送,以及ALGO加密算法,每1秒鐘發送一次數據。
所以實際的連線如下:
代碼中,使用的:
- 加密算法為:AES_ECB_128
- 加密密鑰為:1234567890654321
- 加密的明文為:counter計數器,每秒遞增1次,然后前面補0到6位長度,如:0000109
-
串口發送的實際數據:
DATA:6位明文:密文HEX的ASCII碼
發送的數據中,帶有明文的目的,是為了方便上位機測試驗證。
將開發板使用Type-C連接到電腦,在上位機中,使用串口工具監聽串口,然后編譯下載運行以上代碼,就可以收到如下串口信息了:
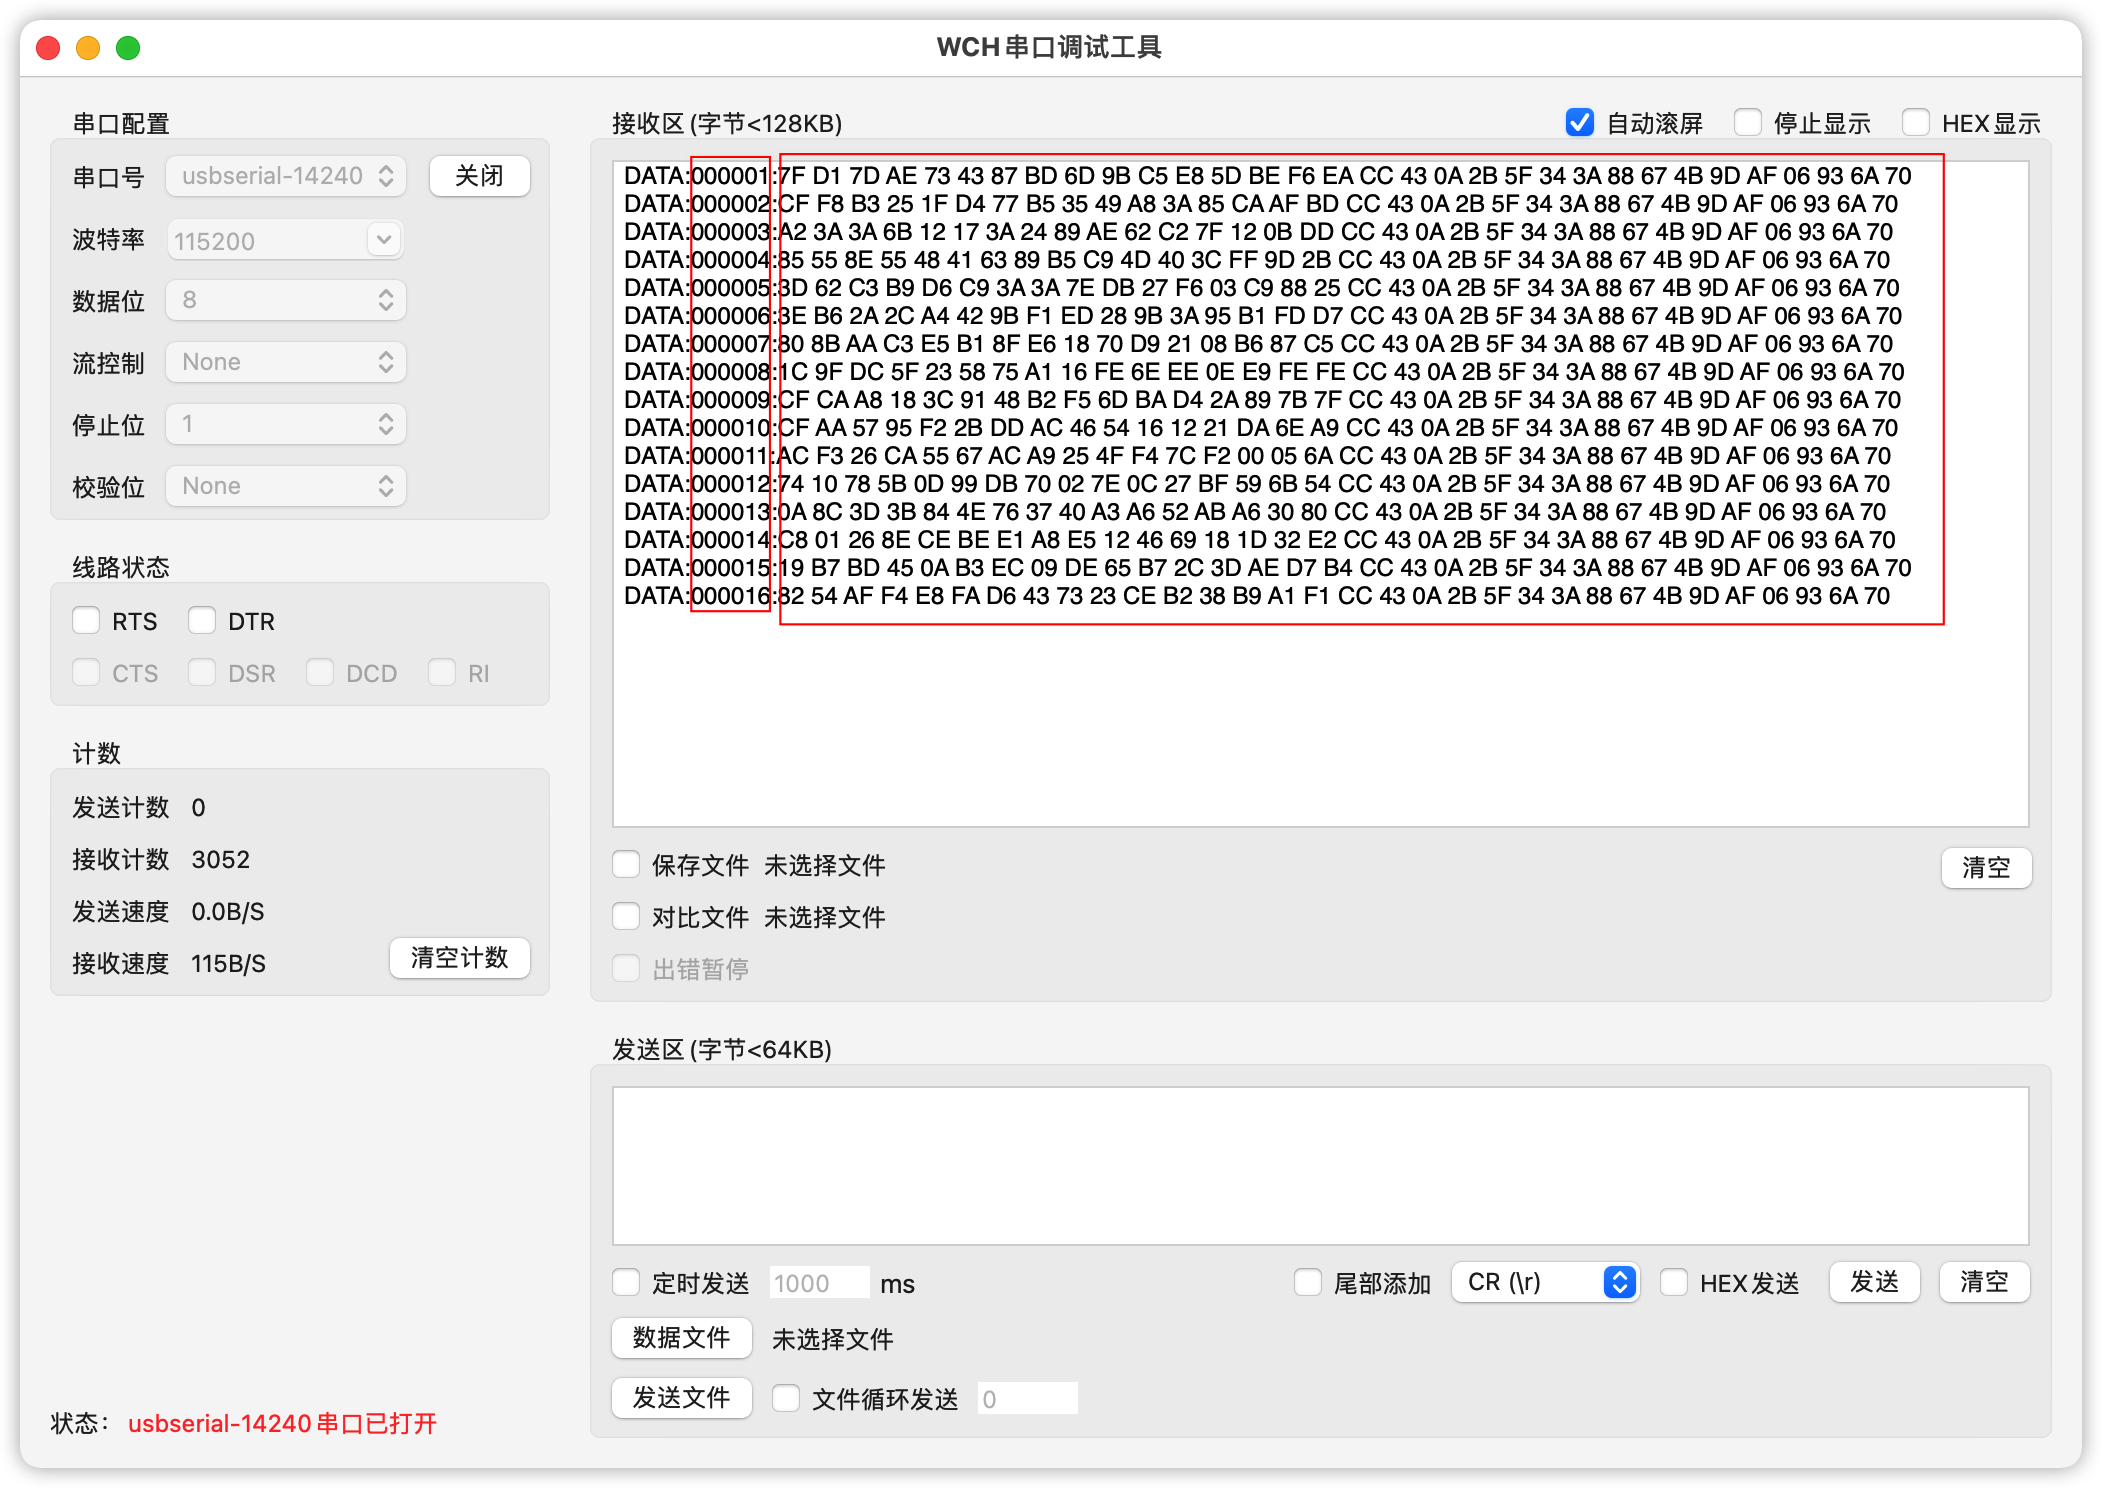
在DATA:6位明文:后面的部分,就是6為明文加密后對應的HEX值,我們獲取該值,然后使用AES_ECB進行解密,就能還原得到明文了。
解密的部分,我使用Python來實現的。
首先,需要安裝pycrypt:
-
Linux/macOS:
pip3 install pycryptodome -
Windows:
pip install pycrypto
然后,使用如下的代碼:
import serial
import serial.tools.list_ports
import hashlib
import base64
from Crypto.Cipher import AES
from Crypto.Cipher import DES
from Crypto.Util.Padding import pad, unpad

password = b''

class Communication():

    #初始化
    def __init__(self,com,bps,timeout):
        self.port = com
        self.bps = bps
        self.timeout =timeout
        global Ret
        try:
            # 打開串口,并得到串口對象
             self.main_engine= serial.Serial(self.port,self.bps,timeout=self.timeout)
            # 判斷是否打開成功
             if (self.main_engine.is_open):
               Ret = True
        except Exception as e:
            print("---異常---:", e)

    #打開串口
    def Open_Engine(self):
        self.main_engine.open()

    #關閉串口
    def Close_Engine(self):
        self.main_engine.close()
        print(self.main_engine.is_open)  # 檢驗串口是否打開

    # 打印可用串口列表
    @staticmethod
    def Print_Used_Com():
        port_list = list(serial.tools.list_ports.comports())
        print(port_list)

    def Read_Size(self,size):
        return self.main_engine.read(size=size)

    #接收一行數據
    # 使用readline()時應該注意:打開串口時應該指定超時,否則如果串口沒有收到新行,則會一直等待。
    # 如果沒有超時,readline會報異常。
    def Read_Line(self):
        return self.main_engine.readline()

    #發數據
    def Send_data(self,data):
        self.main_engine.write(data)

    def Recive_data(self,way):
        # 循環接收數據,此為死循環,可用線程實現
        print("開始接收數據:")
        data = b''
        while True:
            try:
                # 一個字節一個字節的接收
                if self.main_engine.in_waiting:
                    if(way == 0):
                        for i in range(self.main_engine.in_waiting):
                            print("接收ascii數據:"+str(self.Read_Size(1)))
                            data1 = self.Read_Size(1).hex()#轉為十六進制
                            data2 = int(data1,16)#轉為十進制
                            print("收到數據十六進制:"+data1+"  收到數據十進制:"+str(data2))
                    if(way == 1):
                        #整體接收
                        # data = self.main_engine.read(
                        #		self.main_engine.in_waiting).decode("utf-8")#方式一
                        tmp = self.main_engine.read_all()#方式二
                        print("接收ascii數據:", tmp)
                        data = data + tmp
                        if tmp[-1] == 10:
                            data_hex = bytes.fromhex(data[12:-2].decode())
                            data_plain = data[5:11].decode()
                            print("	接收到一批數據:", data[12:-2])
                            print("	接收到的明文數據:", data_plain)
                            date_de = decrypt(data_hex, password)
                            data_de_plain = date_de.decode()
                            print("	解碼后的明文數據:", data_de_plain)
                            data = b''

            except Exception as e:
                print("異常報錯:",e)

def encrypt(data, password):
    bs = AES.block_size
    pad = lambda s: s.ljust(bs,b'')
    cipher = AES.new(password, AES.MODE_ECB)
    data_used = pad(data)
    print("pad(data):", len(data_used), data_used)
    data = cipher.encrypt(data_used)
    return (data)

def decrypt(data, password):
    bs = AES.block_size
    if len(data) < bs:
        print("direct return",data,len(data),bs)
        return (data)
    cipher = AES.new(password, AES.MODE_ECB)
    data  = cipher.decrypt(data)
    return (data)

if __name__=="__main__":
    AES.block_size = 32
    password = b'1234567890654321' #16,24,32位長的密碼

    com = Communication("/dev/cu.usbserial-14240", 115200, None)
    com.Print_Name()
    plain,denc_hex = com.Recive_data(1)
將以上代碼,保存為:uart_sec_recv.py,準備執行。執行以前,要先關掉串口監聽工具。
使用python uart_sec_recv.py執行,開始監聽串口,就能接收到串口數據,并進行解碼:
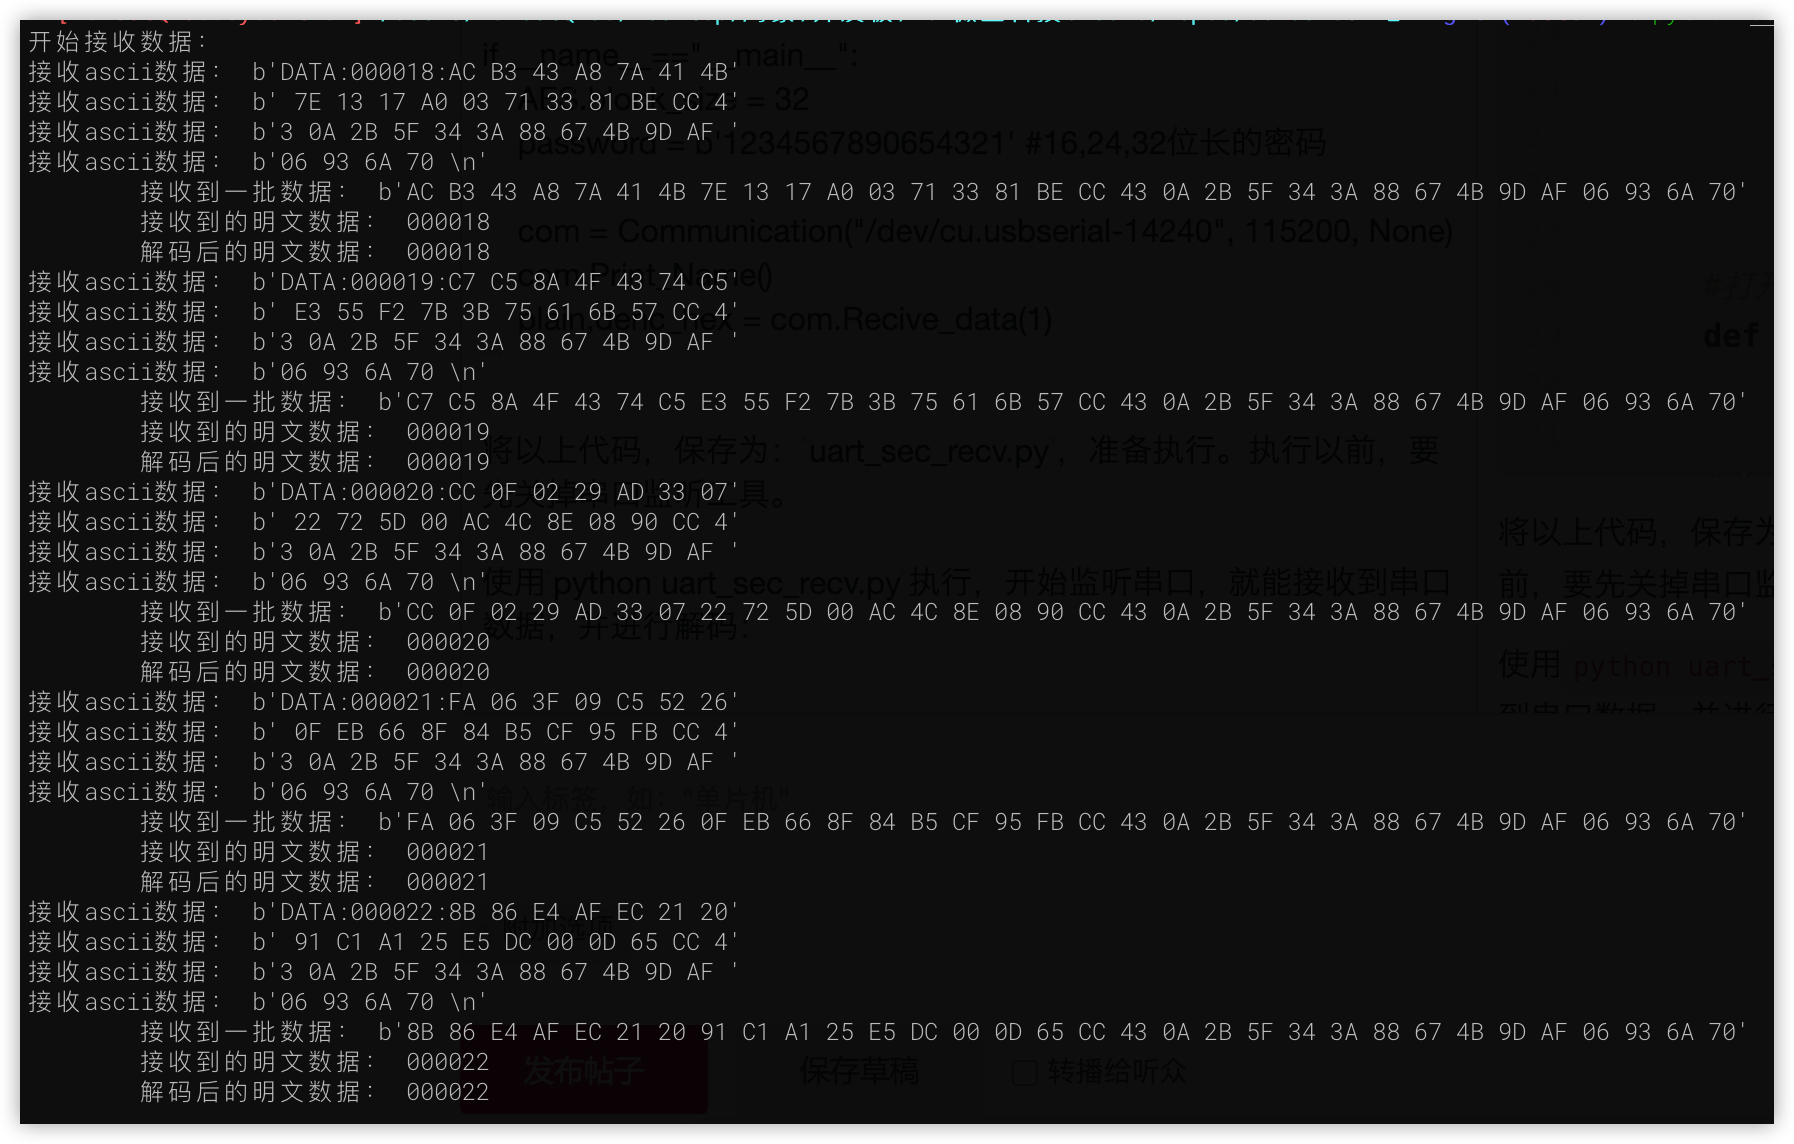
從上述結果中可以看到,解碼后的數據,與傳送過來的明文數據,是一致的,因此加密發送并解碼成功。
以上的分享,演示的是開發板發送加密數據,使用了AES_ECB128加密算法,參考algo_demo.c,可以試用其他的加密算法,當然,上位機的代碼也需要進行針對性的處理。
-
微五科技
+關注
關注
1文章
27瀏覽量
2594 -
開發板試用
+關注
關注
3文章
301瀏覽量
2111 -
CF3310
+關注
關注
0文章
23瀏覽量
348
發布評論請先 登錄
相關推薦
STM32配合可編程加密芯片SMEC88ST的防抄板加密方案設計
有獎丨米爾 全志T536開發板免費試用

瑞芯微平臺Android系統串口測試方法,觸覺智能RK3562開發板演示

淺談加密芯片的一種破解方法和對應加密方案改進設計
追加名額丨米爾瑞芯微RK3576開發板有獎試用

有獎丨米爾 瑞芯微RK3576開發板免費試用

點擊參與米爾NXP i.MX 93開發板有獎試用

esp32加密后無法關閉怎么解決?
PSoC 6 MCUBoot和mbedTLS是否支持加密硬件加速?
fpga開發板與linux開發板區別
加密狗是什么意思 加密狗怎么解除加密
韓國Neowine(紐文微)第三代加密芯片ALPU-C


 【微五科技CF3310開發板試用體驗】利用硬件加密功能,搞定串口加密通訊


評論