一、簡介
這是一個簡單小巧的C語言線程池實現,在 Github 上有 1.1K 的 star,很適合用來學習 Linux 的多線程編程。
另外,里面還涉及到了信號、隊列、同步等知識點,代碼讀起來還是挺過癮的。
特點:
- 符合 ANCI C and POSIX;
- 支持暫停/恢復/等待功能;
- 簡潔的 API;
- 經過嚴格的測試,附帶了豐富的測試用例;
二、使用
快速上手
example.c:
#include "thpool.h"

void task(void *arg){
 printf("Thread #%u working on %d
", (int)pthread_self(), (int) arg);
}

int main(){

 puts("Making threadpool with 4 threads");
 threadpool thpool = thpool_init(4);

 puts("Adding 10 tasks to threadpool");
 int i;
 for (i=0; i<8; i++){
  thpool_add_work(thpool, task, (void*)(uintptr_t)i);
 };

 thpool_wait(thpool);
 puts("Killing threadpool");
 thpool_destroy(thpool);

 return 0;
}
運行效果:
$ gcc example.c thpool.c -D THPOOL_DEBUG -pthread -o example

$ ./example
Making threadpool with 4 threads
THPOOL_DEBUG: Created thread 0 in pool
THPOOL_DEBUG: Created thread 1 in pool
THPOOL_DEBUG: Created thread 2 in pool
THPOOL_DEBUG: Created thread 3 in pool
Adding 10 tasks to threadpool
Thread #1509455616 working on 0
Thread #1509455616 working on 4
Thread #1509455616 working on 5
Thread #1492670208 working on 2
Thread #1492670208 working on 7
Thread #1509455616 working on 6
Thread #1501062912 working on 1
Thread #1517848320 working on 3
Killing threadpool
代碼分析:
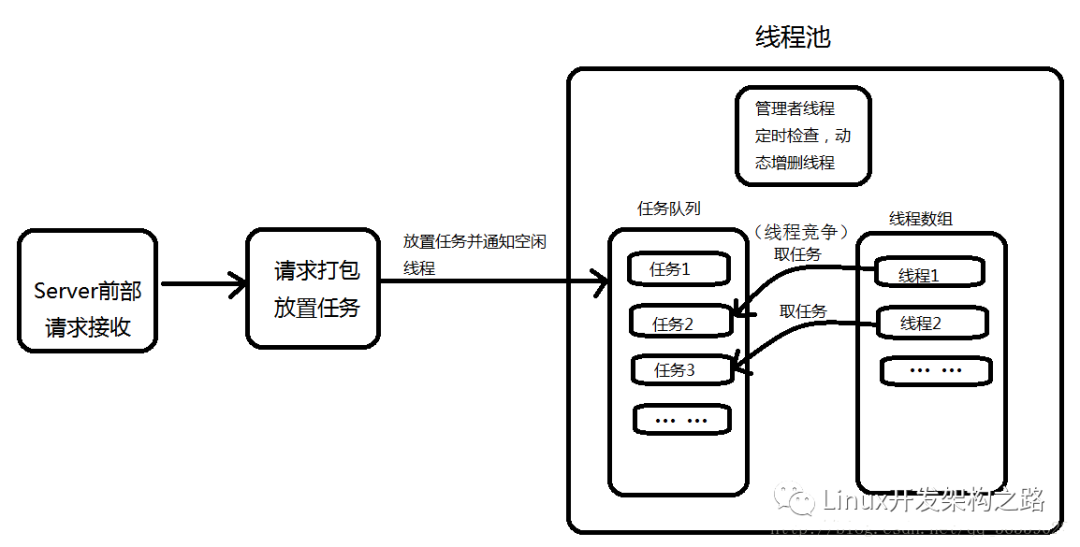
threadpool thpool = thpool_init(4)創建了一個含有 4 個線程的線程池;- 然后調用
thpool_add_work(thpool, ...)往線程池里放入了 8 個任務; - 從結果來看:
線程5616搶到了任務 0 / 4 / 5 / 6;線程0208搶到了任務 2 / 7;線程2919搶到了任務 1;線程8320搶到了任務 3;
API 簡介
| 示例 | 作用 |
|---|---|
| thpool_init(4) | 創建一個含有 4 個線程的線程池。 |
| * thpool_add_work(thpool, (void)function_p, (void )arg_p)* ** | 添加任務, function_p 是任務要執行的函數,arg_p 是 function_p 的參數。 |
| thpool_wait(thpool) | 等待所有任務完成。 |
| thpool_destroy(thpool) | 銷毀線程池,如果還有任務在執行,則會先等待其完成。 |
| thpool_pause(thpool) | 讓所有的線程都停止工作,進入睡眠狀態。 |
| thpool_resume(thpool) | 讓所有的線程都恢復工作。 |
| thpool_num_threads_working(thpool) | 返回當前正在工作的線程數。 |
三、內部實現
整體把握
核心代碼就是 2 個文件:thpool.c 和 thpool.h。
分解 thpool.c
7 個公共函數:
struct thpool_* thpool_init(int num_threads)
int thpool_add_work(thpool_* thpool_p, void (*function_p)(void*), void* arg_p)
void thpool_wait(thpool_* thpool_p)
void thpool_destroy(thpool_* thpool_p)
void thpool_pause(thpool_* thpool_p)
void thpool_resume(thpool_* thpool_p)
int thpool_num_threads_working(thpool_* thpool_p)
正好就是前面說過的 7 個 API,稍后重點分析。
5 個自定義的數據結構:
// 描述一個信號量
typedef struct bsem {...} bsem;

// 描述一個任務
typedef struct job {...} job;

// 描述一個任務隊列
typedef struct jobqueue {...} jobqueue;

// 描述一個線程
typedef struct thread {...} thread;

// 描述一個線程池
typedef struct thpool_ {...} thpool_;
14 個私有函數:
// 構造 struct thread,并調用 pthread_create() 創建線程
static int thread_init (thpool_* thpool_p, struct thread** thread_p, int id)

// 當線程被暫停時會在這里休眠
static void thread_hold(int sig_id)

// 線程在此函數中執行任務
static void* thread_do(struct thread* thread_p)

// 銷毀 struct thread
static void thread_destroy (thread* thread_p)

// 任務隊列相關的操作集合
static int jobqueue_init(jobqueue* jobqueue_p)
static void jobqueue_clear(jobqueue* jobqueue_p)
static void jobqueue_push(jobqueue* jobqueue_p, struct job* newjob)
static struct job* jobqueue_pull(jobqueue* jobqueue_p)
static void jobqueue_destroy(jobqueue* jobqueue_p)

// 信號量相關的操作集合
static void bsem_init(bsem *bsem_p, int value)
static void bsem_reset(bsem *bsem_p)
static void bsem_post(bsem *bsem_p)
static void bsem_post_all(bsem *bsem_p)
static void bsem_wait(bsem* bsem_p)
核心 API 的實現
1. thpool_init()
該函數用于創建一個線程池,先明確線程池的定義:
typedef struct thpool_{
 thread**   threads;                  /* pointer to threads        */
 volatile int num_threads_alive;      /* threads currently alive   */
 volatile int num_threads_working;    /* threads currently working */
 pthread_mutex_t  thcount_lock;       /* used for thread count etc */
 pthread_cond_t  threads_all_idle;    /* signal to thpool_wait     */
 jobqueue  jobqueue;                  /* job queue                 */
} thpool_;
thpool_init() 的實現思路:
- 分配 struct thpool_:
- malloc(sizeof(struct thpool_))
- 初始化 struct thpool_;
- malloc(num_threads * sizeof(struct thread *))
- thread_init(thpool_p, &thpool_p->threads[n], n);
- jobqueue_init(&thpool_p->jobqueue)
- 初始化 jobqueue:
- 創建用戶指定數目的線程,用一個二級指針來指向這一組線程;
- 返回 struct thpool_ *;
2. thpool_add_work()
該函數用于往線程池里添加一個任務,先明確任務的定義:
typedef struct job{
 struct job*  prev; /* pointer to previous job */
 void   (*function)(void* arg);  /* function pointer */
 void*  arg;  /* function's argument */
} job;
程序里是用隊列來管理任務的,這里的 job 首先是一個隊列節點,攜帶的數據是 function + arg。
thpool_add_work 的實現思路:
- 分配 struct job:
- malloc(sizeof(struct job))
- 初始化 struct job;
- newjob->function=function_p;
- newjob->arg=arg_p;
- 添加到隊列中:
- jobqueue_push(&thpool_p->jobqueue, newjob);
3. thpool_pause() 和 thpool_resume()
thpool_pause() 用于暫停所有的線程,通過信號機制來實現:
void thpool_pause(thpool_* thpool_p) {
 int n;
 for (n=0; n < thpool_p->num_threads_alive; n++){
  pthread_kill(thpool_p->threads[n]->pthread, SIGUSR1);
 }
}
給所有工作線程發送 SIGUSR1,該信號的處理行為就是讓線程休眠:
static void thread_hold(int sig_id) {
    (void)sig_id;
 threads_on_hold = 1;
 while (threads_on_hold){
  sleep(1);
 }
}
只需要 thpool_resume() 中,將 threads_on_hold = 0,就可以讓線程返回到原來被中止時的工作狀態。
4. thpool_wait()
wait 的實現比較簡單,只要還有任務或者還有線程處于工作狀態,就執行 pthread 的 wait 操作:
while (thpool_p->jobqueue.len || thpool_p->num_threads_working) {
  pthread_cond_wait(&thpool_p->threads_all_idle, &thpool_p->thcount_lock);
 }
到此,我感覺已經沒有太多難點了,感興趣的小伙伴們可以自行查閱源碼。
四、測試用例
優秀的開源項目通常會附帶豐富的測試用例,此項目也不例外:
- memleaks.sh:測試是否發生內存泄露;
- threadpool.sh: 測試線程池是否能正確地執行任務;
- pause_resume.sh:測試 pause 和 resume 是否正常;
- wait.sh:測試 wait 功能是否正常;
- heap_stack_garbage:測試堆棧內有垃圾數據時的情況;
-
Linux
+關注
關注
87文章
11292瀏覽量
209326 -
C語言
+關注
關注
180文章
7604瀏覽量
136685 -
線程池
+關注
關注
0文章
57瀏覽量
6844 -
線程
+關注
關注
0文章
504瀏覽量
19675 -
GitHub
+關注
關注
3文章
468瀏覽量
16428
發布評論請先 登錄
相關推薦
跨平臺的線程池組件--TP組件
Java中的線程池包括哪些
線程池的線程怎么釋放

Spring 的線程池應用


 C語言線程池的實現方案




評論