每個任務都有一個32位的通知值,該值在創建任務時初始化為零。
配置相關資源
//為1時開啟任務通知
#define configUSE_TASK_NOTIFICATIONS 1
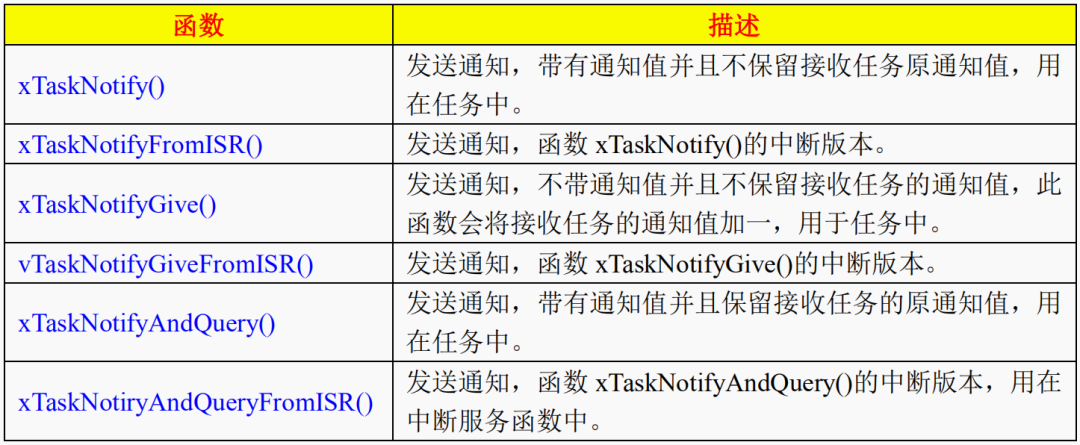
發送
BaseType_t xTaskNotifyGive( TaskHandle_t xTaskToNotify );
參數:
xTaskToNotify:被通知并使其通知值遞增的任務句柄
接收
uint32_t ulTaskNotifyTake( BaseType_t xClearCountOnExit, TickType_t xTicksToWait );
參數:
xClearCountOnExit:是否需要清零
xTicksToWait:等待時間
實驗程序
#include "stm32f10x.h"
#include
#include "FreeRTOS.h"
#include "task.h"

void KEY_Init(void)
{
  GPIO_InitTypeDef GPIO_InitStructure; //定義結構體變量
  RCC_APB2PeriphClockCmd(RCC_APB2Periph_GPIOA|RCC_APB2Periph_GPIOE,ENABLE);

  GPIO_InitStructure.GPIO_Pin=GPIO_Pin_0;     //選擇你要設置的IO口
  GPIO_InitStructure.GPIO_Mode=GPIO_Mode_IPD;//下拉輸入
  GPIO_InitStructure.GPIO_Speed=GPIO_Speed_50MHz;     //設置傳輸速率
  GPIO_Init(GPIOA,&GPIO_InitStructure);      /* 初始化GPIO */

  GPIO_InitStructure.GPIO_Pin=GPIO_Pin_3|GPIO_Pin_2|GPIO_Pin_4;
  GPIO_InitStructure.GPIO_Mode=GPIO_Mode_IPU;  //上拉輸入
  GPIO_InitStructure.GPIO_Speed=GPIO_Speed_50MHz;
  GPIO_Init(GPIOE,&GPIO_InitStructure);
}

void USART_init(uint32_t bound)
{
  GPIO_InitTypeDef GPIO_InitStruct;   //定義GPIO結構體變量
  USART_InitTypeDef USART_InitStruct;   //定義串口結構體變量

  RCC_APB2PeriphClockCmd(RCC_APB2Periph_GPIOA|RCC_APB2Periph_USART1,ENABLE);   //使能GPIOC的時鐘

  GPIO_InitStruct.GPIO_Pin=GPIO_Pin_9;   //配置TX引腳
  GPIO_InitStruct.GPIO_Mode=GPIO_Mode_AF_PP;   //配置PA9為復用推挽輸出
  GPIO_InitStruct.GPIO_Speed=GPIO_Speed_50MHz;   //配置PA9速率
  GPIO_Init(GPIOA,&GPIO_InitStruct);   //GPIO初始化函數

  GPIO_InitStruct.GPIO_Pin=GPIO_Pin_10;   //配置RX引腳
  GPIO_InitStruct.GPIO_Mode=GPIO_Mode_IN_FLOATING;   //配置PA10為浮空輸入
  GPIO_InitStruct.GPIO_Speed=GPIO_Speed_50MHz;   //配置PA10速率
  GPIO_Init(GPIOA,&GPIO_InitStruct);   //GPIO初始化函數


  USART_InitStruct.USART_Mode=USART_Mode_Tx|USART_Mode_Rx;   //發送接收模式
  USART_InitStruct.USART_Parity=USART_Parity_No;   //無奇偶校驗
  USART_InitStruct.USART_BaudRate=bound;   //波特率
  USART_InitStruct.USART_StopBits=USART_StopBits_1;   //停止位1位
  USART_InitStruct.USART_WordLength=USART_WordLength_8b;   //字長8位
  USART_InitStruct.USART_HardwareFlowControl=USART_HardwareFlowControl_None;   //無硬件數據流控制
  USART_Init(USART1,&USART_InitStruct);   //串口初始化函數

  USART_Cmd(USART1,ENABLE);   //使能USART1
}

int fputc(int ch,FILE *f)   //printf重定向函數
{
  USART_SendData(USART1,(uint8_t)ch);   //發送一字節數據
  while(USART_GetFlagStatus(USART1,USART_FLAG_TXE) == RESET);   //等待發送完成
  return ch;
}

#define START_TASK_PRIO 1      //任務優先級
#define START_STK_SIZE 128      //任務堆棧大小
TaskHandle_t StartTask_Handler;   //任務句柄
void Start_Task(void *pvParameters);//任務函數

#define Send_TASK_PRIO 2       //任務優先級
#define Send_STK_SIZE 50       //任務堆棧大小
TaskHandle_t SendTask_Handler;     //任務句柄
void Send_Task(void *p_arg);     //任務函數

#define Read_TASK_PRIO 3       //任務優先級
#define Read_STK_SIZE 50       //任務堆棧大小
TaskHandle_t ReadTask_Handler;   //任務句柄
void Read_Task(void *p_arg);     //任務函數


int main( void )
{
  NVIC_PriorityGroupConfig(NVIC_PriorityGroup_4);//設置系統中斷優先級分組 4

  KEY_Init();
  USART_init(9600);

   printf("車位默認值為0個,按下KEY1申請車位,按下KEY2釋放車位!nn");

  //創建開始任務
  xTaskCreate(
    (TaskFunction_t )Start_Task,     //任務函數
    (const char* )"Start_Task",     //任務名稱
    (uint16_t )START_STK_SIZE,       //任務堆棧大小
    (void* )NULL,             //傳遞給任務函數的參數
    (UBaseType_t )START_TASK_PRIO,     //任務優先級
    (TaskHandle_t* )&StartTask_Handler  //任務句柄
  );
  vTaskStartScheduler();  //開啟調度
}
//開始任務函數
void Start_Task(void *pvParameters)
{
  taskENTER_CRITICAL();   //進入臨界區

  //創建 Send_Task 任務
  xTaskCreate(
    (TaskFunction_t )Send_Task,
    (const char* )"Send_Task",
    (uint16_t )Send_STK_SIZE,
    (void* )NULL,
    (UBaseType_t )Send_TASK_PRIO,
    (TaskHandle_t* )&SendTask_Handler
  );
  //創建 Read_Task 任務
  xTaskCreate(
    (TaskFunction_t )Read_Task,
    (const char* )"Read_Task",
    (uint16_t )Read_STK_SIZE,
    (void* )NULL,
    (UBaseType_t )Read_TASK_PRIO,
    (TaskHandle_t* )&ReadTask_Handler
  );
  vTaskDelete(StartTask_Handler); //刪除開始任務
  taskEXIT_CRITICAL();   //退出臨界區
}

//Send_Task 任務函數
void Send_Task(void *pvParameters)
{
  BaseType_t Return = pdPASS;
  while(1)
  {
    if(GPIO_ReadInputDataBit( GPIOE, GPIO_Pin_4)==0)
    {
      Return = xTaskNotifyGive(ReadTask_Handler);//發送任務通知
      if ( pdPASS == Return )
      {
        printf( "KEY2被按下,釋放1個停車位n" );
      }
    }
    vTaskDelay(50);
  }
}

//Read_Task 任務函數
void Read_Task(void *pvParameters)
{
  uint32_t Return = 0;
  while(1)
  {
    if(GPIO_ReadInputDataBit( GPIOE, GPIO_Pin_3)==0)
    {
       Return = ulTaskNotifyTake(pdFALSE,0);//不清零
      if(Return > 0)
        printf( "KEY1被按下,成功申請到停車位,當前車位為 %d n", Return - 1);
      else
        printf( "KEY1被按下,車位已經沒有了,請按KEY2釋放車位n" );
    }
    vTaskDelay(50);
  }
}
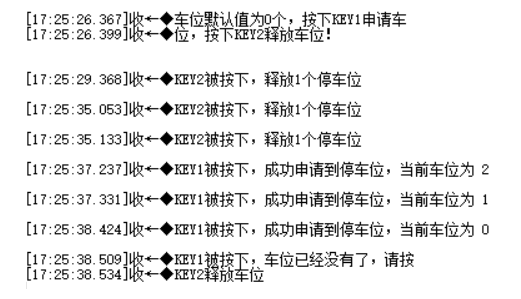
實驗現象
--END--
聲明:本文內容及配圖由入駐作者撰寫或者入駐合作網站授權轉載。文章觀點僅代表作者本人,不代表電子發燒友網立場。文章及其配圖僅供工程師學習之用,如有內容侵權或者其他違規問題,請聯系本站處理。
舉報投訴
-
FreeRTOS
+關注
關注
12文章
484瀏覽量
62141 -
任務
+關注
關注
1文章
20瀏覽量
8535 -
初始化
+關注
關注
0文章
50瀏覽量
11850
發布評論請先 登錄
相關推薦
Free RTOS移植問題的解決辦法?
按照原子哥的free rtos抑制說明文檔做第一個工程,改完代碼編譯出現xPortSysTickHandler()函數未定義,頭文件中加入task.h和FreeRTOS.h。實在找不出問題所在,,,there must be anther problem???
發表于 06-11 07:57
任務通知發送出問題怎么辦
大家好。我在STM32cubemx里使用FreeRTOS,開啟定時器3中斷,然后發送一個任務通知給TIM3_Task。但是無論是在回調函數里使用vTaskNotifyGiveFromISR()這個
發表于 06-18 04:35
任務通知的問題如何解決
的bit(eNotifyAction)eSetBits);//更新指定的bit...... vtaskdealy(1000);在次高級任務2里面接收通知。xResult = xTaskNotifyWait
發表于 07-13 10:36
RTOS中的多任務切換的相關資料分享
淺談RTOS中的多任務切換(基于UC/OS iii)文章目錄淺談RTOS中的多任務切換(基于UC/OS iii)一. 簡介二.主要變量1.全局變量2
發表于 12-06 07:08
FreeRTOS的直接任務(消息)通知
? ? ? ? 之前分享了《FreeRTOS V10.4.0更新了哪些功能?》,今天就來詳細講述其中的一個知識點:FreeRTOS的直接任務(消息)通知,這樣做的目的就是減少RAM占用空間并加快執行


 Free RTOS的任務通知-2



評論