很多時候,我們有這么一個需求,需要在每天的某個固定時間或者每隔一段時間讓應用去執行某一個任務。為了實現這個需求,通常我們會通過多線程來實現這個功能,但是這樣我們需要自己做一些比較麻煩的工作。接下來,讓我們看看如何使用Spring scheduling task簡化定時任務功能的實現。
添加maven依賴
為了方便展示,我們使用Spring Boot來簡化我們的Spring配置。因為我們使用的是Spring自帶的Scheduling,因此我們只需要引入最進本的spring-boot-starter即可。
<parent>
    <groupId>org.springframework.boot<span class="hljs-name"groupId>
    <artifactId>spring-boot-starter-parent<span class="hljs-name"artifactId>
    <version>1.2.5.RELEASE<span class="hljs-name"version>
<span class="hljs-name"parent>

<properties>
    <java.version>1.8<span class="hljs-name"java.version>
<span class="hljs-name"properties>

<dependencies>
    <dependency>
        <groupId>org.springframework.boot<span class="hljs-name"groupId>
        <artifactId>spring-boot-starter<span class="hljs-name"artifactId>
    <span class="hljs-name"dependency>
<span class="hljs-name"dependencies>
注意,Spring boot需要JDK8的編譯環境。
創建Scheduled Task
讓我們創建一個ScheduleTask來實現我們的需求:
@Component
public class ScheduledTask {

    private static final SimpleDateFormat dateFormat = new SimpleDateFormat("yyyy-MM-dd HH:mm:ss");
    private Integer count0 = 1;
    private Integer count1 = 1;
    private Integer count2 = 1;

    @Scheduled(fixedRate = 5000)
    public void reportCurrentTime() throws InterruptedException {
        System.out.println(String.format("---第%s次執行,當前時間為:%s", count0++, dateFormat.format(new Date())));
    }

    @Scheduled(fixedDelay = 5000)
    public void reportCurrentTimeAfterSleep() throws InterruptedException {
        System.out.println(String.format("===第%s次執行,當前時間為:%s", count1++, dateFormat.format(new Date())));
    }

    @Scheduled(cron = "*/5 * * * * *")
    public void reportCurrentTimeCron() throws InterruptedException {
        System.out.println(String.format("+++第%s次執行,當前時間為:%s", count2++, dateFormat.format(new Date())));
    }

}
可以看到,我們在我們真正需要執行的方法上添加了@Scheduled標注,表示這個方法是需要定時執行的。
在@Scheduled標注中,我們使用了三種方式來實現了同一個功能:每隔5秒鐘記錄一次當前的時間:
fixedRate = 5000表示每隔5000ms,Spring scheduling會調用一次該方法,不論該方法的執行時間是多少
fixedDelay = 5000表示當方法執行完畢5000ms后,Spring scheduling會再次調用該方法
cron = "*/5 * * * * * *"提供了一種通用的定時任務表達式,這里表示每隔5秒執行一次。
配置Scheduling
接下來我們通過Spring boot來配置一個最簡單的Spring web應用,我們只需要一個帶有main方法的類即可:
[]()
@SpringBootApplication
@EnableScheduling
public class App {

    public static void main(String[] args) {
        SpringApplication.run(App.class, args);
    }

}
我們先來看看class上的標注:
@SpringBootApplication 實際上是了以下三個標注的集合:
@Configuration 告訴Spring這是一個配置類,里面的所有標注了@Bean的方法的返回值將被注冊為一個Bean
@EnableAutoConfiguration 告訴Spring基于class path的設置、其他bean以及其他設置來為應用添加各種Bean
@ComponentScan 告訴Spring掃描Class path下所有類來生成相應的Bean
@EnableScheduling 告訴Spring創建一個task executor,如果我們沒有這個標注,所有@Scheduled標注都不會執行
通過以上標注,我們完成了schedule的基本配置。最后,我們添加main方法來啟動一個Spring boot應用即可。
測試
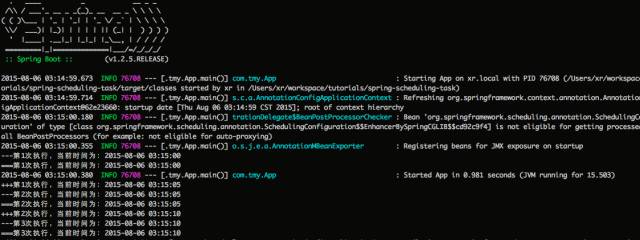
在根目錄下執行命令:mvn spring-boot:run,我們可以看到:

-
Web服務器
+關注
關注
0文章
138瀏覽量
24424 -
JDK
+關注
關注
0文章
81瀏覽量
16602
發布評論請先 登錄
相關推薦
關于stm32系統定時任務的問題
Spring Boot定時任務的重寫方法
SpringBoot如何實現動態增刪啟停定時任務

Python定時任務的實現方式
說說Spring定時任務如何大規模企業級運用
解析Golang定時任務庫gron設計和原理
求一種SpringBoot定時任務動態管理通用解決方案
SpringBoot如何實現定時任務(上)


 如何使用Spring scheduling task簡化定時任務功能的實現?


評論