1. Yolov5簡(jiǎn)介
YOLOv5 模型是 Ultralytics 公司于 2020 年 6 月 9 日公開發(fā)布的。YOLOv5 模型是基于 YOLOv3 模型基礎(chǔ)上改進(jìn)而來(lái)的,有 YOLOv5s、YOLOv5m、YOLOv5l、YOLOv5x 四個(gè)模型。YOLOv5 相比YOLOv4 而言,在檢測(cè)平均精度降低不多的基礎(chǔ)上,具有均值權(quán)重文件更小,訓(xùn)練時(shí)間和推理速度更短的特點(diǎn)。YOLOv5 的網(wǎng)絡(luò)結(jié)構(gòu)分為輸入端BackboneNeck、Head 四個(gè)部分。
本教程針對(duì)目標(biāo)檢測(cè)算法yolov5的訓(xùn)練和部署到EASY-EAI-Nano(RV1126)進(jìn)行說(shuō)明,而數(shù)據(jù)標(biāo)注方法可以參考我們往期的文章《Labelimg的安裝與使用》。
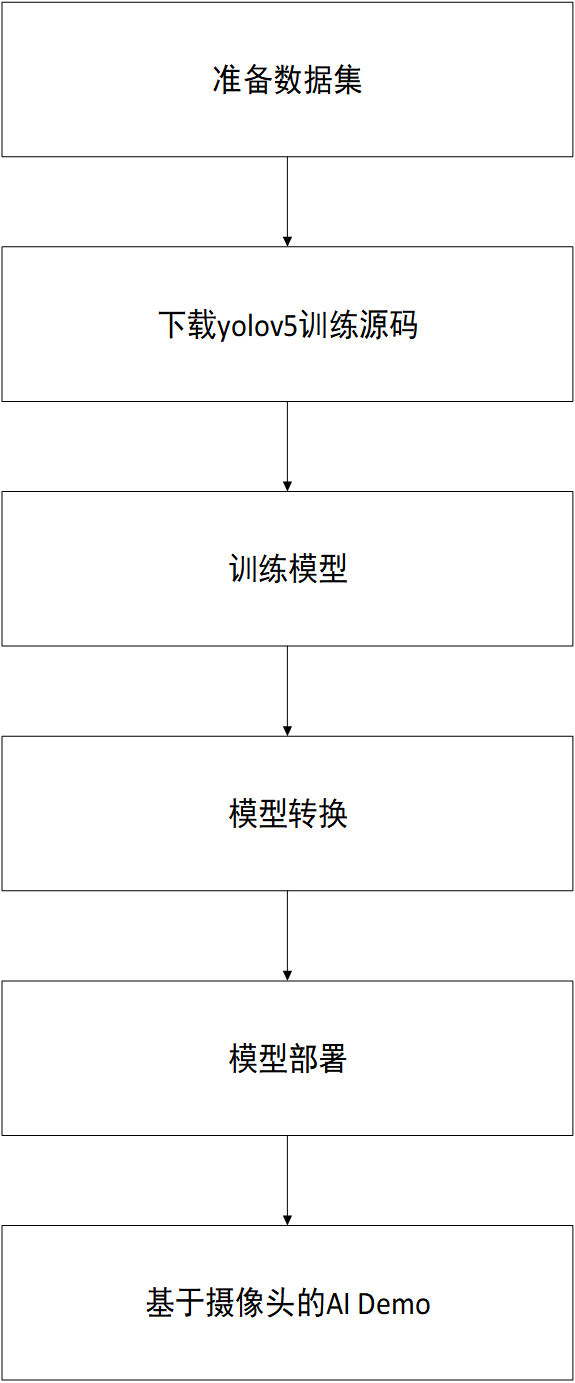
以下為YOLOv5訓(xùn)練部署的大致流程:
?
2. 準(zhǔn)備數(shù)據(jù)集
2.1 數(shù)據(jù)集下載
本教程以口罩檢測(cè)為例
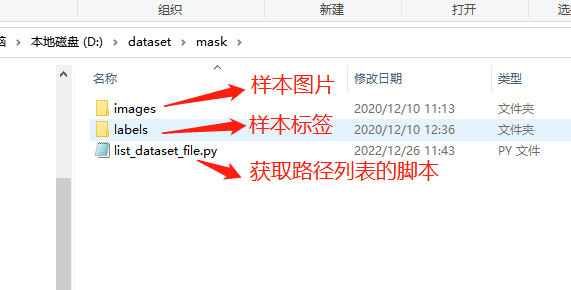
解壓完成后得到以下三個(gè)文件:
?
2.2 生成路徑列表
在數(shù)據(jù)集目錄下執(zhí)行腳本list_dataset_file.py:
python list_dataset_file.py
執(zhí)行現(xiàn)象如下圖所示:

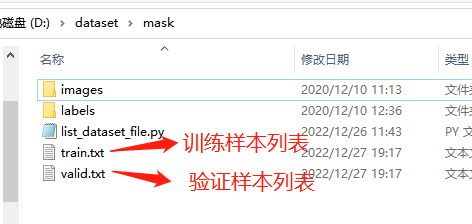
得到訓(xùn)練樣本列表文件train.txt和驗(yàn)證樣本列表文件有效.txt,如下圖所示:
?
3. 下載yolov5訓(xùn)練源碼
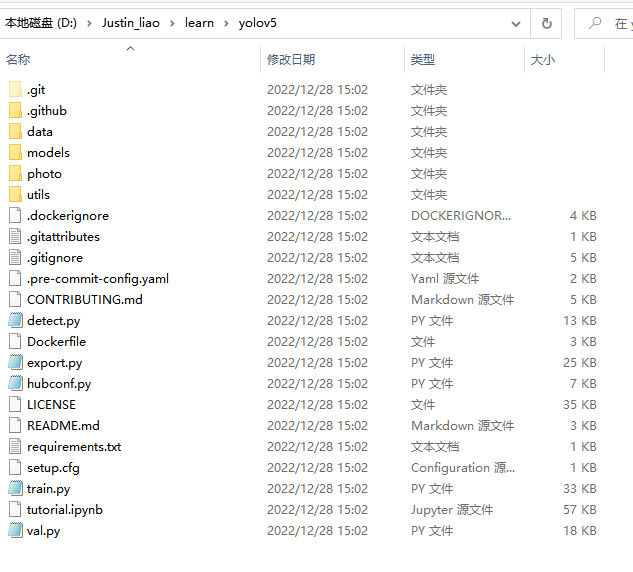
通過(guò)git工具,在PC端克隆遠(yuǎn)程倉(cāng)庫(kù)

得到下圖所示目錄:
?
4. 訓(xùn)練算法模型
切換到y(tǒng)olov5的工作目錄,接下來(lái)以訓(xùn)練一個(gè)口罩檢測(cè)模型為例進(jìn)行說(shuō)明。需要修改data/mask.yaml里面的train.txt和valid.txt的路徑。
?
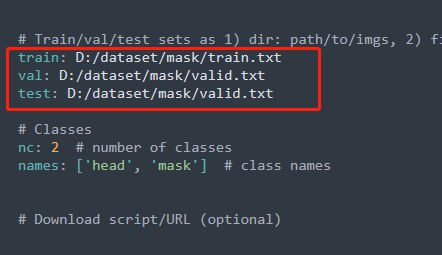
執(zhí)行下列腳本訓(xùn)練算法模型:
python train.py --data mask.yaml --cfg yolov5s.yaml --weights "" --batch-size 64
開始訓(xùn)練模型,如下圖所示:

關(guān)于算法精度結(jié)果可以查看./runs/train/results.csv獲得。
5. 在PC端進(jìn)行模型預(yù)測(cè)
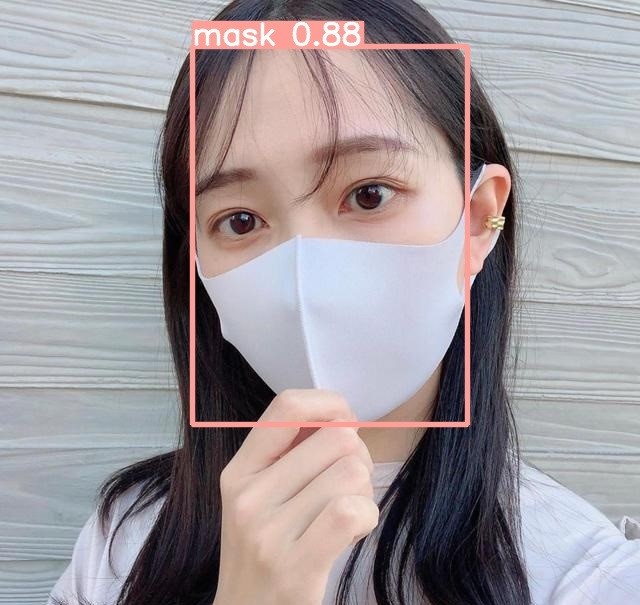
訓(xùn)練完畢后,在./runs/train/exp/weights/best.pt生成通過(guò)驗(yàn)證集測(cè)試的最好結(jié)果的模型。同時(shí)可以執(zhí)行模型預(yù)測(cè),初步評(píng)估模型的效果:
python detect.py --source data/images --weights ./runs/train/exp/weights/best.pt --conf 0.5
6. pt模型轉(zhuǎn)換為onnx模型
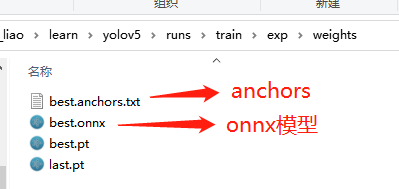
算法部署到EASY-EAI-Nano需要轉(zhuǎn)換為RKNN模型,而轉(zhuǎn)換RKNN之前可以把模型先轉(zhuǎn)換為ONNX模型,同時(shí)會(huì)生成best.anchors.txt:
python export.py --include onnx --rknpu RV1126 --weights ./runs/train/exp/weights/best.pt
生成如下圖所示:
?
7. 轉(zhuǎn)換為rknn模型環(huán)境搭建
onnx模型需要轉(zhuǎn)換為rknn模型才能在EASY-EAI-Nano運(yùn)行,所以需要先搭建rknn-toolkit模型轉(zhuǎn)換工具的環(huán)境。當(dāng)然tensorflow、tensroflow lite、caffe、darknet等也是通過(guò)類似的方法進(jìn)行模型轉(zhuǎn)換,只是本教程onnx為例。
7.1 概述
模型轉(zhuǎn)換環(huán)境搭建流程如下所示:

?
7.2 下載模型轉(zhuǎn)換工具
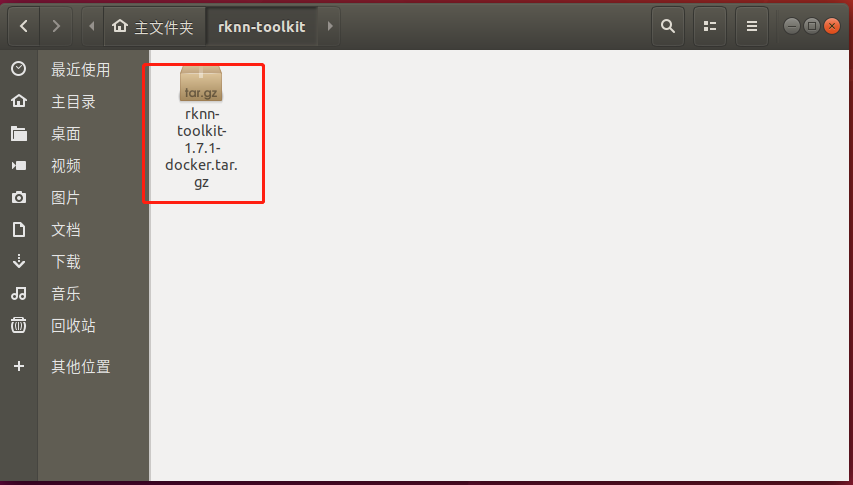
為了保證模型轉(zhuǎn)換工具順利運(yùn)行,請(qǐng)下載網(wǎng)盤里”AI算法開發(fā)/RKNN-Toolkit模型轉(zhuǎn)換工具/rknn-toolkit-v1.7.1/docker/rknn-toolkit-1.7.1-docker.tar.gz”。
網(wǎng)盤下載鏈接:https://pan.baidu.com/s/1LUtU_-on7UB3kvloJlAMkA 提取碼:teuc
7.3 把工具移到ubuntu18.04
把下載完成的docker鏡像移到我司的虛擬機(jī)ubuntu18.04的rknn-toolkit目錄,如下圖所示:
7.4 運(yùn)行模型轉(zhuǎn)換工具環(huán)境
7.4.1 打開終端
在該目錄打開終端:
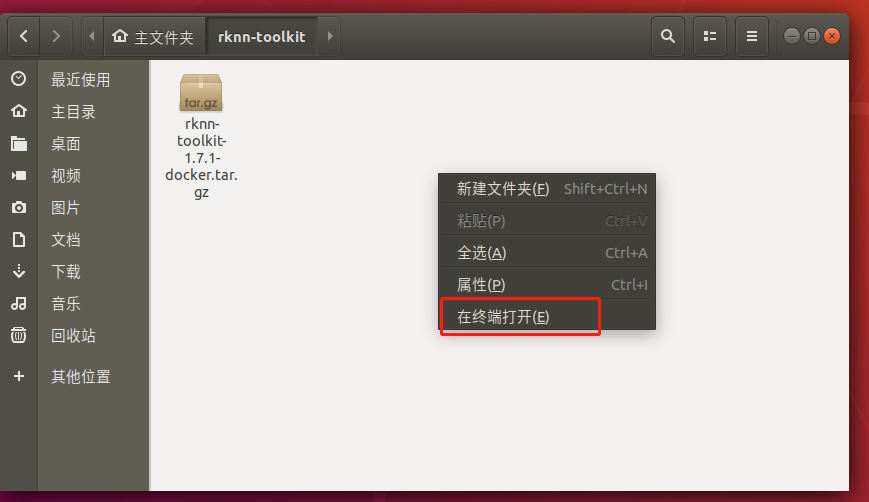
7.4.2 加載docker鏡像
執(zhí)行以下指令加載模型轉(zhuǎn)換工具docker鏡像:
docker load --input /home/developer/rknn-toolkit/rknn-toolkit-1.7.1-docker.tar.gz
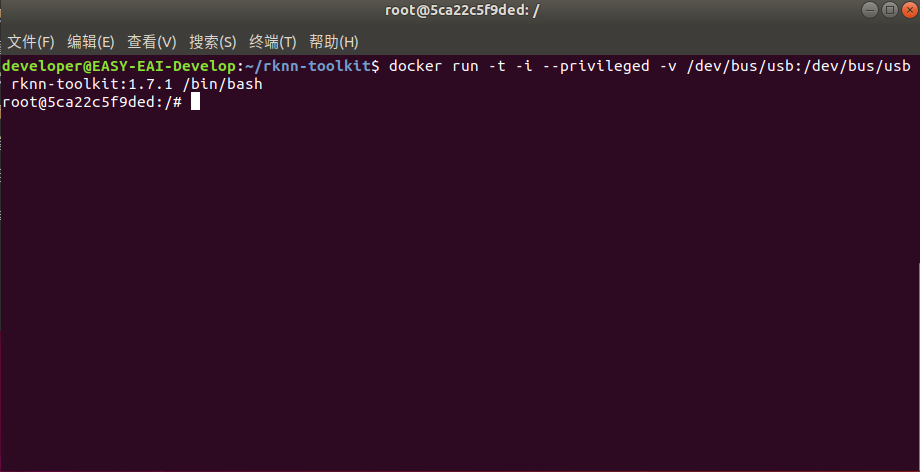
7.4.3 進(jìn)入鏡像bash環(huán)境
執(zhí)行以下指令進(jìn)入鏡像bash環(huán)境:
docker run -t -i --privileged -v /dev/bus/usb:/dev/bus/usb rknn-toolkit:1.7.1 /bin/bash
現(xiàn)象如下圖所示:
7.4.4 測(cè)試環(huán)境
輸入“python”加載python相關(guān)庫(kù),嘗試加載rknn庫(kù),如下圖環(huán)境測(cè)試成功:
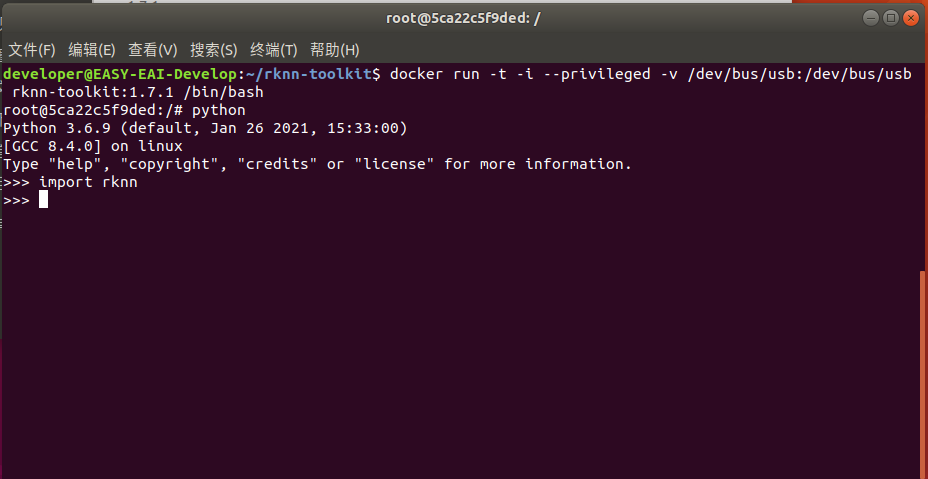
至此,模型轉(zhuǎn)換工具環(huán)境搭建完成。
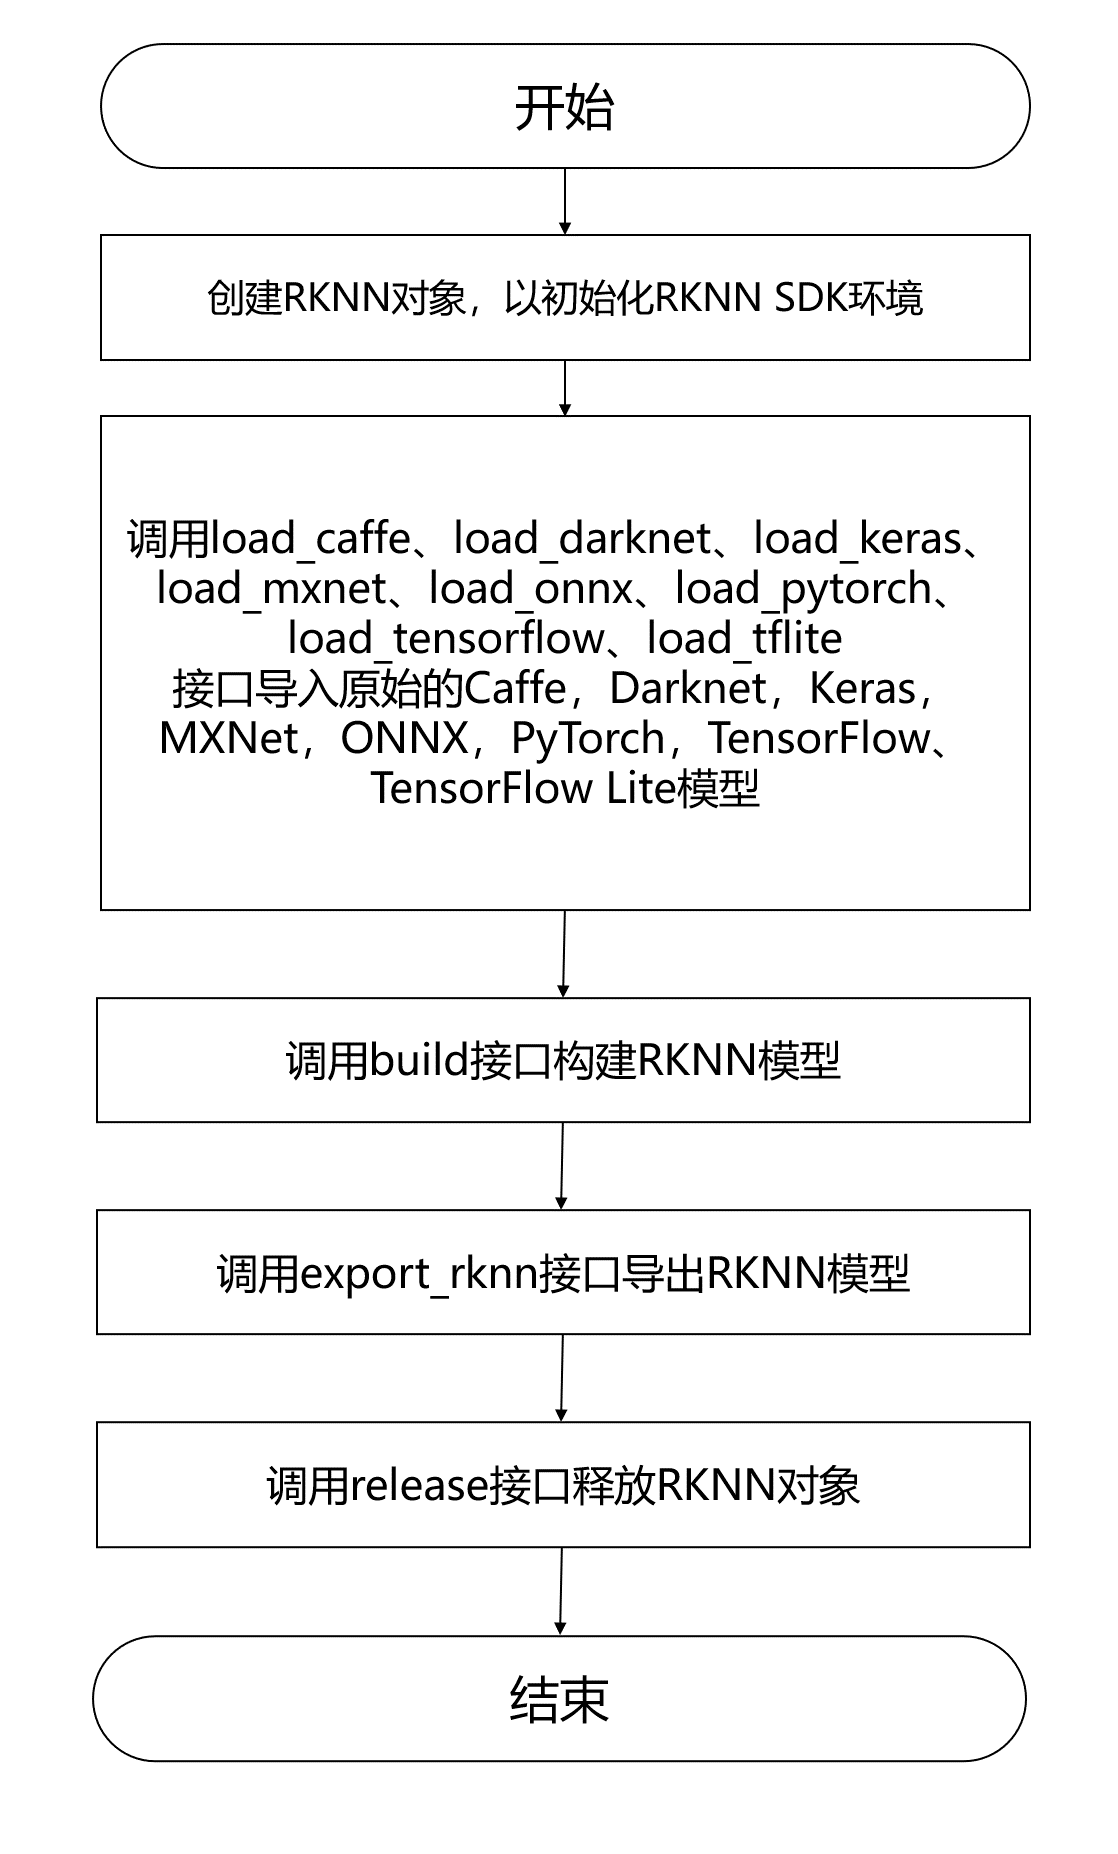
8. rknn模型轉(zhuǎn)換流程介紹
EASY EAI Nano支持.rknn后綴的模型的評(píng)估及運(yùn)行,對(duì)于常見的tensorflow、tensroflow lite、caffe、darknet、onnx和Pytorch模型都可以通過(guò)我們提供的 toolkit 工具將其轉(zhuǎn)換至 rknn 模型,而對(duì)于其他框架訓(xùn)練出來(lái)的模型,也可以先將其轉(zhuǎn)至 onnx 模型再轉(zhuǎn)換為 rknn 模型。模型轉(zhuǎn)換操作流程如下圖所示:
?
8.1 模型轉(zhuǎn)換Demo下載
下載百度網(wǎng)盤鏈接:https://pan.baidu.com/s/1uAiQ6edeGIDvQ7HAm7p0jg 提取碼:6666
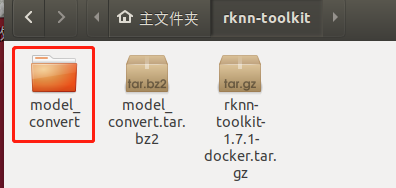
把model_convert.tar.bz2解壓到虛擬機(jī),如下圖所示:
8.2 進(jìn)入模型轉(zhuǎn)換工具docker環(huán)境
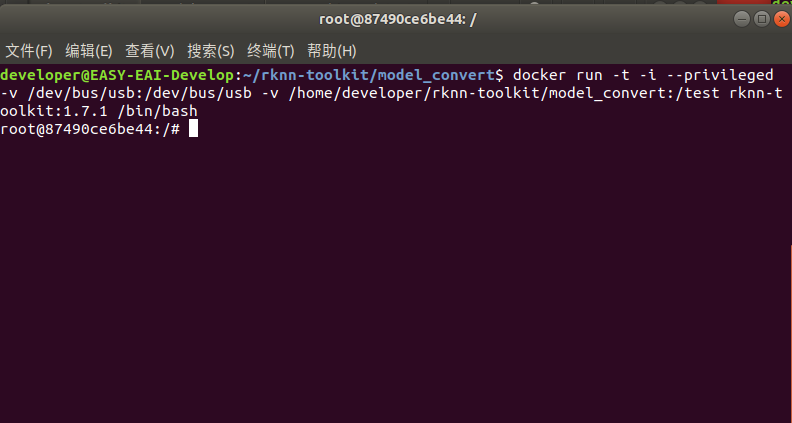
執(zhí)行以下指令把工作區(qū)域映射進(jìn)docker鏡像,其中/home/developer/rknn-toolkit/model_convert為工作區(qū)域,/test為映射到docker鏡像,/dev/bus/usb:/dev/bus/usb為映射usb到docker鏡像:
docker run -t -i --privileged -v /dev/bus/usb:/dev/bus/usb -v /home/developer/rknn-toolkit/model_convert:/test rknn-toolkit:1.7.1 /bin/bash
執(zhí)行成功如下圖所示:
?
8.3 模型轉(zhuǎn)換操作說(shuō)明
8.3.1 模型轉(zhuǎn)換Demo目錄結(jié)構(gòu)
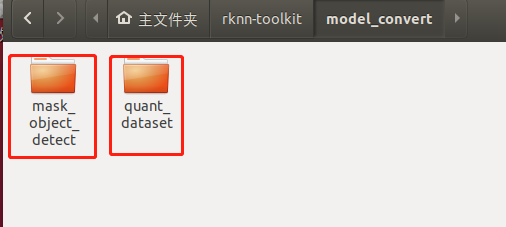
模型轉(zhuǎn)換測(cè)試Demo由mask_object_detect和quant_dataset組成。coco_object_detect存放軟件腳本,quant_dataset存放量化模型所需的數(shù)據(jù)。如下圖所示:
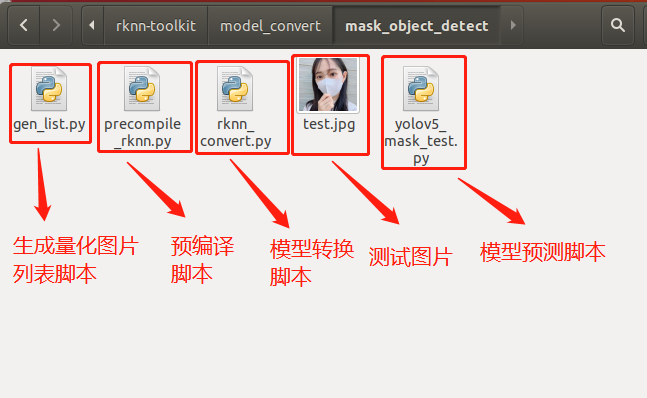
mask_object_detect文件夾存放以下內(nèi)容,如下圖所示:
8.3.2 生成量化圖片列表
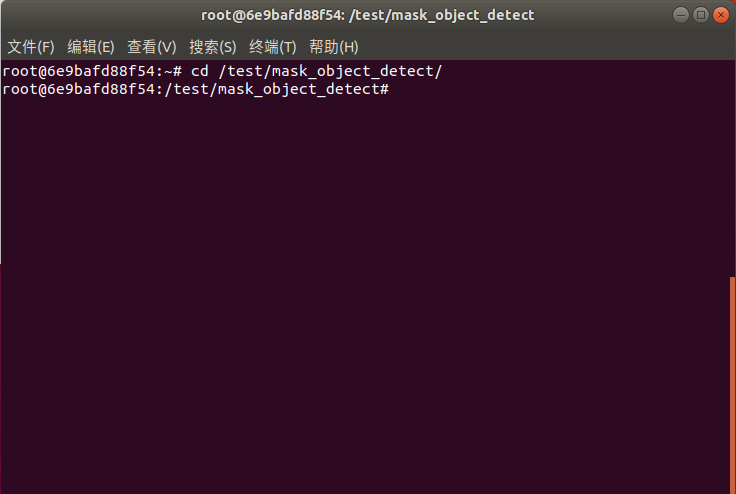
在docker環(huán)境切換到模型轉(zhuǎn)換工作目錄:
cd /test/mask_object_detect/
如下圖所示:
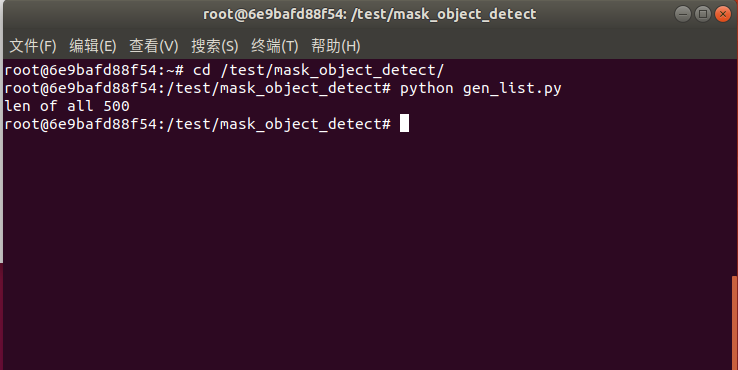
執(zhí)行g(shù)en_list.py生成量化圖片列表:
python gen_list.py
命令行現(xiàn)象如下圖所示:
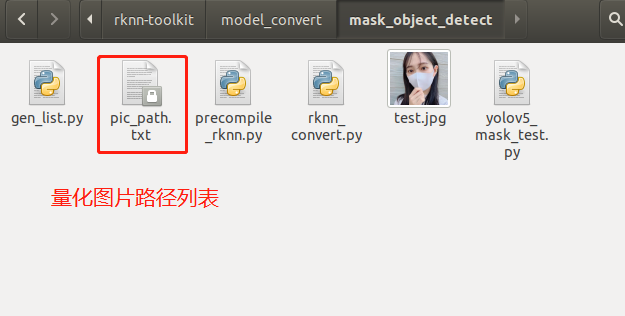
生成“量化圖片列表”如下文件夾所示:
8.3.3 onnx模型轉(zhuǎn)換為rknn模型
rknn_convert.py腳本默認(rèn)進(jìn)行int8量化操作,腳本代碼清單如下所示:
import os import urllib import traceback import time import sys import numpy as np import cv2 from rknn.api import RKNN ONNX_MODEL = 'best.onnx' RKNN_MODEL = './yolov5_mask_rv1126.rknn' DATASET = './pic_path.txt' QUANTIZE_ON = True if __name__ == '__main__': # Create RKNN object rknn = RKNN(verbose=True) if not os.path.exists(ONNX_MODEL): print('model not exist') exit(-1) # pre-process config print('--> Config model') rknn.config(reorder_channel='0 1 2', mean_values=[[0, 0, 0]], std_values=[[255, 255, 255]], optimization_level=3, target_platform = 'rv1126', output_optimize=1, quantize_input_node=QUANTIZE_ON) print('done') # Load ONNX model print('--> Loading model') ret = rknn.load_onnx(model=ONNX_MODEL) if ret != 0: print('Load yolov5 failed!') exit(ret) print('done') # Build model print('--> Building model') ret = rknn.build(do_quantization=QUANTIZE_ON, dataset=DATASET) if ret != 0: print('Build yolov5 failed!') exit(ret) print('done') # Export RKNN model print('--> Export RKNN model') ret = rknn.export_rknn(RKNN_MODEL) if ret != 0: print('Export yolov5rknn failed!') exit(ret) print('done')
把onnx模型best.onnx放到mask_object_detect目錄,并執(zhí)行rknn_convert.py腳本進(jìn)行模型轉(zhuǎn)換:
python rknn_convert.py
生成模型如下圖所示,此模型可以在rknn環(huán)境和EASY EAI Nano環(huán)境運(yùn)行:

?8.3.4 運(yùn)行rknn模型
用yolov5_mask_test.py腳本在PC端的環(huán)境下可以運(yùn)行rknn的模型,如下圖所示:
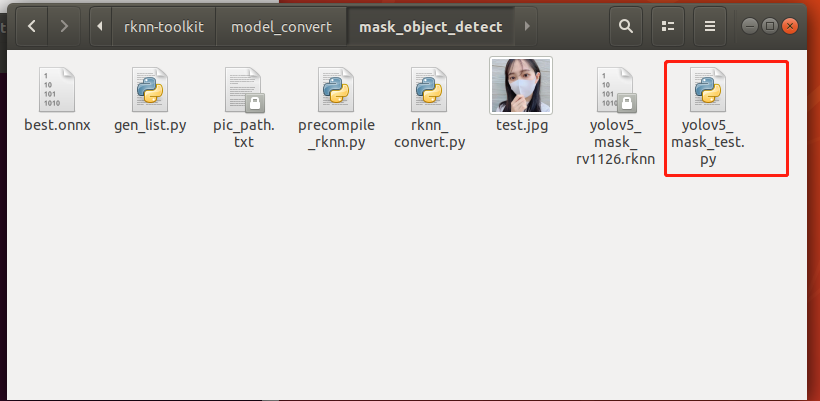
yolov5_mask_test.py腳本程序清單如下所示:
import os
import urllib
import traceback
import time
import sys
import numpy as np
import cv2
import random
from rknn.api import RKNN


RKNN_MODEL = 'yolov5_mask_rv1126.rknn'
IMG_PATH = './test.jpg'
DATASET = './dataset.txt'


BOX_THRESH = 0.25
NMS_THRESH = 0.6
IMG_SIZE = 640


CLASSES = ("head", "mask")


def sigmoid(x):
    return 1 / (1 + np.exp(-x))

def xywh2xyxy(x):
    # Convert [x, y, w, h] to [x1, y1, x2, y2]
    y = np.copy(x)
    y[:, 0] = x[:, 0] - x[:, 2] / 2  # top left x
    y[:, 1] = x[:, 1] - x[:, 3] / 2  # top left y
    y[:, 2] = x[:, 0] + x[:, 2] / 2  # bottom right x
    y[:, 3] = x[:, 1] + x[:, 3] / 2  # bottom right y
    return y

def process(input, mask, anchors):

    anchors = [anchors[i] for i in mask]
    grid_h, grid_w = map(int, input.shape[0:2])

    box_confidence = sigmoid(input[..., 4])
    box_confidence = np.expand_dims(box_confidence, axis=-1)

    box_class_probs = sigmoid(input[..., 5:])

    box_xy = sigmoid(input[..., :2])*2 - 0.5

    col = np.tile(np.arange(0, grid_w), grid_w).reshape(-1, grid_w)
    row = np.tile(np.arange(0, grid_h).reshape(-1, 1), grid_h)
    col = col.reshape(grid_h, grid_w, 1, 1).repeat(3, axis=-2)
    row = row.reshape(grid_h, grid_w, 1, 1).repeat(3, axis=-2)
    grid = np.concatenate((col, row), axis=-1)
    box_xy += grid
    box_xy *= int(IMG_SIZE/grid_h)

    box_wh = pow(sigmoid(input[..., 2:4])*2, 2)
    box_wh = box_wh * anchors

    box = np.concatenate((box_xy, box_wh), axis=-1)

    return box, box_confidence, box_class_probs

def filter_boxes(boxes, box_confidences, box_class_probs):
	"""Filter boxes with box threshold. It's a bit different with origin yolov5 post process!

	# Arguments
		boxes: ndarray, boxes of objects.
		box_confidences: ndarray, confidences of objects.
		box_class_probs: ndarray, class_probs of objects.

	# Returns
		boxes: ndarray, filtered boxes.
		classes: ndarray, classes for boxes.
		scores: ndarray, scores for boxes.
	"""
	box_scores = box_confidences * box_class_probs
	box_classes = np.argmax(box_class_probs, axis=-1)
	box_class_scores = np.max(box_scores, axis=-1)
	pos = np.where(box_confidences[...,0] >= BOX_THRESH)


	boxes = boxes[pos]
	classes = box_classes[pos]
	scores = box_class_scores[pos]

	return boxes, classes, scores

def nms_boxes(boxes, scores):
    """Suppress non-maximal boxes.

    # Arguments
        boxes: ndarray, boxes of objects.
        scores: ndarray, scores of objects.

    # Returns
        keep: ndarray, index of effective boxes.
    """
    x = boxes[:, 0]
    y = boxes[:, 1]
    w = boxes[:, 2] - boxes[:, 0]
    h = boxes[:, 3] - boxes[:, 1]

    areas = w * h
    order = scores.argsort()[::-1]

    keep = []
    while order.size > 0:
        i = order[0]
        keep.append(i)

        xx1 = np.maximum(x[i], x[order[1:]])
        yy1 = np.maximum(y[i], y[order[1:]])
        xx2 = np.minimum(x[i] + w[i], x[order[1:]] + w[order[1:]])
        yy2 = np.minimum(y[i] + h[i], y[order[1:]] + h[order[1:]])

        w1 = np.maximum(0.0, xx2 - xx1 + 0.00001)
        h1 = np.maximum(0.0, yy2 - yy1 + 0.00001)
        inter = w1 * h1

        ovr = inter / (areas[i] + areas[order[1:]] - inter)
        inds = np.where(ovr <= NMS_THRESH)[0]
        order = order[inds + 1]
    keep = np.array(keep)
    return keep


def yolov5_post_process(input_data):
    masks = [[0, 1, 2], [3, 4, 5], [6, 7, 8]]
    anchors = [[10, 13], [16, 30], [33, 23], [30, 61], [62, 45],
              [59, 119], [116, 90], [156, 198], [373, 326]]

    boxes, classes, scores = [], [], []
    for input,mask in zip(input_data, masks):
        b, c, s = process(input, mask, anchors)
        b, c, s = filter_boxes(b, c, s)
        boxes.append(b)
        classes.append(c)
        scores.append(s)

    boxes = np.concatenate(boxes)
    boxes = xywh2xyxy(boxes)
    classes = np.concatenate(classes)
    scores = np.concatenate(scores)

    nboxes, nclasses, nscores = [], [], []
    for c in set(classes):
        inds = np.where(classes == c)
        b = boxes[inds]
        c = classes[inds]
        s = scores[inds]

        keep = nms_boxes(b, s)

        nboxes.append(b[keep])
        nclasses.append(c[keep])
        nscores.append(s[keep])

    if not nclasses and not nscores:
        return None, None, None

    boxes = np.concatenate(nboxes)
    classes = np.concatenate(nclasses)
    scores = np.concatenate(nscores)

    return boxes, classes, scores

def scale_coords(x1, y1, x2, y2, dst_width, dst_height):

	dst_top, dst_left, dst_right, dst_bottom = 0, 0, 0, 0
	gain = 0

	if dst_width > dst_height:
		image_max_len = dst_width
		gain = IMG_SIZE / image_max_len
		resized_height = dst_height * gain
		height_pading = (IMG_SIZE - resized_height)/2
		print("height_pading:", height_pading)
		y1 = (y1 - height_pading)
		y2 = (y2 - height_pading)

	print("gain:", gain)
	dst_x1 = int(x1 / gain)
	dst_y1 = int(y1 / gain)
	dst_x2 = int(x2 / gain)
	dst_y2 = int(y2 / gain)

	return dst_x1, dst_y1, dst_x2, dst_y2

def plot_one_box(x, img, color=None, label=None, line_thickness=None):
    tl = line_thickness or round(0.002 * (img.shape[0] + img.shape[1]) / 2) + 1  # line/font thickness
    color = color or [random.randint(0, 255) for _ in range(3)]
    c1, c2 = (int(x[0]), int(x[1])), (int(x[2]), int(x[3]))
    cv2.rectangle(img, c1, c2, color, thickness=tl, lineType=cv2.LINE_AA)
    if label:
        tf = max(tl - 1, 1)  # font thickness
        t_size = cv2.getTextSize(label, 0, fontScale=tl / 3, thickness=tf)[0]
        c2 = c1[0] + t_size[0], c1[1] - t_size[1] - 3
        cv2.rectangle(img, c1, c2, color, -1, cv2.LINE_AA)  # filled
        cv2.putText(img, label, (c1[0], c1[1] - 2), 0, tl / 3, [225, 255, 255], thickness=tf, lineType=cv2.LINE_AA)

def draw(image, boxes, scores, classes):
	"""Draw the boxes on the image.

	# Argument:
		image: original image.
		boxes: ndarray, boxes of objects.
		classes: ndarray, classes of objects.
		scores: ndarray, scores of objects.
		all_classes: all classes name.
	"""
	for box, score, cl in zip(boxes, scores, classes):

		x1, y1, x2, y2 = box
		print('class: {}, score: {}'.format(CLASSES[cl], score))
		print('box coordinate x1,y1,x2,y2: [{}, {}, {}, {}]'.format(x1, y1, x2, y2))
		x1 = int(x1)
		y1 = int(y1)
		x2 = int(x2)
		y2 = int(y2)

		dst_x1, dst_y1, dst_x2, dst_y2 = scale_coords(x1, y1, x2, y2, image.shape[1], image.shape[0])
		#print("img.cols:", image.cols)

		plot_one_box((dst_x1, dst_y1, dst_x2, dst_y2), image, label='{0} {1:.2f}'.format(CLASSES[cl], score))


		'''
		cv2.rectangle(image, (dst_x1, dst_y1), (dst_x2, dst_y2), (255, 0, 0), 2)
		cv2.putText(image, '{0} {1:.2f}'.format(CLASSES[cl], score),
					(dst_x1, dst_y1 - 6),
					cv2.FONT_HERSHEY_SIMPLEX,
					0.6, (0, 0, 255), 2)
		'''


def letterbox(im, new_shape=(640, 640), color=(0, 0, 0)):
    # Resize and pad image while meeting stride-multiple constraints
    shape = im.shape[:2]  # current shape [height, width]
    if isinstance(new_shape, int):
        new_shape = (new_shape, new_shape)

    # Scale ratio (new / old)
    r = min(new_shape[0] / shape[0], new_shape[1] / shape[1])

    # Compute padding
    ratio = r, r  # width, height ratios
    new_unpad = int(round(shape[1] * r)), int(round(shape[0] * r))
    dw, dh = new_shape[1] - new_unpad[0], new_shape[0] - new_unpad[1]  # wh padding

    dw /= 2  # divide padding into 2 sides
    dh /= 2

    if shape[::-1] != new_unpad:  # resize
        im = cv2.resize(im, new_unpad, interpolation=cv2.INTER_LINEAR)
    top, bottom = int(round(dh - 0.1)), int(round(dh + 0.1))
    left, right = int(round(dw - 0.1)), int(round(dw + 0.1))
    im = cv2.copyMakeBorder(im, top, bottom, left, right, cv2.BORDER_CONSTANT, value=color)  # add border
    return im, ratio, (dw, dh)


if __name__ == '__main__':

	# Create RKNN object
	rknn = RKNN(verbose=True)

	print('--> Loading model')
	ret = rknn.load_rknn(RKNN_MODEL)
	if ret != 0:
		print('load rknn model failed')
		exit(ret)
	print('done')

	# init runtime environment
	print('--> Init runtime environment')
	ret = rknn.init_runtime()
	# ret = rknn.init_runtime('rv1126', device_id='1126')
	if ret != 0:
		print('Init runtime environment failed')
		exit(ret)
	print('done')

	# Set inputs
	img = cv2.imread(IMG_PATH)
	letter_img, ratio, (dw, dh) = letterbox(img, new_shape=(IMG_SIZE, IMG_SIZE))
	letter_img = cv2.cvtColor(letter_img, cv2.COLOR_BGR2RGB)


	# Inference
	print('--> Running model')
	outputs = rknn.inference(inputs=[letter_img])

	print('--> inference done')

	# post process
	input0_data = outputs[0]
	input1_data = outputs[1]
	input2_data = outputs[2]

	input0_data = input0_data.reshape([3,-1]+list(input0_data.shape[-2:]))
	input1_data = input1_data.reshape([3,-1]+list(input1_data.shape[-2:]))
	input2_data = input2_data.reshape([3,-1]+list(input2_data.shape[-2:]))

	input_data = list()
	input_data.append(np.transpose(input0_data, (2, 3, 0, 1)))
	input_data.append(np.transpose(input1_data, (2, 3, 0, 1)))
	input_data.append(np.transpose(input2_data, (2, 3, 0, 1)))

	print('--> transpose done')

	boxes, classes, scores = yolov5_post_process(input_data)

	print('--> get result done')

	#img_1 = cv2.cvtColor(img, cv2.COLOR_RGB2BGR)
	if boxes is not None:
		draw(img, boxes, scores, classes)

	cv2.imwrite('./result.jpg', img)
	#cv2.imshow("post process result", img_1)
	#cv2.waitKeyEx(0)

	rknn.release()
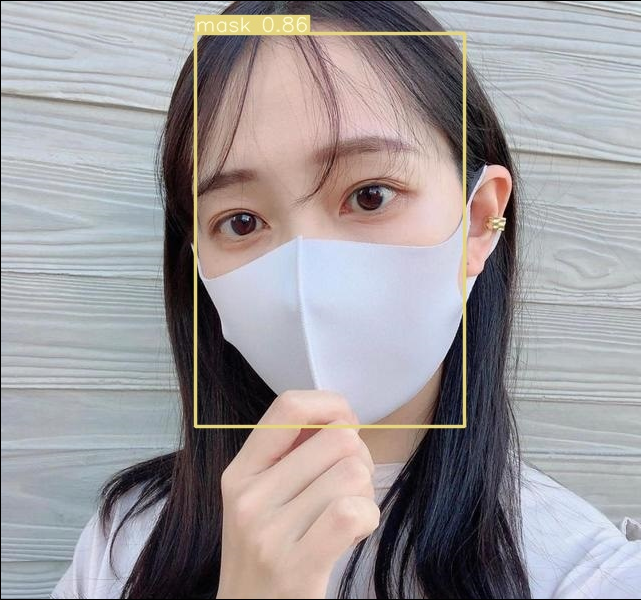
執(zhí)行后得到result.jpg如下圖所示:
8.3.5 模型預(yù)編譯
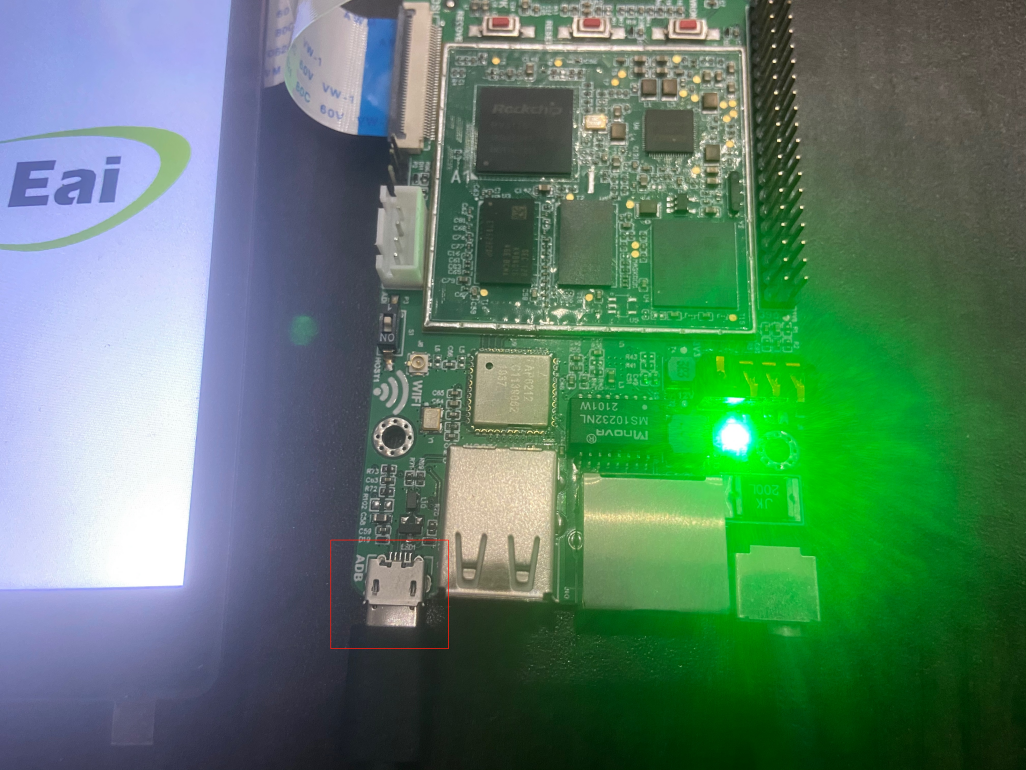
由于rknn模型用NPU API在EASY EAI Nano加載的時(shí)候啟動(dòng)速度會(huì)好慢,在評(píng)估完模型精度沒問(wèn)題的情況下,建議進(jìn)行模型預(yù)編譯。預(yù)編譯的時(shí)候需要通過(guò)EASY EAI Nano主板的環(huán)境,所以請(qǐng)務(wù)必接上adb口與ubuntu保證穩(wěn)定連接。
板子端接線如下圖所示,撥碼開關(guān)需要是adb:
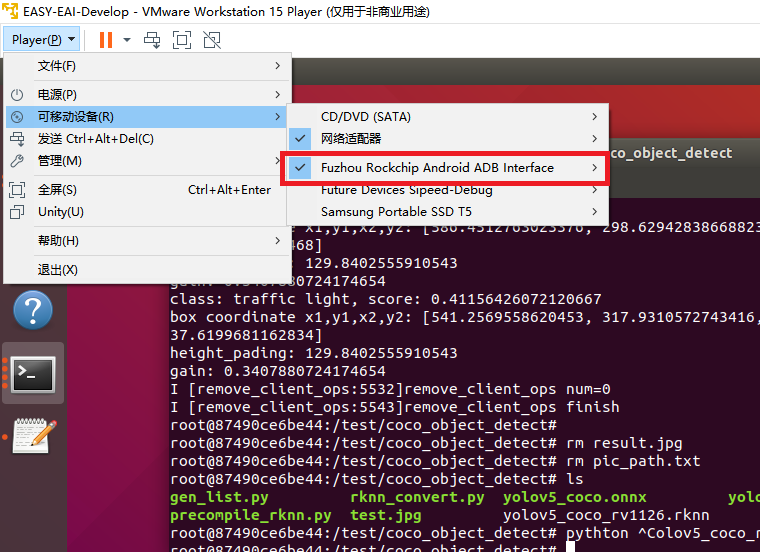
虛擬機(jī)要保證接上adb設(shè)備:
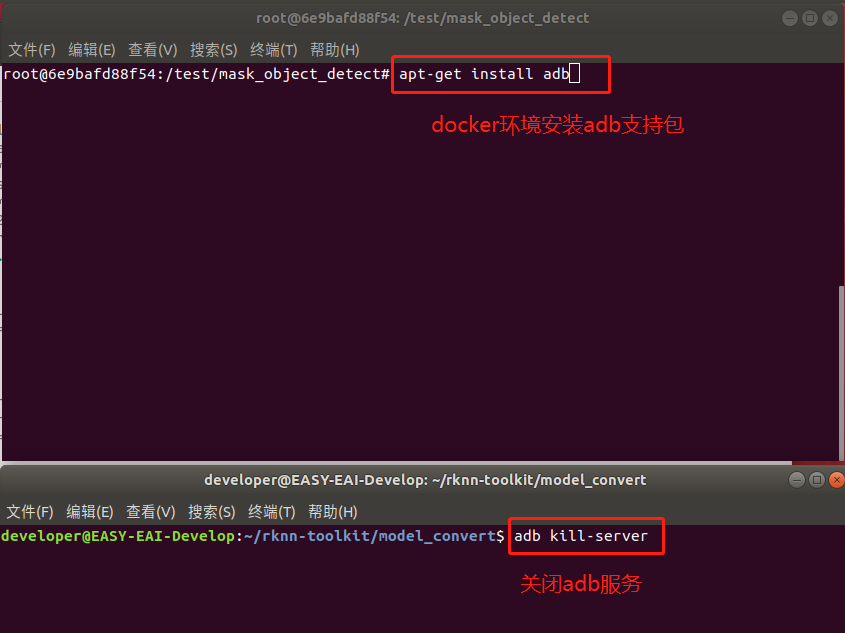
由于在虛擬機(jī)里ubuntu環(huán)境與docker環(huán)境對(duì)adb設(shè)備資源是競(jìng)爭(zhēng)關(guān)系,所以需要關(guān)掉ubuntu環(huán)境下的adb服務(wù),且在docker里面通過(guò)apt-get安裝adb軟件包。以下指令在ubuntu環(huán)境與docker環(huán)境里各自執(zhí)行:
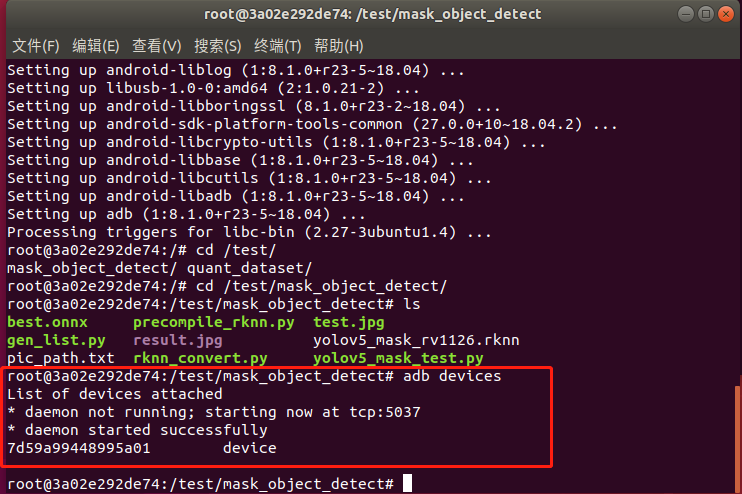
在docker環(huán)境里執(zhí)行adb devices,現(xiàn)象如下圖所示則設(shè)備連接成功:
運(yùn)行precompile_rknn.py腳本把模型執(zhí)行預(yù)編譯:
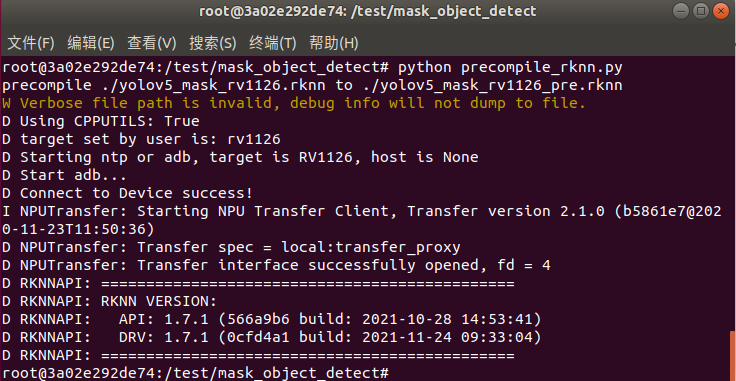
python precompile_rknn.py
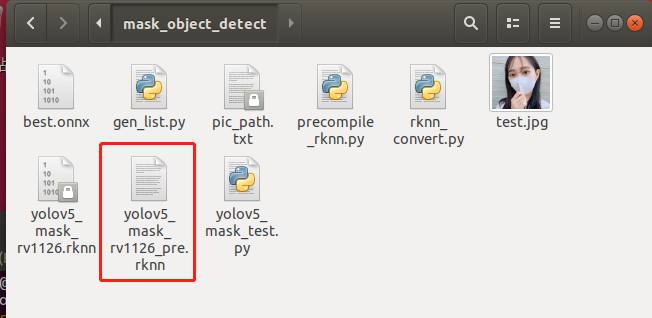
執(zhí)行效果如下圖所示,生成預(yù)編譯模型yolov5_mask_rv1126_pre.rknn:
至此預(yù)編譯部署完成,模型轉(zhuǎn)換步驟已全部完成。生成如下預(yù)編譯后的int8量化模型:
9. 模型部署示例
9.1 模型部署示例介紹
本小節(jié)展示yolov5模型的在EASY EAI Nano的部署過(guò)程,該模型僅經(jīng)過(guò)簡(jiǎn)單訓(xùn)練供示例使用,不保證模型精度。
9.2 準(zhǔn)備工作
9.2.1 硬件準(zhǔn)備
EASY EAI Nano開發(fā)板,microUSB數(shù)據(jù)線,帶linux操作系統(tǒng)的電腦。需保證EASY EAI Nano與linux系統(tǒng)保持adb連接。
9.2.2 交叉編譯環(huán)境準(zhǔn)備
本示例需要交叉編譯環(huán)境的支持,可以參考在線文檔“入門指南/開發(fā)環(huán)境準(zhǔn)備/安裝交叉編譯工具鏈”。
9.2.3 文件下載
下載yolov5 C Demo示例文件。
下載解壓后如下圖所示:

9.3 在EASY EAI Nano運(yùn)行yolov5 demo
9.3.1 解壓yolov5 demo
下載程序包移至ubuntu環(huán)境后,執(zhí)行以下指令解壓:
tar -xvf yolov5_detect_C_demo.tar.bz2
9.3.2 編譯yolov5 demo
執(zhí)行以下腳本編譯demo:
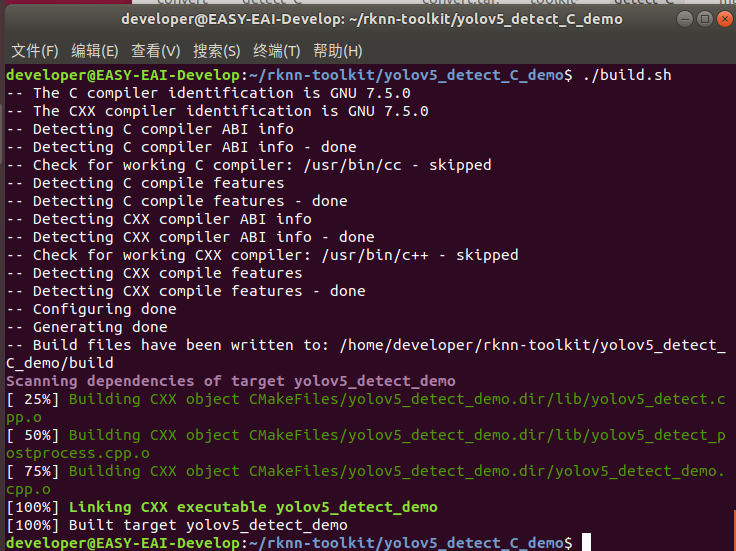
./build.sh
編譯成功后如下圖所示:
?9.3.3 執(zhí)行yolov5 demo
執(zhí)行以下指令把可執(zhí)行程序推送到開發(fā)板端:
adb push yolov5_detect_demo_release/ /userdata
登錄到開發(fā)板執(zhí)行程序:
adb shell cd /userdata/yolov5_detect_demo_release/ ./yolov5_detect_demo
? 執(zhí)行結(jié)果如下圖所示,算法執(zhí)行時(shí)間為50ms:

取回測(cè)試圖片:
adb pull /userdata/yolov5_detect_demo_release/result.jpg .
測(cè)試結(jié)果如下圖所示:
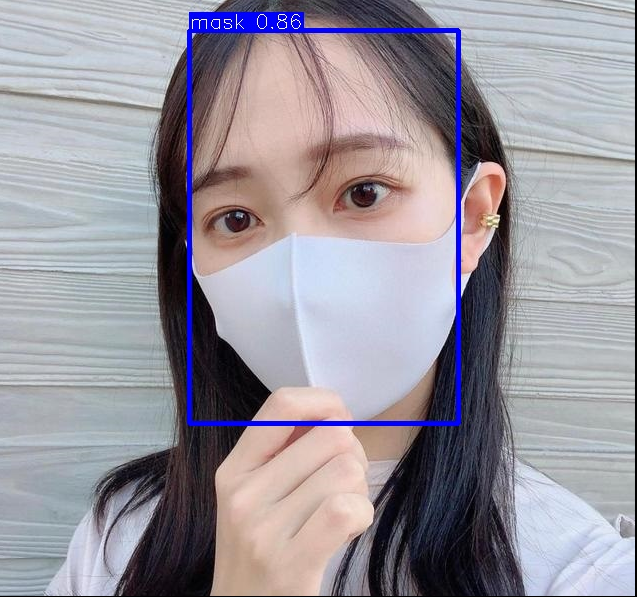
10. 基于攝像頭的AI Demo
10.1 攝像頭Demo介紹
本小節(jié)展示yolov5模型的在EASY EAI Nano執(zhí)行攝像頭Demo的過(guò)程,該模型僅經(jīng)過(guò)簡(jiǎn)單訓(xùn)練供示例使用,不保證模型精度。
10.2 準(zhǔn)備工作
10.2.1 硬件準(zhǔn)備
EASY-EAI-Nano人工智能開發(fā)套件(包括:EASY EAI Nano開發(fā)板,雙目攝像頭,5寸高清屏幕,microUSB數(shù)據(jù)線),帶linux操作系統(tǒng)的電腦,。需保證EASY EAI Nano與linux系統(tǒng)保持adb連接。
10.2.2 交叉編譯環(huán)境準(zhǔn)備
本示例需要交叉編譯環(huán)境的支持,可以參考在線文檔“入門指南/開發(fā)環(huán)境準(zhǔn)備/安裝交叉編譯工具鏈”。
鏈接為:https://www.easy-eai.com/document_details/3/135。
10.2.3 文件下載
攝像頭識(shí)別Demo的程序源碼可以通過(guò)百度網(wǎng)盤下載:
https://pan.baidu.com/s/18cAp4yT_LhDZ5XAHG-L1lw(提取碼:6666)。
下載解壓后如下圖所示:
?
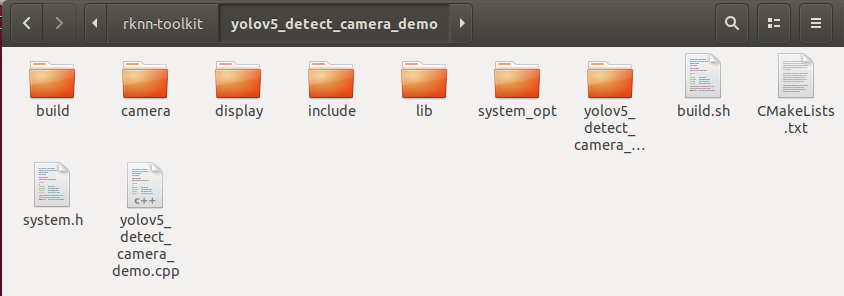
10.3 在EASY EAI Nano運(yùn)行yolov5 demo
10.3.1 解壓yolov5 camera demo
下載程序包移至ubuntu環(huán)境后,執(zhí)行以下指令解壓:
tar -xvf yolov5_detect_camera_demo.tar.tar.bz2
10.3.2 編譯yolov5 camera demo
執(zhí)行以下腳本編譯demo:
./build.sh
編譯成功后如下圖所示:

10.3.3 執(zhí)行yolov5 camera demo
執(zhí)行以下指令把可執(zhí)行程序推送到開發(fā)板端:
adb push yolov5_detect_camera_demo_release/ /userdata
登錄到開發(fā)板執(zhí)行程序:
adb shell cd /userdata/yolov5_detect_camera_demo_release/ ./yolov5_detect_camera_demo
測(cè)試結(jié)果如下圖所示:
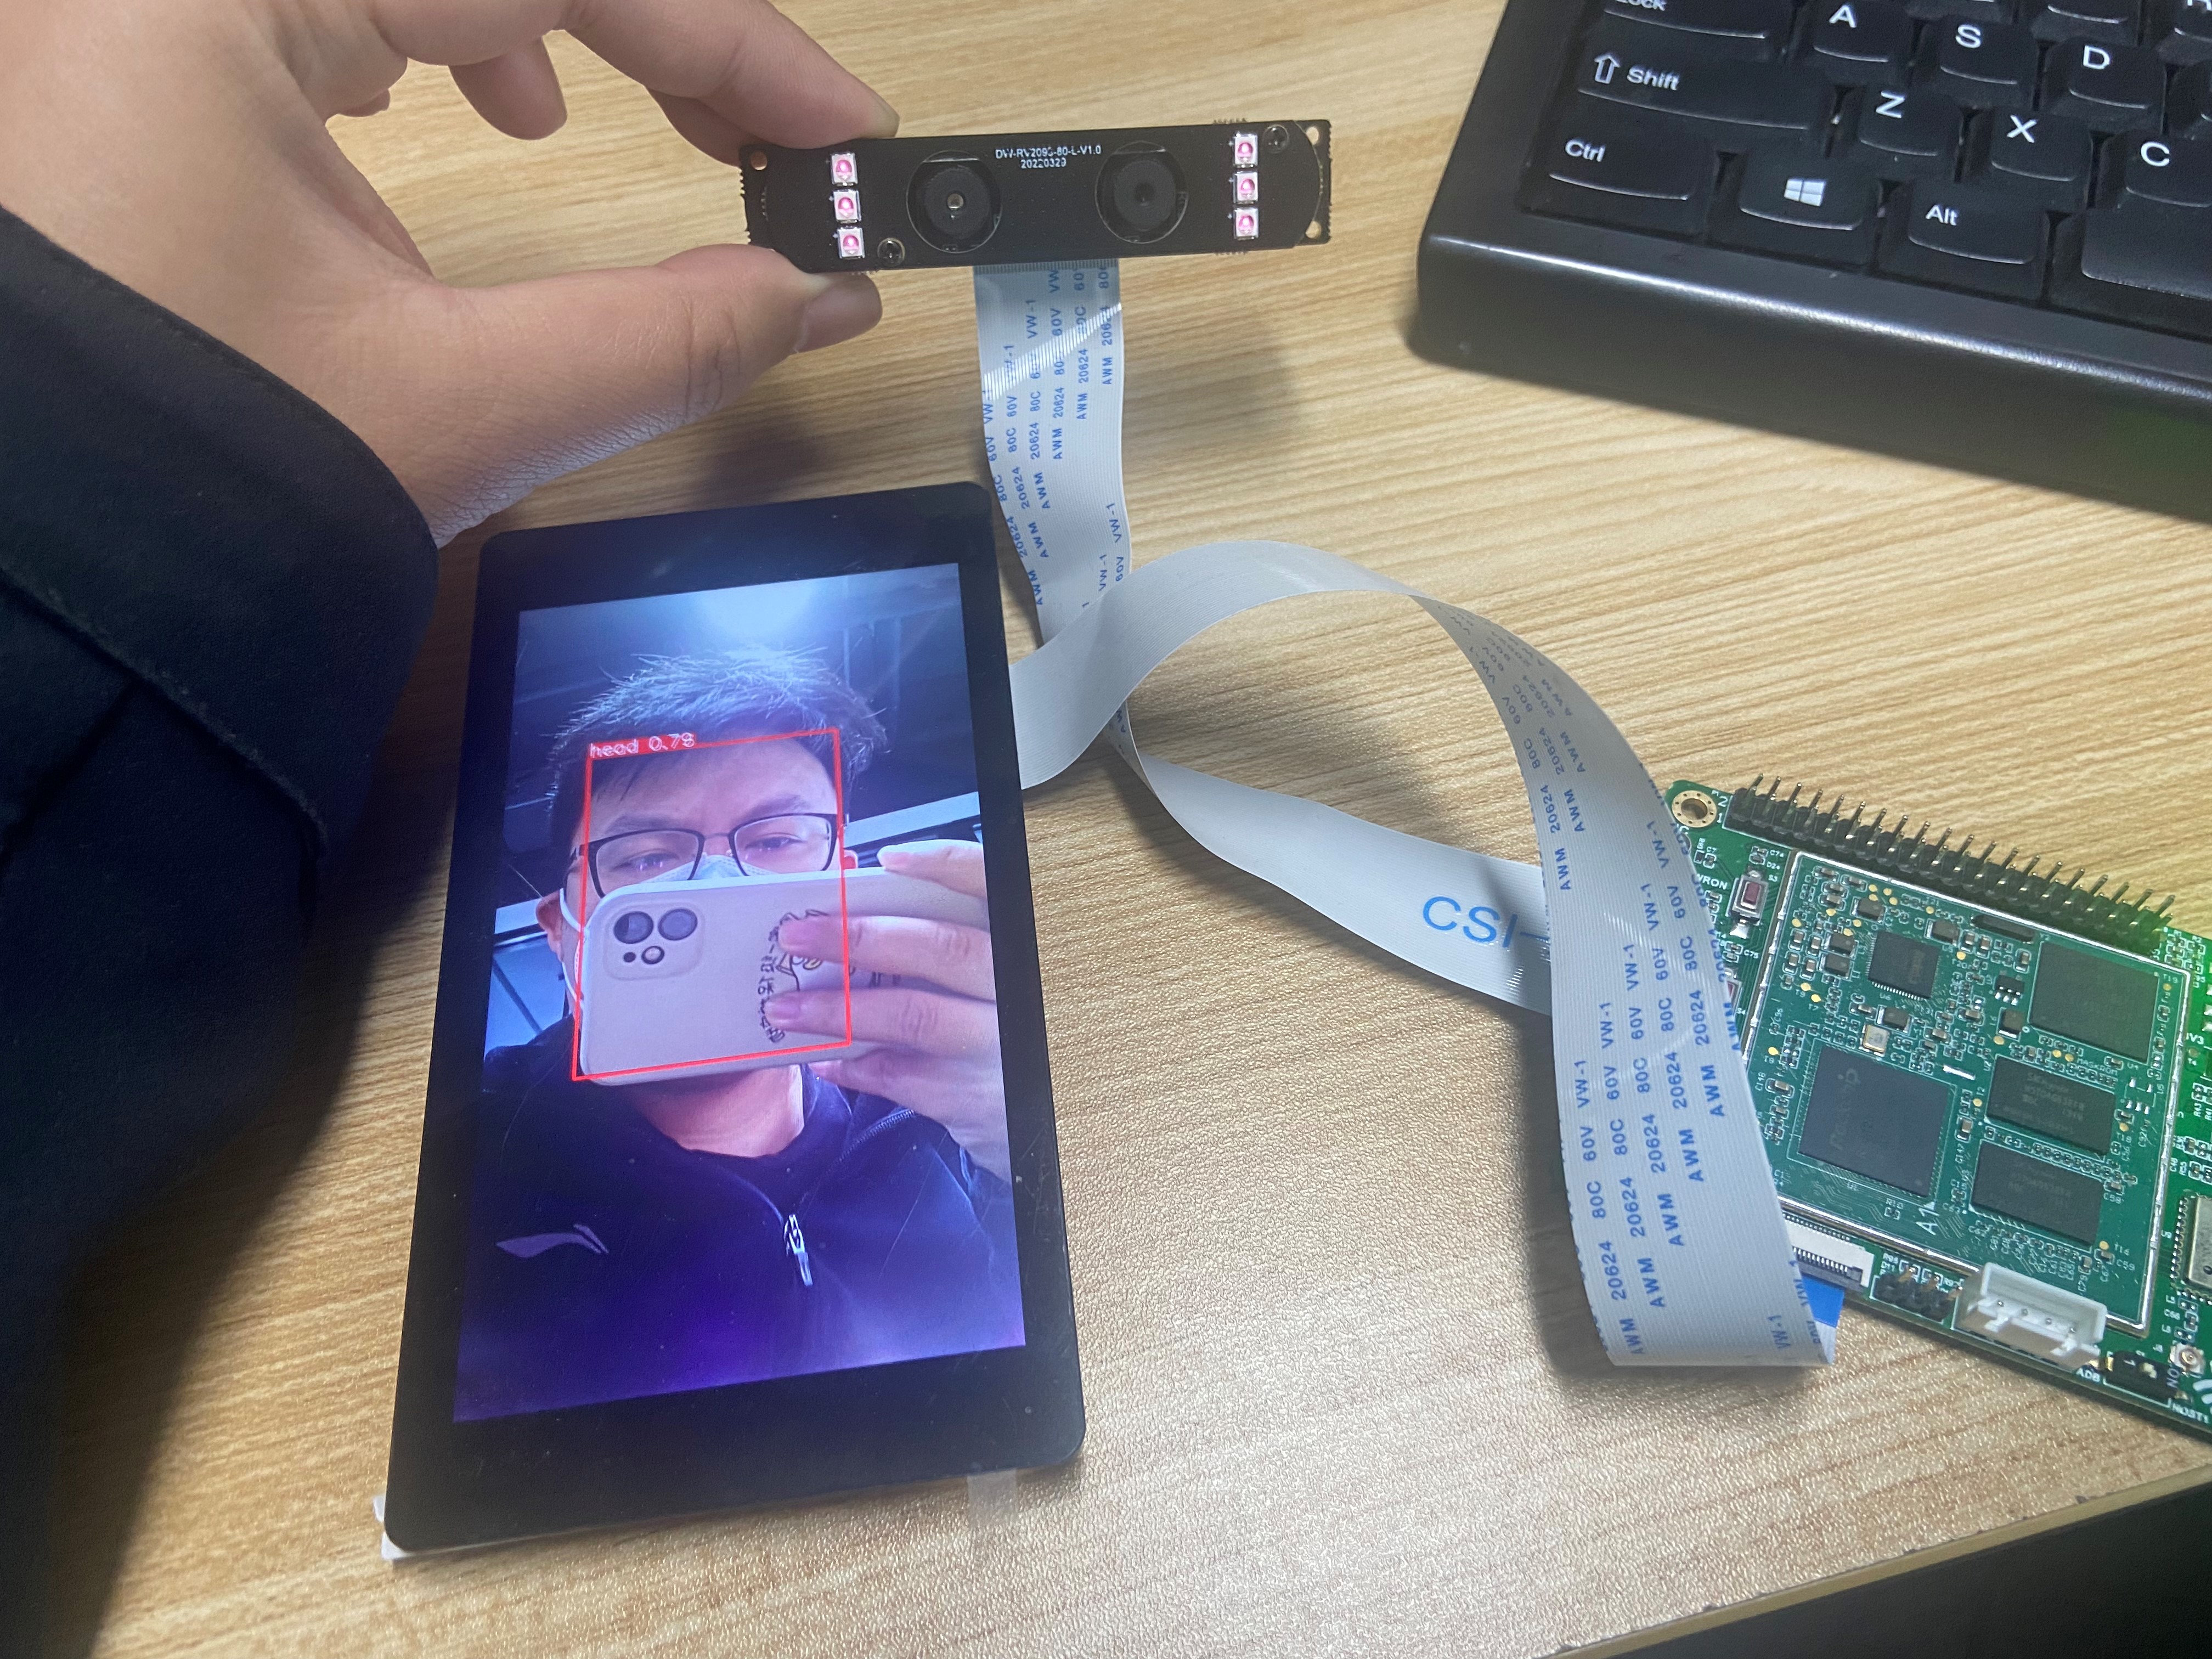
硬件使用
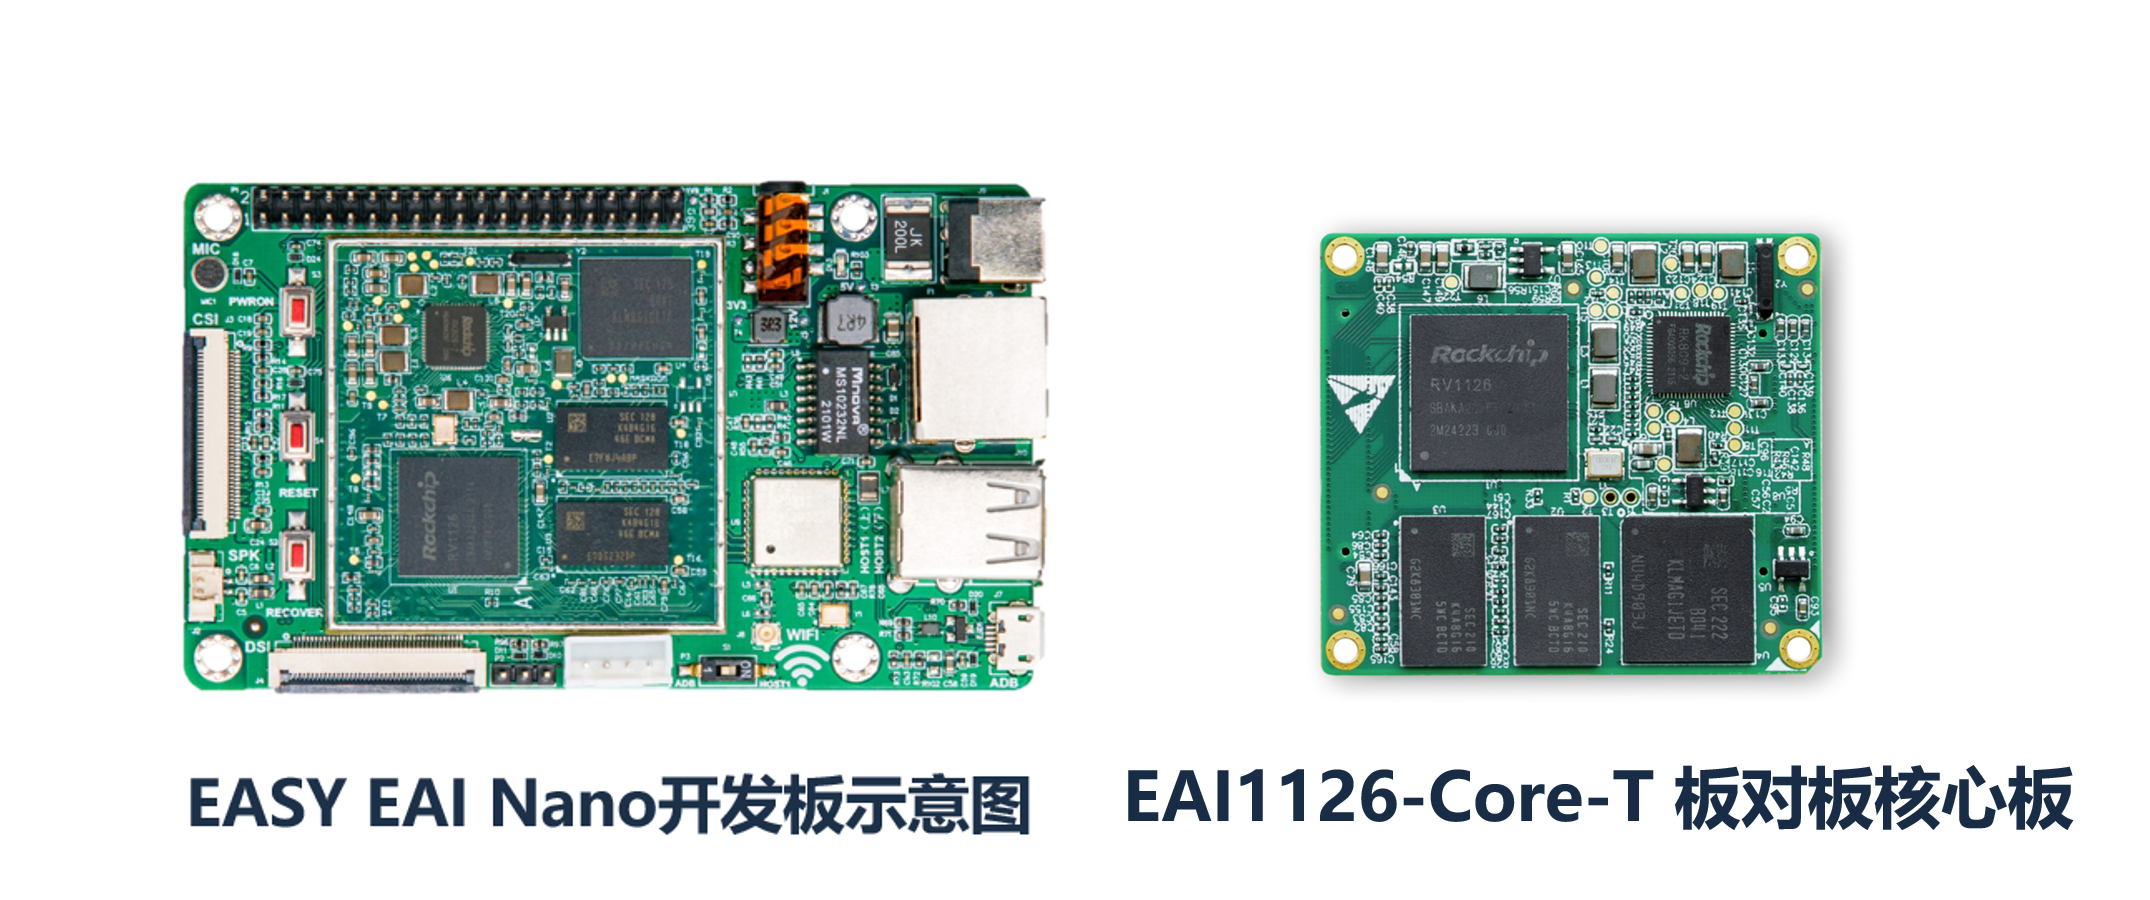
本教程使用的是EASY EAI nano(RV1126)開發(fā)板。
EASY EAI Nano是基于瑞芯微RV1126 處理器設(shè)計(jì),具有四核CPU@1.5GHz與NPU@2Tops AI邊緣計(jì)算能力。實(shí)現(xiàn)AI運(yùn)算的功耗不及所需GPU的10%。配套AI算法工具完善,支持Tensorflow、Pytorch、Caffe、MxNet、DarkNet、ONNX等主流AI框架直接轉(zhuǎn)換和部署。有豐富的軟硬件開發(fā)資料,而且外設(shè)資源豐富,接口齊全,還有豐富的功能配件可供選擇。集成有以太網(wǎng)、Wi-Fi 等通信外設(shè)。攝像頭、顯示屏(帶電容觸摸)、喇叭、麥克風(fēng)等交互外設(shè)。2 路 USB Host 接口、1 路 USB Device 調(diào)試接口。集成協(xié)議串口、TF 卡、IO 拓展接口(兼容樹莓派/Jetson nano拓展接口)等通用外設(shè)。內(nèi)置人臉識(shí)別、安全帽監(jiān)測(cè)、人體骨骼點(diǎn)識(shí)別、火焰檢測(cè)、車輛檢測(cè)等各類 AI 算法,并提供完整的 Linux 開發(fā)包供客戶二次開發(fā)。
?
-
模型
+關(guān)注
關(guān)注
1文章
3226瀏覽量
48807 -
目標(biāo)檢測(cè)
+關(guān)注
關(guān)注
0文章
209瀏覽量
15605
發(fā)布評(píng)論請(qǐng)先 登錄
相關(guān)推薦
什么是YOLO?RK3568+YOLOv5是如何實(shí)現(xiàn)物體識(shí)別的?一起來(lái)了解一下!

在RK3568教學(xué)實(shí)驗(yàn)箱上實(shí)現(xiàn)基于YOLOV5的算法物體識(shí)別案例詳解
在樹莓派上部署YOLOv5進(jìn)行動(dòng)物目標(biāo)檢測(cè)的完整流程
YOLOv6在LabVIEW中的推理部署(含源碼)
RK3588 技術(shù)分享 | 在Android系統(tǒng)中使用NPU實(shí)現(xiàn)Yolov5分類檢測(cè)
【飛凌嵌入式OK3576-C開發(fā)板體驗(yàn)】rknn實(shí)現(xiàn)yolo5目標(biāo)檢測(cè)
RK3588 技術(shù)分享 | 在Android系統(tǒng)中使用NPU實(shí)現(xiàn)Yolov5分類檢測(cè)-迅為電子



 【教程】yolov5訓(xùn)練部署全鏈路教程


評(píng)論