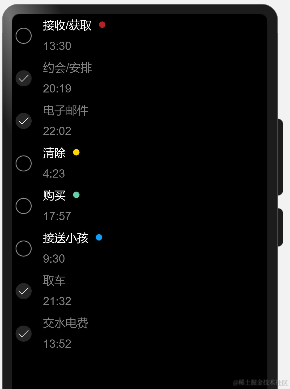
列表的編輯模式用途十分廣泛,常見(jiàn)于待辦事項(xiàng)管理、文件管理、備忘錄的記錄管理等應(yīng)用場(chǎng)景。
在列表的編輯模式下,新增和刪除列表項(xiàng)是最基礎(chǔ)的功能,其核心是對(duì)列表項(xiàng)對(duì)應(yīng)的數(shù)據(jù)集合進(jìn)行數(shù)據(jù)添加和刪除。
下面以待辦事項(xiàng)管理為例,介紹如何快速實(shí)現(xiàn)新增和刪除列表項(xiàng)功能。
環(huán)境要求
本例基于以下環(huán)境開(kāi)發(fā),開(kāi)發(fā)者也可以基于其他適配的版本進(jìn)行開(kāi)發(fā):
IDE:DevEco Studio 3.1 Release
SDK:Ohos_sdk_public 3.2.12.5(API Version 9 Release)
新增列表項(xiàng)
當(dāng)用戶點(diǎn)擊添加按鈕時(shí),將彈出列表項(xiàng)選擇界面,用戶點(diǎn)擊確定后,列表中新增對(duì)應(yīng)項(xiàng)目。
新增待辦
開(kāi)發(fā)步驟
定義列表項(xiàng)數(shù)據(jù)結(jié)構(gòu)和初始化列表數(shù)據(jù),構(gòu)建列表整體布局和列表項(xiàng)。
以待辦事項(xiàng)管理為例,首先定義待辦事項(xiàng)的數(shù)據(jù)結(jié)構(gòu):
importutilfrom'@ohos.util';

exportclassToDo{
key:string=util.generateRandomUUID(true);
name:string;

constructor(name:string){
this.name=name;
}
}
然后,初始化待辦事項(xiàng)列表和可選事項(xiàng)列表:
@StatetoDoData:ToDo[]=[];
privateavailableThings:string[]=['讀書(shū)','運(yùn)動(dòng)','旅游','聽(tīng)音樂(lè)','看電影','唱歌'];
構(gòu)建 UI 界面,初始界面包含“待辦”和新增按鈕“+”:
Text('待辦')
.fontSize(36)
.margin({left:40})
Blank()
Text('+')
.fontWeight(FontWeight.Lighter)
.fontSize(40)
.margin({right:30})
構(gòu)建列表布局并通過(guò) ForEach 循環(huán)渲染列表項(xiàng):
List({space:10}){
ForEach(this.toDoData,(toDoItem)=>{
ListItem(){
...
}
},toDoItem=>toDoItem.key)
}
為新增按鈕綁定點(diǎn)擊事件,并在事件中通過(guò) TextPickerDialog.show 添加新增列表項(xiàng)的邏輯:
Text('+')
.onClick(()=>{
TextPickerDialog.show({
range:this.availableThings,//將可選事項(xiàng)列表配置到選擇對(duì)話框中
onAccept:(value:TextPickerResult)=>{
this.toDoData.push(newToDo(this.availableThings[value.index]));//用戶點(diǎn)擊確認(rèn),將選擇的數(shù)據(jù)添加到待辦列表toDoData中
},
})
})
刪除列表項(xiàng)
當(dāng)用戶長(zhǎng)按列表項(xiàng)進(jìn)入刪除模式時(shí),提供用戶刪除列表項(xiàng)選擇的交互界面,用戶勾選完成后點(diǎn)擊刪除按鈕,列表中刪除對(duì)應(yīng)的項(xiàng)目。
長(zhǎng)按刪除待辦事項(xiàng)
開(kāi)發(fā)步驟
列表的刪除功能一般進(jìn)入編輯模式后才可使用,所以需要提供編輯模式的入口。
以待辦列表為例,通過(guò) LongPressGesture() 監(jiān)聽(tīng)列表項(xiàng)的長(zhǎng)按事件,當(dāng)用戶長(zhǎng)按列表項(xiàng)時(shí),進(jìn)入編輯模式。
//ToDoListItem.ets

Flex({justifyContent:FlexAlign.SpaceBetween,alignItems:ItemAlign.Center}){
...
}
.gesture(
GestureGroup(GestureMode.Exclusive,
LongPressGesture()//監(jiān)聽(tīng)長(zhǎng)按事件
.onAction(()=>{
if(!this.isEditMode){
this.isEditMode=true;//進(jìn)入編輯模式
this.selectedItems.push(this.toDoItem);//記錄長(zhǎng)按時(shí)選中的列表項(xiàng)
}
})
)
)
需要響應(yīng)用戶的選擇交互,記錄要?jiǎng)h除的列表項(xiàng)數(shù)據(jù)。
在待辦列表中,通過(guò)勾選框的勾選或取消勾選,響應(yīng)用戶勾選列表項(xiàng)變化,記錄所有選擇的列表項(xiàng)。
//ToDoListItem.ets

if(this.isEditMode){
Checkbox()
.onChange((isSelected)=>{
if(isSelected){
this.selectedItems.push(this.toDoItem)//勾選時(shí),記錄選中的列表項(xiàng)
}else{
letindex=this.selectedItems.indexOf(this.toDoItem)
if(index!==-1){
this.selectedItems.splice(index,1)//取消勾選時(shí),則將此項(xiàng)從selectedItems中刪除
}
}
})
...
}
需要響應(yīng)用戶點(diǎn)擊刪除按鈕事件,刪除列表中對(duì)應(yīng)的選項(xiàng)。
//ToDoList.ets

Button('刪除')
.onClick(()=>{
//刪除選中的列表項(xiàng)對(duì)應(yīng)的toDoData數(shù)據(jù)
letleftData=this.toDoData.filter((item)=>{
returnthis.selectedItems.find((selectedItem)=>selectedItem!==item);
})

this.toDoData=leftData;
this.isEditMode=false;
})
...
完整示例代碼
新增和刪除列表項(xiàng)的實(shí)現(xiàn)共涉及三個(gè)文件,各文件完整代碼如下:
待辦事項(xiàng)數(shù)據(jù)結(jié)構(gòu)代碼(ToDo.ets):
//ToDo.ets
importutilfrom'@ohos.util';

exportclassToDo{
key:string=util.generateRandomUUID(true)
name:string;

constructor(name:string){
this.name=name;
}
}
待辦事項(xiàng)列表代碼(ToDoList.ets):
//ToDoList.ets
import{ToDo}from'../model/ToDo';
import{ToDoListItem}from'./ToDoListItem';

@Entry
@Component
structToDoList{
@StatetoDoData:ToDo[]=[]
@Watch('onEditModeChange')@StateisEditMode:boolean=false
@StateselectedItems:ToDo[]=[]

privateavailableThings:string[]=["讀書(shū)","運(yùn)動(dòng)","旅游",'聽(tīng)音樂(lè)','看電影','唱歌']

saveData(value:string){
this.toDoData.push(newToDo(value))
}

onEditModeChange(){
if(!this.isEditMode){
this.selectedItems=[]
}
}

build(){
Column(){
Row(){
if(this.isEditMode){
Text('X')
.fontSize(20)
.onClick(()=>{
this.isEditMode=false;
})
.margin({left:20,right:20})

Text('已選擇'+this.selectedItems.length+'項(xiàng)')
.fontSize(24)
}else{
Text('待辦')
.fontSize(36)
.margin({left:40})
Blank()
Text('+')
.fontWeight(FontWeight.Lighter)
.fontSize(40)
.margin({right:30})
.onClick(()=>{
TextPickerDialog.show({
range:this.availableThings,
onAccept:(value:TextPickerResult)=>{
this.toDoData.push(newToDo(this.availableThings[value.index]))
console.info('tododata:'+JSON.stringify(this.toDoData))
},
})
})
}
}
.height('12%')
.width('100%')

List({initialIndex:0,space:10}){
ForEach(this.toDoData,toDoItem=>{
ListItem(){
ToDoListItem({
isEditMode:$isEditMode,
toDoItem:toDoItem,
selectedItems:$selectedItems
})
}.padding({left:24,right:24,bottom:12})
},toDoItem=>toDoItem.key)
}
.height('73%')
.listDirection(Axis.Vertical)
.edgeEffect(EdgeEffect.Spring)

if(this.isEditMode){
Row(){
Button('刪除')
.width('80%')
.onClick(()=>{
letleftData=this.toDoData.filter((item)=>{
returnthis.selectedItems.find((selectedItem)=>selectedItem!=item)
})
console.log('leftData:'+leftData);
this.isEditMode=false;
this.toDoData=leftData;
})
.backgroundColor('#ffd75d5d')
}
.height('15%')
}
}
.backgroundColor('#fff1f3f5')
.width('100%')
.height('100%')
}
}
待辦事項(xiàng)代碼(ToDoListItem.ets):
//ToDoListItem.ets
import{ToDo}from'../model/ToDo';

@Component
exportstructToDoListItem{
@LinkisEditMode:boolean
@LinkselectedItems:ToDo[]
privatetoDoItem:ToDo;

hasBeenSelected():boolean{
returnthis.selectedItems.indexOf(this.toDoItem)!=-1
}

build(){
Flex({justifyContent:FlexAlign.SpaceBetween,alignItems:ItemAlign.Center}){
Row({space:4}){
Circle()
.width(24)
.height(24)
.fill(Color.White)
.borderWidth(3)
.borderRadius(30)
.borderColor('#ffdcdfdf')
.margin({right:10})

Text(`${this.toDoItem.name}`)
.maxLines(1)
.fontSize(24)
.textOverflow({overflow:TextOverflow.Ellipsis})
}
.padding({left:12})

if(this.isEditMode){
Checkbox()
.select(this.hasBeenSelected()?true:false)
.onChange((isSelected)=>{
if(isSelected){
this.selectedItems.push(this.toDoItem)
}else{
letindex=this.selectedItems.indexOf(this.toDoItem)
if(index!=-1){
this.selectedItems.splice(index,1)
}
}
})
.width(24)
.height(24)
}
}
.width('100%')
.height(80)
.padding({
left:16,
right:12,
top:4,
bottom:4
})
.borderRadius(24)
.linearGradient({
direction:GradientDirection.Right,
colors:this.hasBeenSelected()?[[0xffcdae,0.0],[0xFfece2,1.0]]:[[0xffffff,0.0],[0xffffff,1.0]]
})
.gesture(
GestureGroup(GestureMode.Exclusive,
LongPressGesture()
.onAction(()=>{
if(!this.isEditMode){
this.isEditMode=true
this.selectedItems.push(this.toDoItem)
}
})
)
)
}
}
審核編輯:湯梓紅
-
IDE
+關(guān)注
關(guān)注
0文章
346瀏覽量
47389 -
文件管理
+關(guān)注
關(guān)注
0文章
14瀏覽量
8971 -
SDK
+關(guān)注
關(guān)注
3文章
1058瀏覽量
47439 -
OpenHarmony
+關(guān)注
關(guān)注
26文章
3806瀏覽量
17956
原文標(biāo)題:OpenHarmony上實(shí)現(xiàn)“待辦事項(xiàng)”功能
文章出處:【微信號(hào):gh_834c4b3d87fe,微信公眾號(hào):OpenHarmony技術(shù)社區(qū)】歡迎添加關(guān)注!文章轉(zhuǎn)載請(qǐng)注明出處。
發(fā)布評(píng)論請(qǐng)先 登錄
OpenHarmony開(kāi)發(fā)實(shí)例:【 待辦事項(xiàng)TodoList】

HarmonyOS開(kāi)發(fā)案例:【待辦列表】


5分鐘代碼挑戰(zhàn)Flutter實(shí)現(xiàn)待辦事項(xiàng)App

5分鐘代碼挑戰(zhàn)Flutter實(shí)現(xiàn)待辦事項(xiàng)App
實(shí)用待辦事項(xiàng)APP大推薦---《Count2task 記事達(dá)人》
我應(yīng)該知道什么才能在fpga領(lǐng)域工作?
HarmonyOS應(yīng)用開(kāi)發(fā)-UI設(shè)計(jì)開(kāi)發(fā)與預(yù)覽
app圖標(biāo)動(dòng)效在openharmony的源碼上哪里實(shí)現(xiàn)的?
卡片分揀機(jī)的制作

OpenHarmony生態(tài)論壇:UROVO在OpenHarmony上的規(guī)劃和實(shí)踐

如何在OpenHarmony開(kāi)源代碼基礎(chǔ)上實(shí)現(xiàn)數(shù)字管家開(kāi)發(fā)宿舍全屋智能
構(gòu)建低功耗數(shù)字化的Wi-Fi待辦事項(xiàng)列表

何為自主智能體?


評(píng)論