


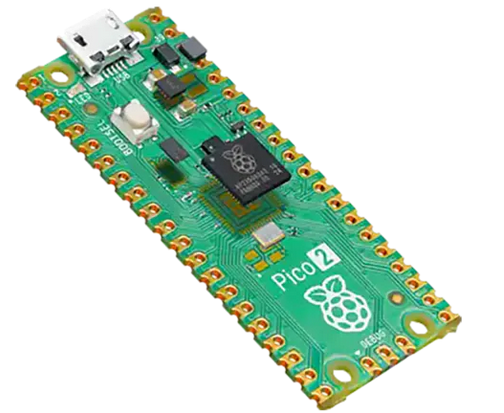
當我們提及物聯網(IoT, Internet of Things)開發,可能首先想到的是Arduino或是ESP8266這樣的微控制器開發板。然而,Raspberry Pi的微控制器開發板——Raspberry Pi Pico W,也是一個很好的選擇。
在本項目中,將會介紹如何使用Raspberry Pi Pico W和MicroPython,并用Thonny IDE的平臺來撰寫程序。
Raspberry Pi Pico W 簡介
Raspberry Pi Pico W是由RaspberryPi基金會出品的微控制器開發板。它配備了一個RP2040微控制器,有264KB的內部RAM,并且支持MicroPython程序語言,這讓我們可以更方便地開發物聯網應用。
使用上和Raspberry Pi Pico沒有多大差別,只是Raspberry Pi Pico W 還支持Wi-Fi 802.11n無線網絡和藍牙,更多Raspberry Pi Pico相關介紹連結如下:
Raspberry Pi Pico family
Raspberry Pi Pico介紹(含使用ArduinoIDE和擴充板)
MicroPython簡介
MicroPython是一種針對微控制器和受限環境設計的Python 3 程序語言編譯程序和執行環境。這種程序語言實現了Python 3的大部分語法和特性,并對于開發板所需的低功耗和實時響應有進一步優化。MicroPython提供了豐富的API,可以直接控制微控制器的GPIO、I2C、SPI等各種硬件資源。
Thonny IDE簡介
Thonny是一個專為Python初學者設計的集成開發環境(IDE)。它的介界面簡單,功能強大,對于學習Python語言非常有幫助。而且,Thonny IDE 也支持 MicroPython,我們可以直接在Thonny IDE中編寫MicroPython 程序,并上傳到Raspberry Pi Pico W上執行。
請由 Thonny 官方網站下載 Thonny。
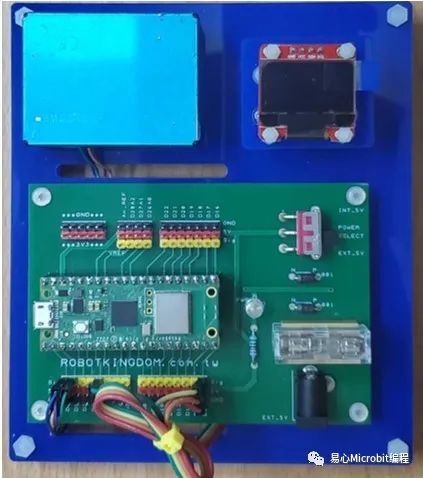
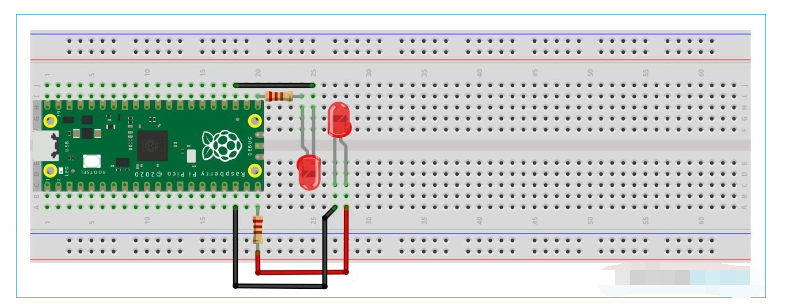
電路接線圖
本次項目分享如何透過Thonny IDE來撰寫MicroPython程序,并使用PMS5003粉塵傳感器取得數值和經由Raspberry Pi Pico W的Wi-Fi功能取得目前臺灣時間,并顯示在OLED中。
以下介紹Raspberry Pi Pico W、Raspberry Pi Pico W擴充板、OLED、PMS5003接線圖。
Raspberry Pi Pico與擴充板接法(擴充板可兼容于Raspberry Pi Pico W)
https://cavedu.gitbook.io/cavedu/raspberry_pi_pico_info/pico_breakout
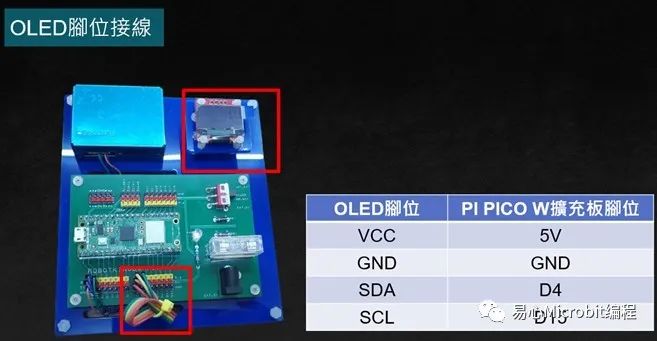
Raspberry Pi Pico W擴充板與OLED接線圖
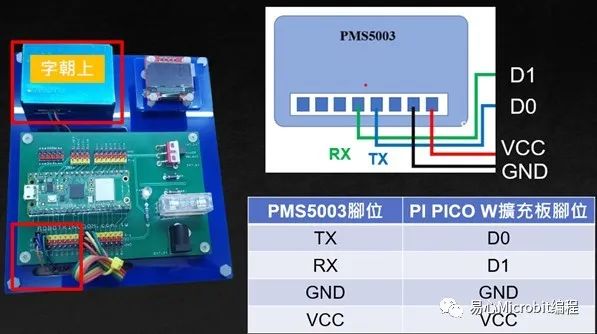
Raspberry Pi Pico W擴充板與PMS5003接線圖
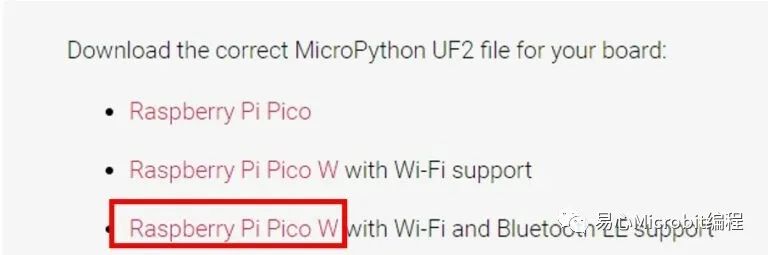
接下來使用 Thonny IDE 來編寫程序,請先下載 Raspberry Pi Pico W 的 uf2 韌體檔,除非有更新版本的韌體,否則更新只要一次即可。
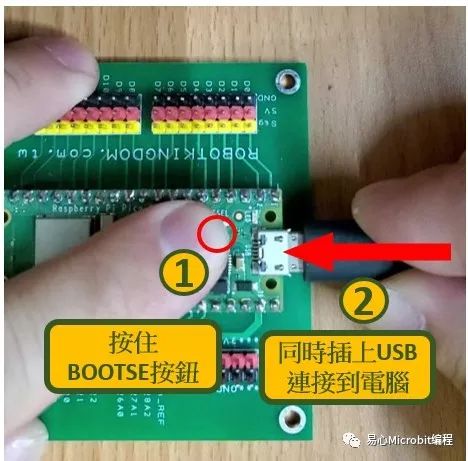
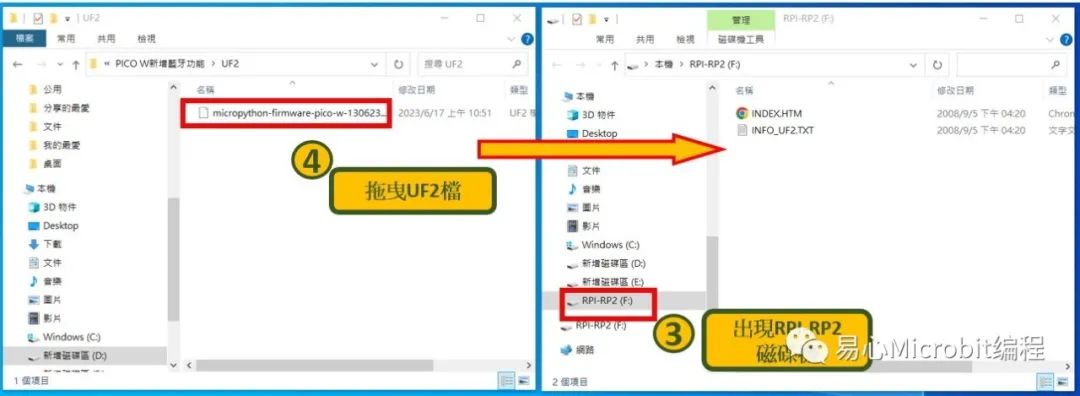
如何上傳Raspberry Pi Pico W的uf2檔
按住 Raspberry Pi Pico W 的 BOOTSET 按鈕時,插上USB連接到計算機。
Raspberry Pi Pico W 會被計算機辨識為一個磁盤,將 uf2 韌體檔拖放到其中就會自動更新韌體。
Raspberry Pi Pico W連接Thonny IDE
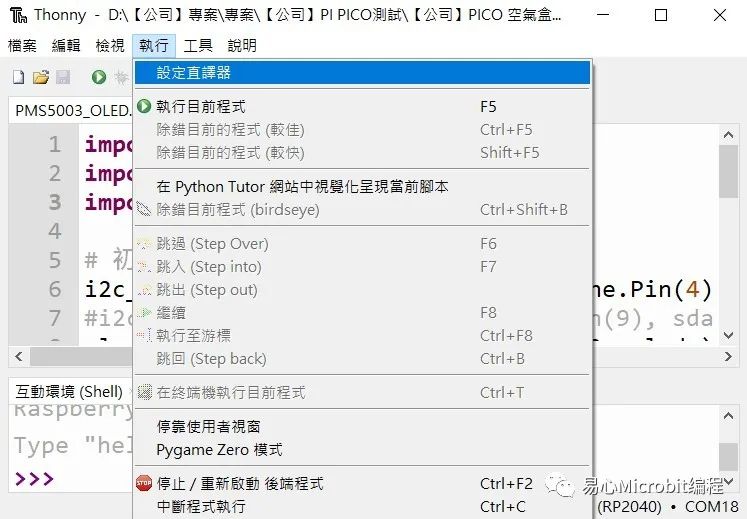
●將Thonny IDE下載至計算機,并解壓縮后開啟,請選擇執行>設定直譯器
●選Micro Python (RP2040)
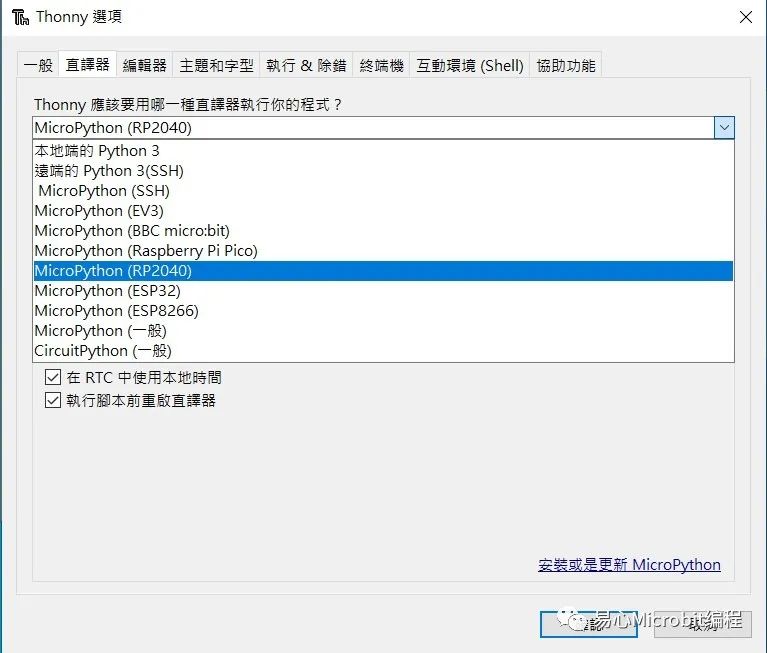
●端口選擇USB序列裝置(COM X)
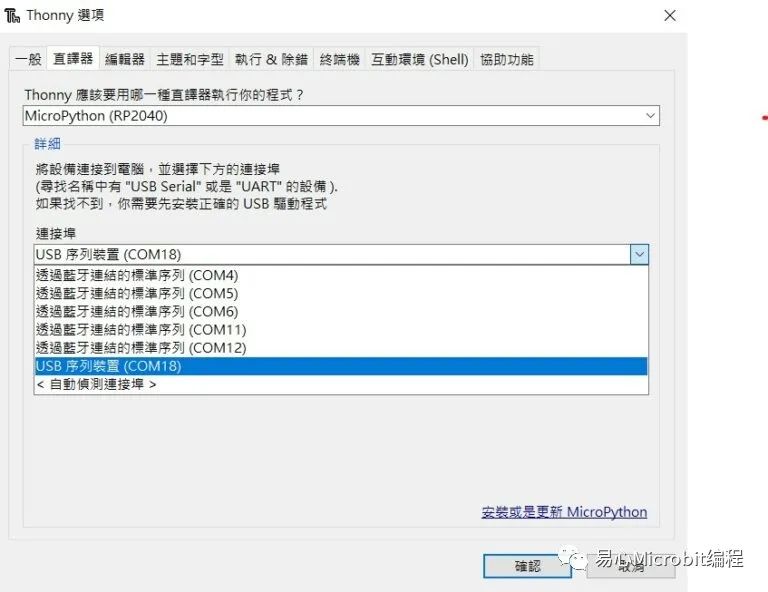
[注] COM號要記住,后續上傳程序需要正確指定 COM 號,概念如同 Aduino IDE
●確認是否抓到 Raspberry Pi Pico W
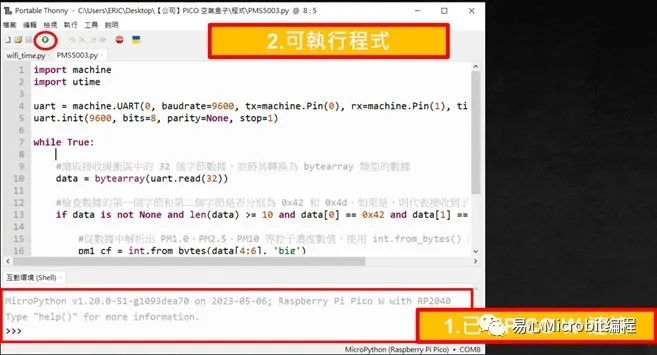
檢查 Thonny IDE 下方的互動環境(Shell),如果沒有紅字錯誤訊息即可上傳程序,這時候還沒寫,繼續看下去吧。
匯入OLED函式庫至 Raspberry Pi Pico W
本項目需要透過 OLED 顯示模塊來顯示數值,故需要先匯入OLED 函式庫
1. 下載 OLED 函式庫,檔名ssd1306.py到您的計算機
2. 在 Thonny IDE 中安裝套件
我們可由 Thonny IDE 呼叫系統命令行來安裝 python 套件,請由工具–> 開啟系統命令行
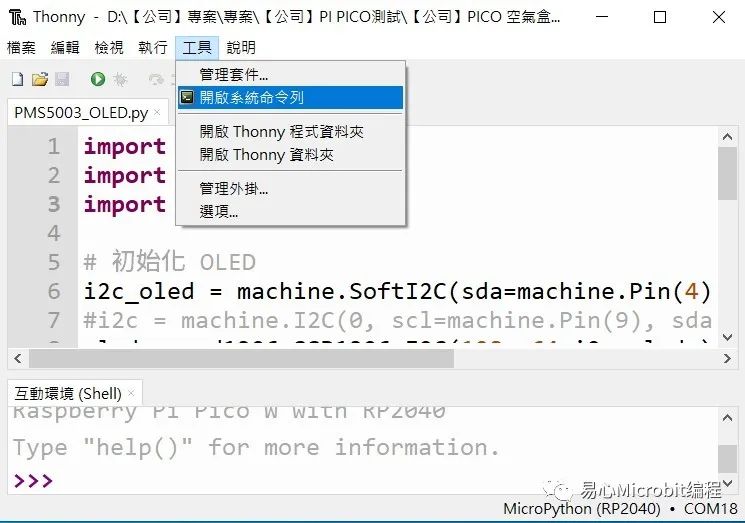
開啟系統命令行,如下圖
3. 安裝 adafruit-ampy 套件
為了順利執行程序,我們需要安裝 adafruit-ampy 套件,用于透過串行端口與 CircuitPython 或 MicroPython 開發板互動,
安裝方式就是一般的 pip 指令,相當簡單:
4. 匯入OLED函式庫到RaspberryPi Pico W
cd module_library
ampy --port COMX put ssd1306.py
[注]請注意,并不是開啟下方的窗口,若出現下方窗口,則要再按一次開啟系統命令行。
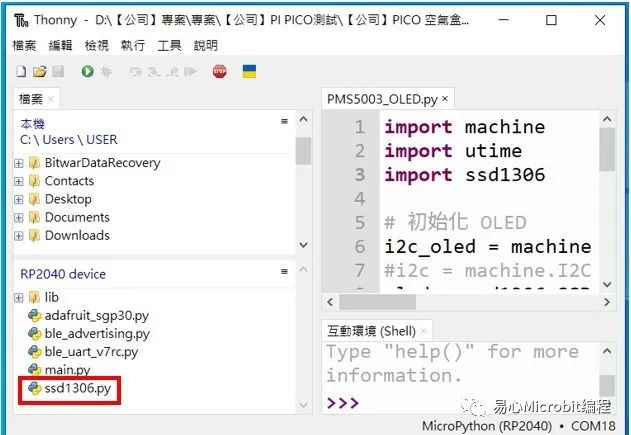
5. 如何查看已匯入的函式庫
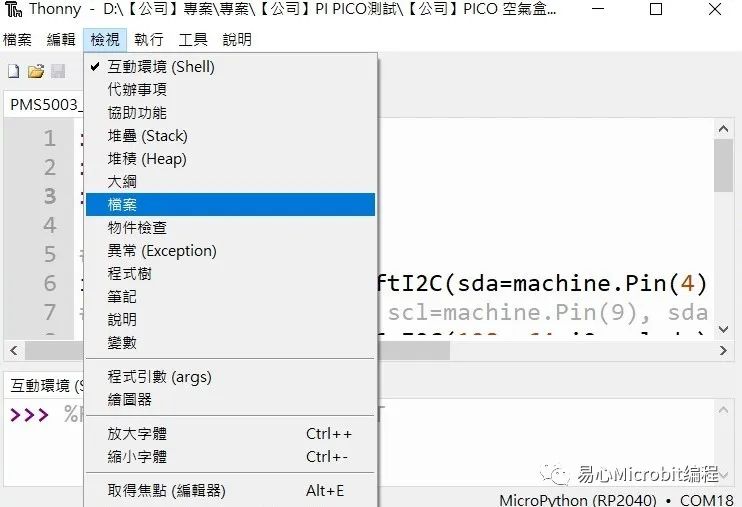
在 Thonny IDE 中,點選檢視 -> 檔案,可以查看Raspberry Pi Pico W中匯入的檔案
確認已匯入先前所操作的檔案
執行程序
本專題有兩個程序 (或下載原始碼,或由以下復制也可以):
在 OLED 顯示時間(
OLED_wifitime.py
)
在 OLED 顯示 PMS5003 粉塵傳感器數值(
PMS5003_OLED.py
)
OLED_wifitime.py
import machine
import utime
import ssd1306
from time import sleep
import network
import ntptime
import urequests
i2c = machine.SoftI2C(scl=machine.Pin(15),sda=machine.Pin(4))
oled_width = 128
oled_height = 64
oled = ssd1306.SSD1306_I2C(oled_width,oled_height, i2c)
# 初始化 UART
uart = machine.UART(0, baudrate=9600,tx=machine.Pin(0), rx=machine.Pin(1), timeout=1000)
uart.init(9600, bits=8, parity=None,stop=1)
# 初始化WiFi
sta_if = network.WLAN(network.STA_IF)
sta_if.active(True)
wifi_ssid = "XXXXX"
wifi_password = "XXXXXXX"
sta_if.connect(wifi_ssid, wifi_password)
# 顯示WiFi連接狀態
oled.fill(0)
oled.text('WiFi:', 0, 0)
if sta_if.isconnected():
oled.text('connected', 40, 0)
else:
oled.text('connceting', 40, 0)
oled.show()
#設定時區
TIME_ZONE = 8
# 取得NTP時間
#ntptime.settime()
for i in range(5):
try:
ntptime.settime()
break
except OSError:
print('Error connecting to NTP server, retrying...')
utime.sleep(5)
else:
print('Could not connect to NTP server after 5 retries.')
# 等待一段時間
utime.sleep(3)
while True:
t= utime.localtime(utime.time() + TIME_ZONE * 3600)
oled.fill(0)
oled.text(str("%d/%02d/%02d" % (t[0], t[1], t[2])), 0, 0)
oled.text(str("%02d:%02d:%02d" % (t[3], t[4], t[5])), 0, 16)
oled.show()
utime.sleep(1)
PMS5003_OLED.py
import machine
import utime
import ssd1306
from time import sleep
i2c = machine.SoftI2C(scl=machine.Pin(15),sda=machine.Pin(4))
oled_width = 128
oled_height = 64
oled = ssd1306.SSD1306_I2C(oled_width,oled_height, i2c)
# 初始化 UART
uart = machine.UART(0, baudrate=9600,tx=machine.Pin(0), rx=machine.Pin(1), timeout=1000)
uart.init(9600, bits=8, parity=None,stop=1)
while True:
#讀取 PMS5003 數據
data = bytearray(uart.read(32))
# 判斷是否為正確的PMS5003 資料
if data is not None and len(data) >= 10 and data[0] == 0x42 anddata[1] == 0x4d:
pm1_cf = int.from_bytes(data[4:6], 'big')
pm25_cf = int.from_bytes(data[6:8], 'big')
pm10_cf = int.from_bytes(data[8:10], 'big')
#清除 OLED
oled.fill(0)
# 顯示 PMS5003 數據
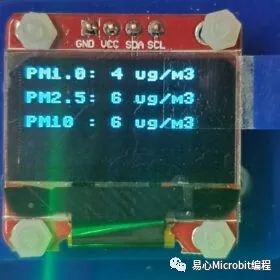
oled.text("PM1.0: %d ug/m3" % pm1_cf, 0, 22)
oled.text("PM2.5: %d ug/m3" % pm25_cf, 0, 38)
oled.text("PM10 : %d ug/m3" % pm10_cf, 0, 54)
# 更新 OLED
oled.show()
utime.sleep(1)
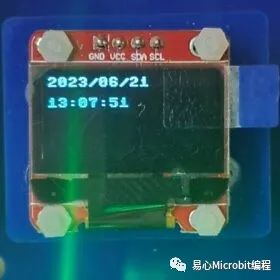
實際展示
執行程序之后,可在 OLED 顯示模塊上看到相關信息,恭喜成功啰!
審核編輯:湯梓紅
-
微控制器
+關注
關注
48文章
7937瀏覽量
154408 -
物聯網
+關注
關注
2930文章
46151瀏覽量
391080 -
開發板
+關注
關注
25文章
5646瀏覽量
103977 -
Arduino
+關注
關注
189文章
6497瀏覽量
190615 -
Micropython
+關注
關注
0文章
68瀏覽量
5248
原文標題:使用 Raspberry Pi Pico W 和 MicroPython 開發物聯網應用
文章出處:【微信號:易心Microbit編程,微信公眾號:易心Microbit編程】歡迎添加關注!文章轉載請注明出處。
發布評論請先 登錄
Raspberry Pi Pico是什么
微控制器開發板Raspberry Pi Pico
使用raspberry pi Pico的原因
基于Raspberry Pi Pico開發先進的家庭自動化系統
raspberry pi Pico使用MicroPython變磚后的解決方法

適用于Raspberry Pi 4的Raspberry Pi Pico開發板
使用MicroPython在Raspberry Pi上通過雙核編程的多線程控制LED
基于樹莓派Raspberry Pi Pico的自動澆花系統
Arduino Raspberry Pi Pico/RP2040以太網:W5100S EVB Pico
Raspberry Pi Pico 2 W 發布


 工商網監
工商網監

評論