大家都說如果運維不上監控,那就是功力還沒修煉到家。而當前在眾多監控軟件中,Prometheus備受大家青睞。今天浩道就跟大家分享關于Prometheus監控服務的安裝部署指南。這份部署指南可以說是全網最詳細了,如果按照這份指南都部署不成功,那么你只能加我VX,一對一手把手教了,不過我會教會大家的!一、Prometheus 監控工具介紹Prometheus是一套開源的監控&報警&時間序列數據庫的組合,起始是由SoundCloud公司開發的。隨著發展,越來越多公司和組織接受采用Prometheus,社區也十分活躍,他們便將它獨立成開源項目,并且有公司來運作。google SRE的書內也曾提到跟他們BorgMon監控系統相似的實現是Prometheus。現在最常見的Kubernetes容器管理系統中,通常會搭配Prometheus進行監控。1、Prometheus 的優點
1、非常少的外部依賴,安裝使用超簡單;
2、已經有非常多的系統集成 例如:docker HAProxy Nginx JMX等等;
3、服務自動化發現;
4、直接集成到代碼;
5、設計思想是按照分布式、微服務架構來實現的;
6、多維數據模型:由度量名稱和鍵值對標識的時間序列數據;
7、支持多種exporter采集數據;
8、PromQL:一種靈活的查詢語言,可以利用多維數據完成復雜的查詢;
9、不依賴分布式存儲,單個服務器節點可直接工作(不需要安裝數據庫,直接使用即可,內置集成了數據庫不需要重新的部署);
10、基于HTTP的pull方式采集時間序列數據;
11、推送時間序列數據通過PushGateway組件支持,目標主機上報數據到PushGateway,普羅米修斯從PushGateway拉取數據,這個是可以跨網段的;
12、通過服務發現或靜態配置發現目標;
13、多種圖形模式及儀表盤支持(grafana);
14、高效的存儲,每個采集數據占用3.5bytes左右,300萬的時間序列,30s的時間間隔,保留60天,消耗磁盤大約200G;
15、做高可用,對數據進行異地備份。聯邦集群,部署多套普羅米修斯,每套普羅米修斯可以在不同的機房,然后將這些普羅米修斯匯總到一個普羅米修斯,那么就可以將各個地方的數據,整體收集上來了。
2、Prometheus 的組件與架構
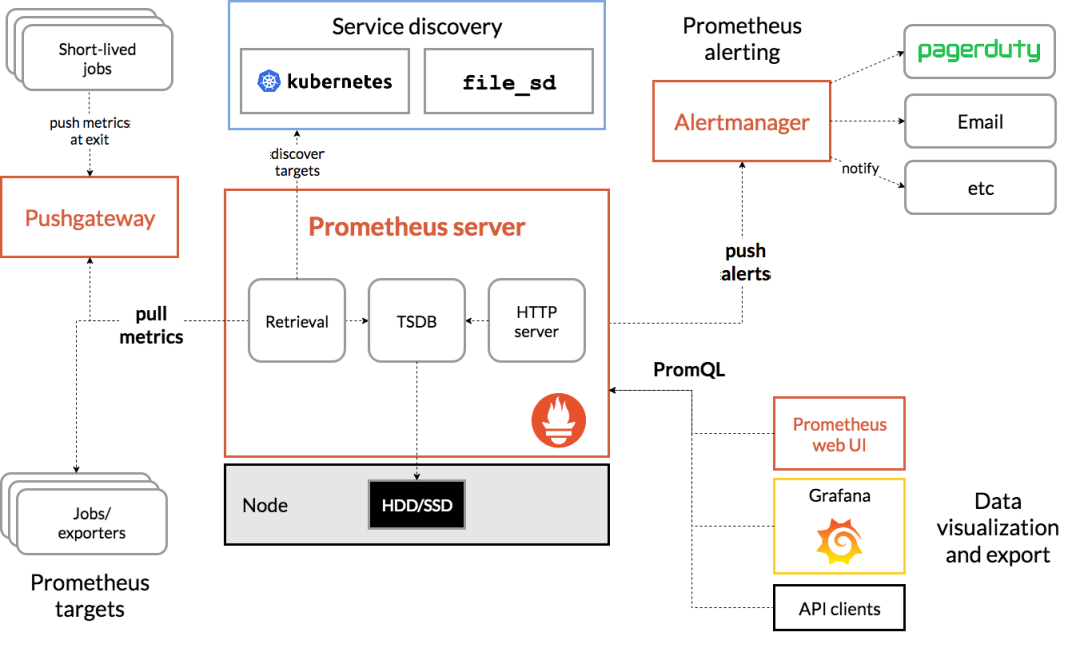 Prometheus生態系統由多個組件組成,其中許多組件是可選的:
1、主要的Prometheus server,用于存儲時間序列數據。
2、用于檢測應用程序代碼的客戶端庫。
3、用于支持short-lived工作的推送網關(push gateway)。
4、針對HAProxy,StatsD,Graphite等服務的exporters。
5、一個alertmanager處理警報管理器。
6、各種支持工具。
大多數Prometheus組件都是用Go編寫的,因此很容易構建和部署為靜態二進制文件。
具體組件的作用:
1)Prometheus Server:收集指標和存儲時間序列數據,并提供查詢接口(采集,存儲,查詢);
2)ClientLibrary:客戶端庫;
3)Push Gateway:短期存儲指標數據。主要用于臨時性的任務,各個目標主機可以上報數據到pushgateway,,然后prometheus server統一從pushgateway拉取數據;
4)Exporters:采集已有的第三方服務監控指標并暴露metrics(類似于zabbix agent,但是exporter有很多種,針對不同的監控指標);
5)Alertmanager:從prometheus server端收到alters之后,會進行去重,分組,并且路由到接收方,發出報警,常見的接收方式有:電子郵件,微信,釘釘;
6) Web UI:簡單的Web控制臺;
普羅米修斯服務端是內置了TSDB的數據庫,是存儲在本地的文件系統當中。存儲了采集被監控端數據指標。獲取指標有兩種方式:1)一種直接是從pushgateway這里獲取被監控指標,這是一個獨立的組件,主要完成短周期任務暴露的指標,比如定時任務。(短周期任務不是每分鐘都有的指標,可能在運行任務的時候才會產生指標。所以可以將臨時的指標匯總到pushgateway,然后有pushgateway統一的暴露給服務端去采集);
2)另外一種就是主要使用持久性的應用,比如nginx,mysql還要微服務jar包,這些都屬于持久性運行任務的;
使用這種任務的監控就是采用exporter方式了。會配置exporter這樣一個組件,主要是用來采集指標暴露給服務端。
Prometheus 根據配置的作業,直接從數據源pull拉取或者通過中間推送網關(push gateway),獲取度量值Metrics。它在本地存儲所有獲取的樣本,并在此數據上運行規則,以從現有數據聚合和記錄新的時間序列,或者生成警報。Grafana或其他API使用者可用于可視化收集的數據。
服務端采集好之后就會存儲在tsdb數據庫當中,可以通過其ui去查看,因為其通過了http服務就可以訪問其ui了。在ui上可以通過promql完成數據的查詢。(export--->prometheus(TSDB)---->promsql);
告警是由altermanager提供的,在普羅米修斯這里定義告警規則,普羅米修斯這里會周期的評估當前采集的指標是否觸發了告警規則,如果觸發了會將事件推送給altermanger。altermanger會根據自己相關的邏輯處理后發給接收人,提供email
普羅米修斯實現了服務的發現,也就是可以自動的找到被監控端,這個需要在普羅米修斯的配置文件里面去配置。有了服務發現就不要一個一個的去配置了,讓被監控端自動納入監控。
普羅米修斯從目標主機拉取數據的時候有兩種方式,一種是靜態的,也就是我們部署exporter,靜態的采集指標,也可以配置服務發現,自動的發現指標數據。通過服務發現和exporter采集到的數據的方式都是采用了默認的pull方式拉取指標的,也可以使用pushgateway上報到prometheus當中。
3、監控指標數據模型
數據模型:
1)Prometheus將所有數據存儲為時間序列(存儲的時候都會記錄時間,并且存儲到時序的數據庫里面,也就是內置的TSDB);
2)具有相同度量名稱以及標簽屬于同一個指標(指標名稱是一樣,但是標簽是不一樣的);
3)每個時間序列都由度量標準名稱和一組鍵值對(稱為標簽)唯一標識;
通過標簽查詢指定指標。
指標格式 :指標名稱加上多個標簽
<metric name>{<label name>=<label value>,...}
在配置被監控端這里,要配置監控誰,在配置被監控端,必須要暴露指標出來,這種指標以https的方式給暴露出來,暴露出來之后在配置文件當中配置被監控端,最后就會被普羅米修斯給采集到,如果以上正確配置,在普羅米修斯的圖形界面targets可以看到被監控端,也可以通過指標名稱查看采集的數據了。
這個就相當于數據庫,可以提供promql來查詢數據,并且通過圖表繪制出來;二、Prometheus監控安裝部署1、環境及軟件工具準備
1)基礎環境準備,兩臺主機,規劃信息如下:

2)關閉selinux;
vi編輯 /etc/selinux/config 文件,修改SELINUX的值為disabled
#注意修改完畢之后需要重啟linux服務
SELINUX=disabled
3)關閉防火墻。
# 1 關閉firewalld服務
systemctl stop firewalld
systemctl disable firewalld
# 2 關閉iptables服務
systemctl stop iptables
systemctl disable iptables
4)prometheus官網下載:
https://prometheus.io/download/
這里下載最新版本:
https://github.com/prometheus/prometheus/releases/download/v2.45.0/prometheus-2.45.0.linux-amd64.tar.gz
5)node_exporter下載地址:
https://prometheus.io/download/
這里下載最新版本:
https://github.com/prometheus/node_exporter/releases/download/v1.6.1/node_exporter-1.6.1.linux-amd64.tar.gz
6)grafana官網下載 :
https://grafana.com/grafana/download
這里下載最新版本:
https://dl.grafana.com/enterprise/release/grafana-enterprise-10.0.2-1.x86_64.rpm
2、prometheus安裝
1)下載prometheus
weget https://github.com/prometheus/prometheus/releases/download/v2.45.0/prometheus-2.45.0.linux-amd64.tar.gz
我這里下載保存在 /opt目錄下,完成如下所示:
[root@master opt]# ls -lh
總用量 87M
-rw-r--r--. 1 root root 87M 7月  19 17:21 prometheus-2.45.0.linux-amd64.tar.gz
[root@master opt]#
2)解壓安裝prometheus
[root@master opt]# tar -xzvf prometheus-2.45.0.linux-amd64.tar.gz
[root@master opt]# mv prometheus-2.45.0.linux-amd64 prometheus
[root@master opt]# ls -lh
總用量 87M
drwxr-xr-x. 4 1001  123 132 6月  23 23:45 prometheus
-rw-r--r--. 1 root root 87M 7月  19 17:21 prometheus-2.45.0.linux-amd64.tar.gz
[root@master opt]#
3)進入到 /opt/prometheus 目錄啟動prometheus
[root@master opt]# cd prometheus
[root@master prometheus]# ./prometheus
ts=2023-07-19T09:32:03.885Z caller=main.go:534 level=info msg="No time or size retention was set so using the default time retention" duration=15d
ts=2023-07-19T09:32:03.886Z caller=main.go:578 level=info msg="Starting Prometheus Server" mode=server version="(version=2.45.0, branch=HEAD, revision=8ef767e396bf8445f009f945b0162fd71827f445)"
ts=2023-07-19T09:32:03.887Z caller=main.go:583 level=info build_context="(go=go1.20.5, platform=linux/amd64, user=root@920118f645b7, date=20230623-1549, tags=netgo,builtinassets,stringlabels)"
ts=2023-07-19T09:32:03.887Z caller=main.go:584 level=info host_details="(Linux 3.10.0-957.el7.x86_64 #1 SMP Thu Nov 8 2332 UTC 2018 x86_64 master (none))"
ts=2023-07-19T09:32:03.887Z caller=main.go:585 level=info fd_limits="(soft=4096, hard=4096)"
ts=2023-07-19T09:32:03.887Z caller=main.go:586 level=info vm_limits="(soft=unlimited, hard=unlimited)"
ts=2023-07-19T09:32:03.893Z caller=web.go:562 level=info component=web msg="Start listening for connections" address=0.0.0.0:9090
ts=2023-07-19T09:32:03.896Z caller=main.go:1019 level=info msg="Starting TSDB ..."
ts=2023-07-19T09:32:03.901Z caller=tls_config.go:274 level=info component=web msg="Listening on" address=[::]:9090
ts=2023-07-19T09:32:03.901Z caller=tls_config.go:277 level=info component=web msg="TLS is disabled." http2=false address=[::]:9090
ts=2023-07-19T09:32:03.913Z caller=head.go:595 level=info component=tsdb msg="Replaying on-disk memory mappable chunks if any"
ts=2023-07-19T09:32:03.913Z caller=head.go:676 level=info component=tsdb msg="On-disk memory mappable chunks replay completed" duration=15.4μs
ts=2023-07-19T09:32:03.913Z caller=head.go:684 level=info component=tsdb msg="Replaying WAL, this may take a while"
ts=2023-07-19T09:32:03.914Z caller=head.go:755 level=info component=tsdb msg="WAL segment loaded" segment=0 maxSegment=0
ts=2023-07-19T09:32:03.914Z caller=head.go:792 level=info component=tsdb msg="WAL replay completed" checkpoint_replay_duration=41.9μs wal_replay_duration=1.1234ms wbl_replay_duration=11.2μs total_replay_duration=1.3374ms
ts=2023-07-19T09:32:03.916Z caller=main.go:1040 level=info fs_type=XFS_SUPER_MAGIC
ts=2023-07-19T09:32:03.916Z caller=main.go:1043 level=info msg="TSDB started"
ts=2023-07-19T09:32:03.916Z caller=main.go:1224 level=info msg="Loading configuration file" filename=prometheus.yml
ts=2023-07-19T09:32:03.928Z caller=main.go:1261 level=info msg="Completed loading of configuration file" filename=prometheus.yml totalDuration=11.5929ms db_storage=15.8μs remote_storage=19.2μs web_handler=10.7μs query_engine=14μs scrape=1.0045ms scrape_sd=52.4μs notify=42.7μs notify_sd=29.6μs rules=11.8μs tracing=32.6μs
ts=2023-07-19T09:32:03.928Z caller=main.go:1004 level=info msg="Server is ready to receive web requests."
ts=2023-07-19T09:32:03.928Z caller=manager.go:995 level=info component="rule manager" msg="Starting rule manager..."
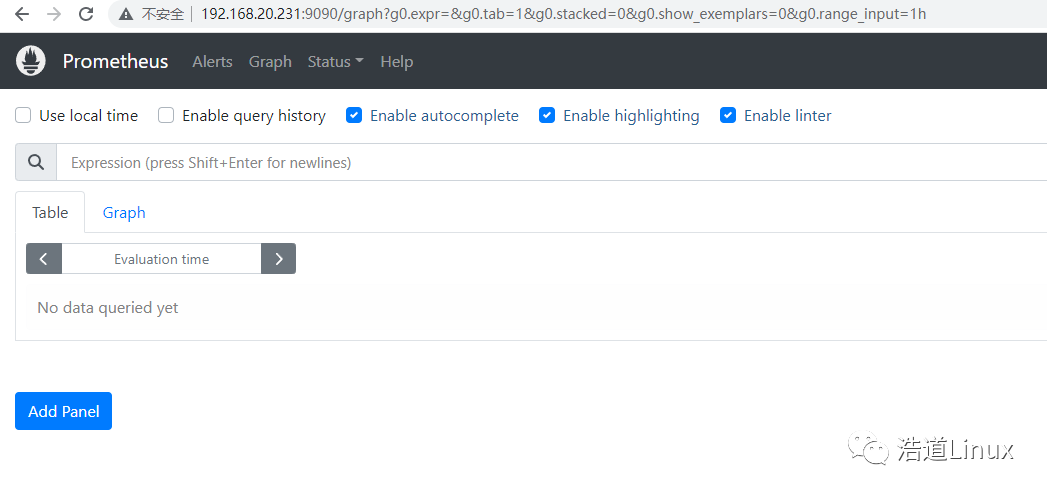
4)待啟動完成后,用以下地址直接無密碼登錄
http://192.168.20.231:9090/
如下圖所示:
5)為prometheus服務創建service并設置開機自動啟動
vim /usr/lib/systemd/system/prometheus.service
編輯如下內容,大家根據自己實際的安裝目錄進行編輯
[root@master ~]# cat /usr/lib/systemd/system/prometheus.service
[Unit]
Description=prometheus
Documentation=https://prometheus.io/
After=network.target
[Service]
Type=simple
User=root
Group=root
ExecStart=/opt/prometheus/prometheus --config.file=/opt/prometheus/prometheus.yml
Restart=on-failure
[Install]
WantedBy=multi-user.target
[root@master ~]#
使service生效并且設置開機自啟動
systemctl daemon-reload
systemctl enable prometheus
6)reboot重啟系統,查看服務狀態是正常的
[root@master ~]# systemctl status prometheus
● prometheus.service - prometheus
   Loaded: loaded (/usr/lib/systemd/system/prometheus.service; enabled; vendor preset: disabled)
   Active: active (running) since 三 2023-07-19 0933 CST; 43s ago
     Docs: https://prometheus.io/
 Main PID: 5976 (prometheus)
   CGroup: /system.slice/prometheus.service
           └─5976 /opt/prometheus/prometheus --config.file=/opt/prometheus/prometheus.yml


7月 19 0934 master prometheus[5976]: ts=2023-07-19T0134.433Z caller=head.go:676 level=info component=tsdb msg="On-disk memory mappable chunks replay completed" duration=55.101μs
7月 19 0934 master prometheus[5976]: ts=2023-07-19T0134.433Z caller=head.go:684 level=info component=tsdb msg="Replaying WAL, this may take a while"
7月 19 0934 master prometheus[5976]: ts=2023-07-19T0134.437Z caller=head.go:755 level=info component=tsdb msg="WAL segment loaded" segment=0 maxSegment=0
7月 19 0934 master prometheus[5976]: ts=2023-07-19T0134.437Z caller=head.go:792 level=info component=tsdb msg="WAL replay completed" checkpoint_replay_duration=1.016…ion=3.831257ms
7月 19 0934 master prometheus[5976]: ts=2023-07-19T0134.439Z caller=main.go:1040 level=info fs_type=XFS_SUPER_MAGIC
7月 19 0934 master prometheus[5976]: ts=2023-07-19T0134.439Z caller=main.go:1043 level=info msg="TSDB started"
7月 19 0934 master prometheus[5976]: ts=2023-07-19T0134.439Z caller=main.go:1224 level=info msg="Loading configuration file" filename=/opt/prometheus/prometheus.yml
7月 19 0934 master prometheus[5976]: ts=2023-07-19T0134.444Z caller=main.go:1261 level=info msg="Completed loading of configuration file" filename=/opt/prometheus/prometheus.yml…μs
7月 19 0934 master prometheus[5976]: ts=2023-07-19T0134.444Z caller=main.go:1004 level=info msg="Server is ready to receive web requests."
7月 19 0934 master prometheus[5976]: ts=2023-07-19T0134.444Z caller=manager.go:995 level=info component="rule manager" msg="Starting rule manager..."
Hint: Some lines were ellipsized, use -l to show in full.
[root@master ~]#
3、grafana安裝1)我這里安裝最新版本的grafana,大家可以直接通過yum命令下載安裝
yum install -y https://dl.grafana.com/enterprise/release/grafana-enterprise-10.0.2-1.x86_64.rpm
也可以將對應二進制文件下載到本地后再進行安裝,這樣速度快點。
[root@master opt]# ll
總用量 174664
-rw-r--r--. 1 root root 87661825 7月  19 10:03 grafana-enterprise-10.0.2-1.x86_64.rpm
drwxr-xr-x. 5 1001  123      144 7月  19 2023 prometheus
-rw-r--r--. 1 root root 91189594 7月  19 2023 prometheus-2.45.0.linux-amd64.tar.gz
[root@master opt]# yum install grafana-enterprise-10.0.2-1.x86_64.rpm
2)待安裝完畢后,啟動grafana服務,查看到服務狀態如下正常。
[root@master ~]#  systemctl daemon-reload
[root@master ~]# systemctl start grafana-server
[root@master ~]# systemctl status grafana-server
● grafana-server.service - Grafana instance
   Loaded: loaded (/usr/lib/systemd/system/grafana-server.service; disabled; vendor preset: disabled)
   Active: active (running) since 三 2023-07-19 1015 CST; 25s ago
     Docs: http://docs.grafana.org
 Main PID: 6945 (grafana)
   CGroup: /system.slice/grafana-server.service
           └─6945 /usr/share/grafana/bin/grafana server --config=/etc/grafana/grafana.ini --pidfile=/var/run/grafana/grafana-server.pid --packaging=rpm cfg:default.paths.logs=/var/log/gr...


7月 19 1015 master grafana[6945]: logger=ngalert.state.manager t=2023-07-19T1015.24341291+08:00 level=info msg="Warming state cache for startup"
7月 19 1015 master grafana[6945]: logger=caching.service t=2023-07-19T1015.24445863+08:00 level=warn msg="Caching service is disabled"
7月 19 1015 master grafana[6945]: logger=report t=2023-07-19T1015.244980141+08:00 level=warn msg="Scheduling and sending of reports disabled, SMTP is not configured ... to enable."
7月 19 1015 master grafana[6945]: logger=http.server t=2023-07-19T1015.250259745+08:00 level=info msg="HTTP Server Listen" address=[::]:3000 protocol=http subUrl= socket=
7月 19 1015 master grafana[6945]: logger=sqlstore.transactions t=2023-07-19T1015.267350682+08:00 level=info msg="Database locked, sleeping then retrying" error="data...e is locked"
7月 19 1015 master grafana[6945]: logger=ngalert.state.manager t=2023-07-19T1015.268604707+08:00 level=info msg="State cache has been initialized" states=0 duration=25.191797ms
7月 19 1015 master grafana[6945]: logger=ticker t=2023-07-19T1015.268828111+08:00 level=info msg=starting first_tick=2023-07-19T1020+08:00
7月 19 1015 master grafana[6945]: logger=ngalert.multiorg.alertmanager t=2023-07-19T1015.268860012+08:00 level=info msg="starting MultiOrg Alertmanager"
7月 19 1016 master grafana[6945]: logger=grafana.update.checker t=2023-07-19T1016.035234839+08:00 level=info msg="Update check succeeded" duration=795.319198ms
7月 19 1016 master grafana[6945]: logger=plugins.update.checker t=2023-07-19T1016.117663666+08:00 level=info msg="Update check succeeded" duration=874.346258ms
Hint: Some lines were ellipsized, use -l to show in full.
[root@master ~]#
3)將grafana-server服務設置為開機自啟動
systemctl enable grafana-server
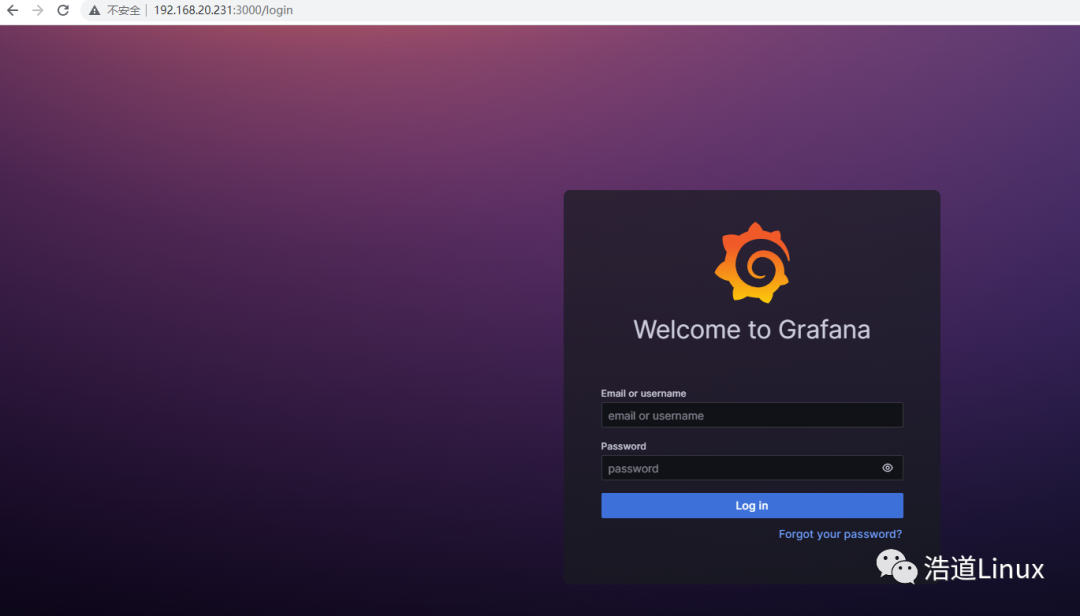
4)通過以下地址訪問garfana,并且配置相應的數據源
http://192.168.20.231:3000/login
登錄界面如下所示,默認用戶名及密碼分別是admin,admin
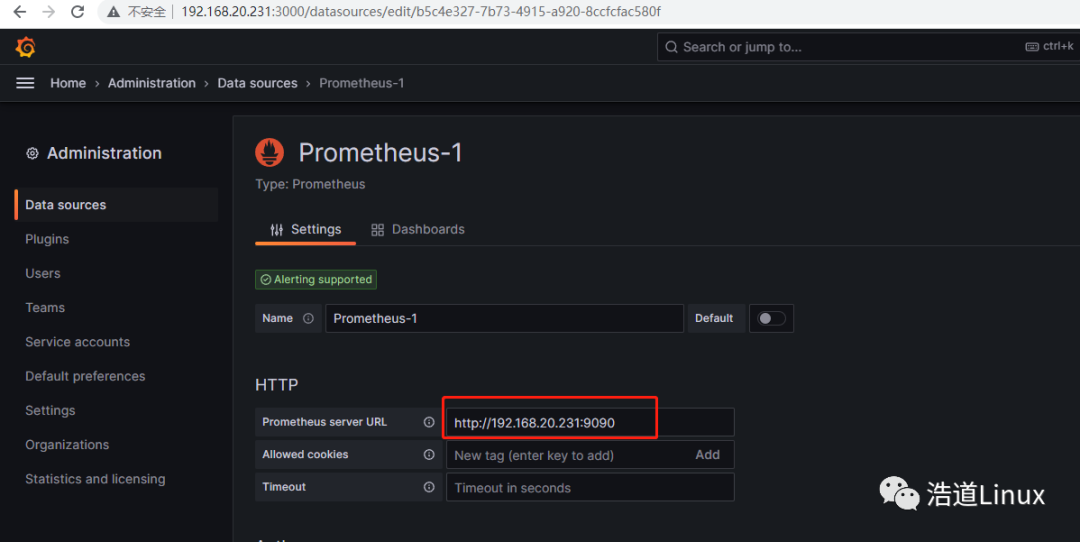
5)登錄進入grafana系統后,對數據源進行配置,點擊,add your first data source,進入添加數據源頁面:

6)進入后,點擊Prometheus,進入配置頁面;
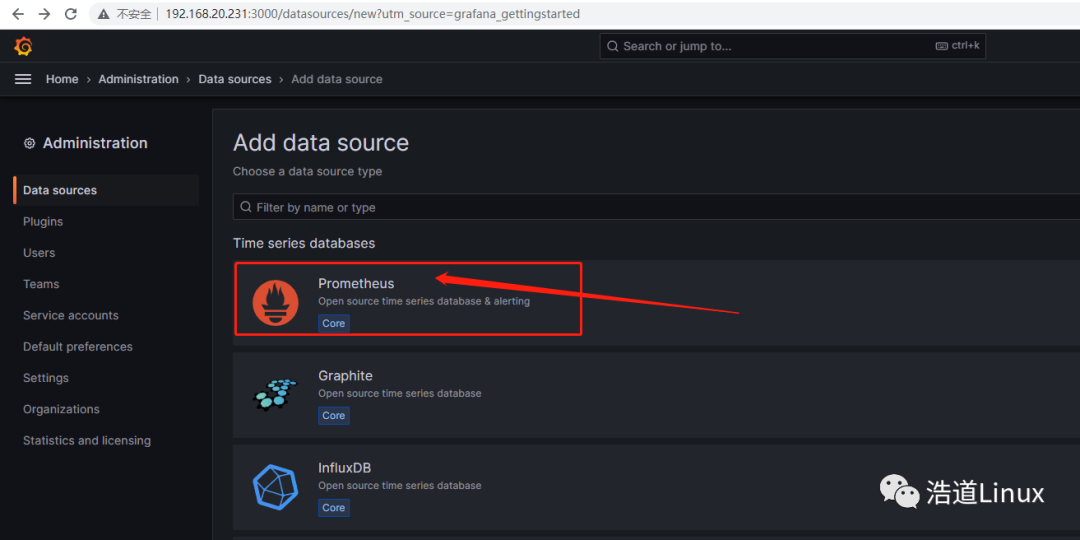
7)編輯HTTP下的URL,這里是主機IP是192.168.20.231,所以填:http://192.68.20.231:9090
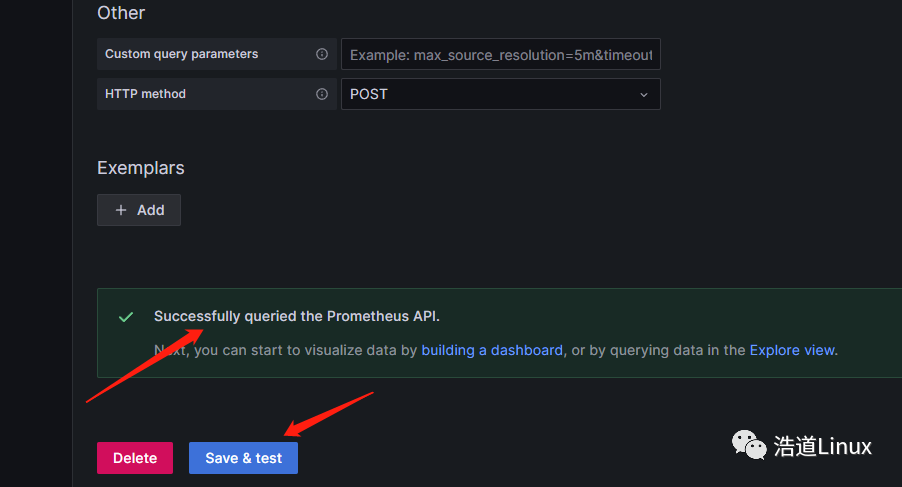
8)拉到最底部進行保存,如下所示即為保存成功。
4、監控主機中安裝node_exporter
首先在監控主機192.168.20.231上進行安裝該組件。
1)下載最新的node_exporter版本
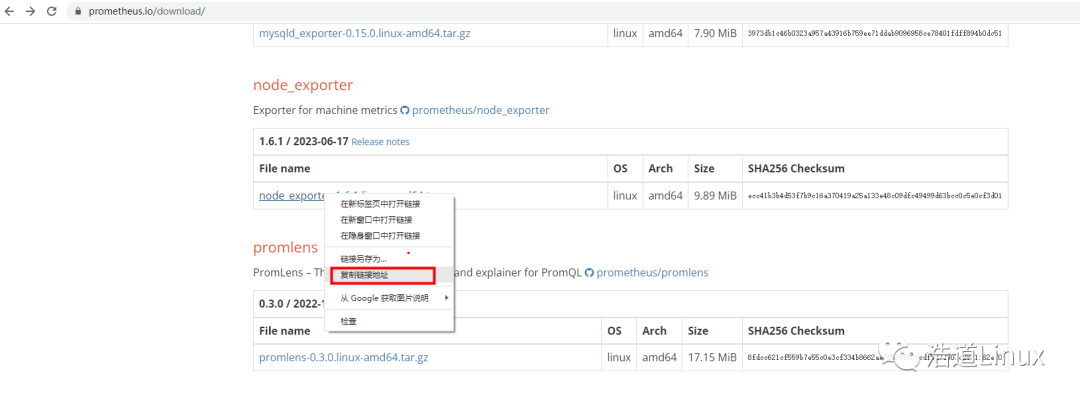
wget https://github.com/prometheus/node_exporter/releases/download/v1.6.1/node_exporter-1.6.1.linux-amd64.tar.gz
下載完成后如下圖所示:

2)對軟件壓縮包進行解壓,并且將安裝包放到自己系統安裝目錄下,我自己放在/usr/local/目錄中
[]
[]
3)將安裝包中的可執行文件node_exporter拷貝到/usr/local/bin目錄中
mv /usr/local/node_exporter-1.6.1.linux-amd64/node_exporter /usr/local/bin/
4)為node_exporter服務創建service服務
vim /usr/lib/systemd/system/node_exporter.service
大家根據自己實際安裝目錄,寫入cat命令相關內容到上述文件中。
[root@master ruanjianfile]# cat /usr/lib/systemd/system/node_exporter.service
[Unit]
Description=node_exporter
Documentation=https://prometheus.io/
After=network.target
[Service]
Type=simple
User=root
Group=root
ExecStart=/usr/local/bin/node_exporter
Restart=on-failure
[Install]
WantedBy=multi-user.target
5)為node_exporter設置自動啟動并啟動服務
systemctl daemon-reload
systemctl enable node_exporter
systemctl start node_exporter
6)查看node_exporter服務狀態,如下服務狀態為正常狀態
[root@master ~]# systemctl status node_exporter
● node_exporter.service - node_exporter
   Loaded: loaded (/usr/lib/systemd/system/node_exporter.service; enabled; vendor preset: disabled)
   Active: active (running) since 三 2023-07-19 1407 CST; 3min 0s ago
     Docs: https://prometheus.io/
 Main PID: 7146 (node_exporter)
   CGroup: /system.slice/node_exporter.service
           └─7146 /usr/local/bin/node_exporter


7月 19 14:25:07 master node_exporter[7146]: ts=2023-07-19T06:25:07.181Z caller=node_exporter.go:117 level=info collector=thermal_zone
7月 19 14:25:07 master node_exporter[7146]: ts=2023-07-19T06:25:07.181Z caller=node_exporter.go:117 level=info collector=time
7月 19 14:25:07 master node_exporter[7146]: ts=2023-07-19T06:25:07.181Z caller=node_exporter.go:117 level=info collector=timex
7月 19 14:25:07 master node_exporter[7146]: ts=2023-07-19T06:25:07.181Z caller=node_exporter.go:117 level=info collector=udp_queues
7月 19 14:25:07 master node_exporter[7146]: ts=2023-07-19T06:25:07.181Z caller=node_exporter.go:117 level=info collector=uname
7月 19 14:25:07 master node_exporter[7146]: ts=2023-07-19T06:25:07.181Z caller=node_exporter.go:117 level=info collector=vmstat
7月 19 14:25:07 master node_exporter[7146]: ts=2023-07-19T06:25:07.181Z caller=node_exporter.go:117 level=info collector=xfs
7月 19 14:25:07 master node_exporter[7146]: ts=2023-07-19T06:25:07.181Z caller=node_exporter.go:117 level=info collector=zfs
7月 19 14:25:07 master node_exporter[7146]: ts=2023-07-19T06:25:07.182Z caller=tls_config.go:274 level=info msg="Listening on" address=[::]:9100
7月 19 14:25:07 master node_exporter[7146]: ts=2023-07-19T06:25:07.182Z caller=tls_config.go:277 level=info msg="TLS is disabled." http2=f...::]:9100
Hint: Some lines were ellipsized, use -l to show in full.
[root@master ~]#
5、監控主機中進行監控相關參數配置
1)vi編輯修改prometheus中相關配置文件;
主要在對應該控件軟件安裝目錄下/opt/prometheus/prometheus.yml這個文件中;
在原文件的scrape_configs模塊下增加如下配置內容:
  - job_name: 'master_prometheus'
    static_configs:
        - targets: ['192.168.20.231:9100']
修改后/opt/prometheus/prometheus.yml如下所示:
[root@master prometheus]# cat prometheus.yml
# my global config
global:
  scrape_interval: 15s # Set the scrape interval to every 15 seconds. Default is every 1 minute.
  evaluation_interval: 15s # Evaluate rules every 15 seconds. The default is every 1 minute.
  # scrape_timeout is set to the global default (10s).


# Alertmanager configuration
alerting:
  alertmanagers:
    - static_configs:
        - targets:
          # - alertmanager:9093


# Load rules once and periodically evaluate them according to the global 'evaluation_interval'.
rule_files:
  # - "first_rules.yml"
  # - "second_rules.yml"


# A scrape configuration containing exactly one endpoint to scrape:
# Here it's Prometheus itself.
scrape_configs:
  # The job name is added as a label `job=` to any timeseries scraped from this config.
  - job_name: "prometheus"


    # metrics_path defaults to '/metrics'
    # scheme defaults to 'http'.


    static_configs:
      - targets: ["localhost:9090"]


  - job_name: 'master_prometheus'
    static_configs:
        - targets: ['192.168.20.231:9100']
2)檢查配置是否正確:
養成好習慣,每次修改配置文件完成,用promtool檢測配置文件是否正確。如下檢查配置文件正確方可執行下一步。
[]
Checking /opt/prometheus/prometheus.yml
SUCCESS: /opt/prometheus/prometheus.yml is valid prometheus config file syntax
[]
3)重啟prometheus服務進行相關測試
systemctl restart prometheus
打開如下測試地址
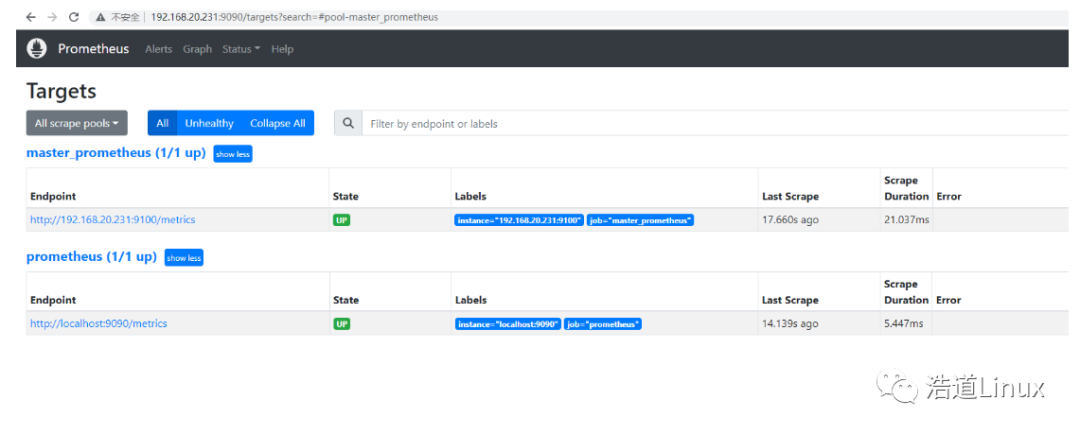
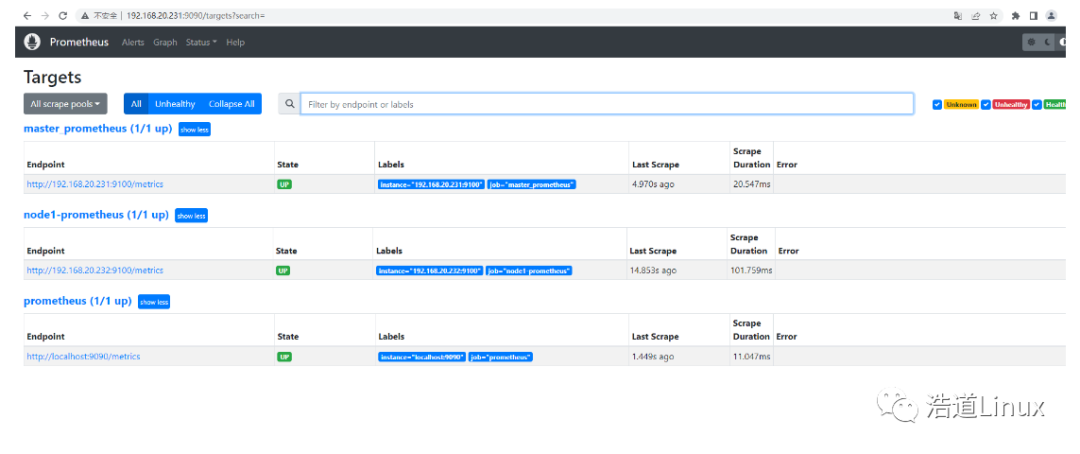
http://192.168.20.231:9090/targets
如下圖所示,可以看到targets已經增加了對監控主機master_prometheus的監控。
6、被監控主機中安裝node_exporter及進行參數配置
首先在被監控主機192.168.20.232上進行安裝該組件。
1)安裝步驟參考監控主機中node_exporter安裝這個章節,安裝方法步驟一樣。
2)在監控主機192.168.20.231上修改對應配置文件,
修改/opt/prometheus/prometheus.yml這個文件后面,添加如下內容:
  - job_name: "node1-prometheus"
    static_configs:
        - targets: ['192.168.20.232:9100']
3)檢測配置文件正常后,重啟服務
[]
Checking /opt/prometheus/prometheus.yml
SUCCESS: /opt/prometheus/prometheus.yml is valid prometheus config file syntax
[]
4)待服務起來后,打開下面地址進行測試
http://192.168.20.231:9090/targets
正常如下圖所示,targets已經增加了對被監控主機node1的監控。
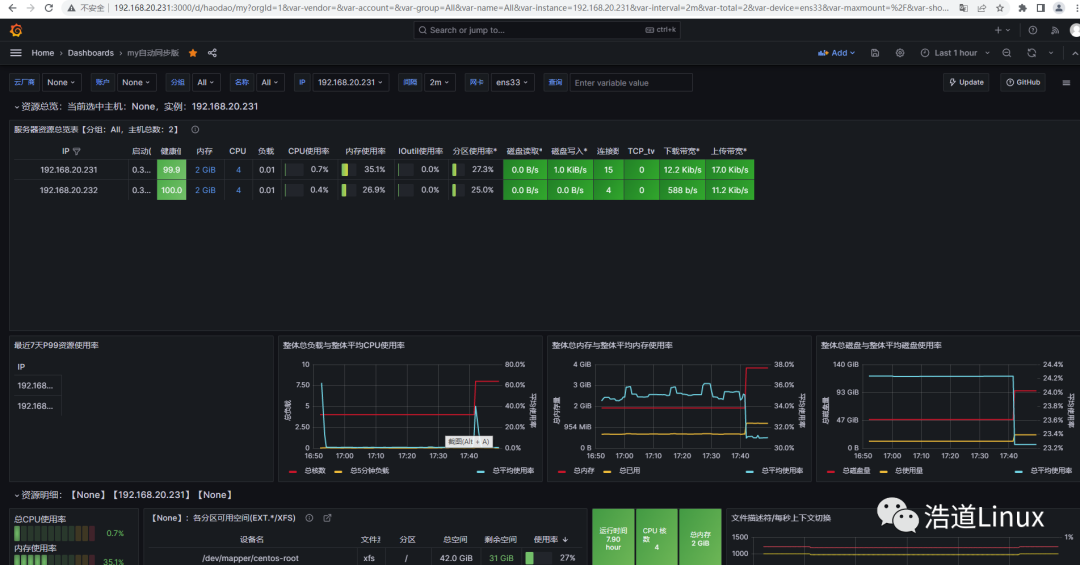
7、grafana中添加配置監控模板
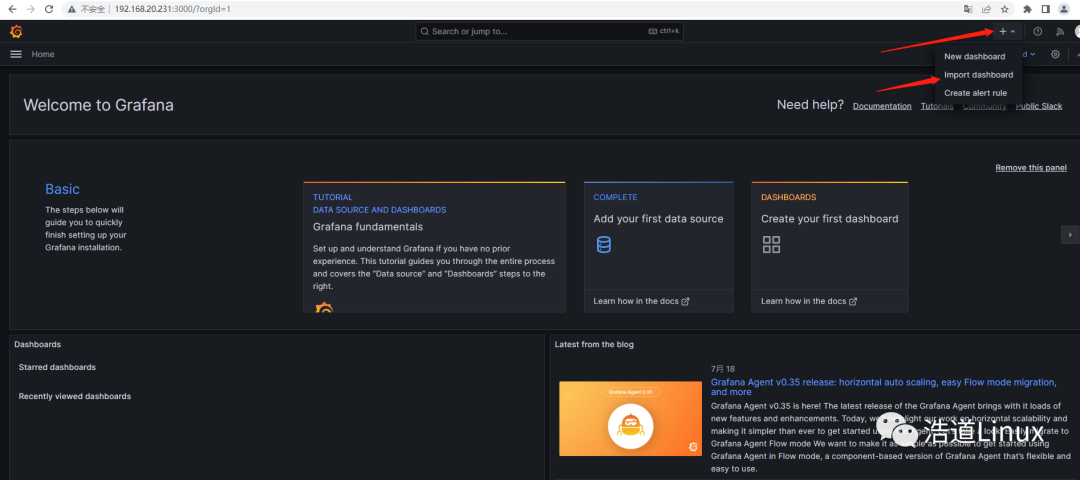
1)如圖點擊“+”號后,選擇import dashboard
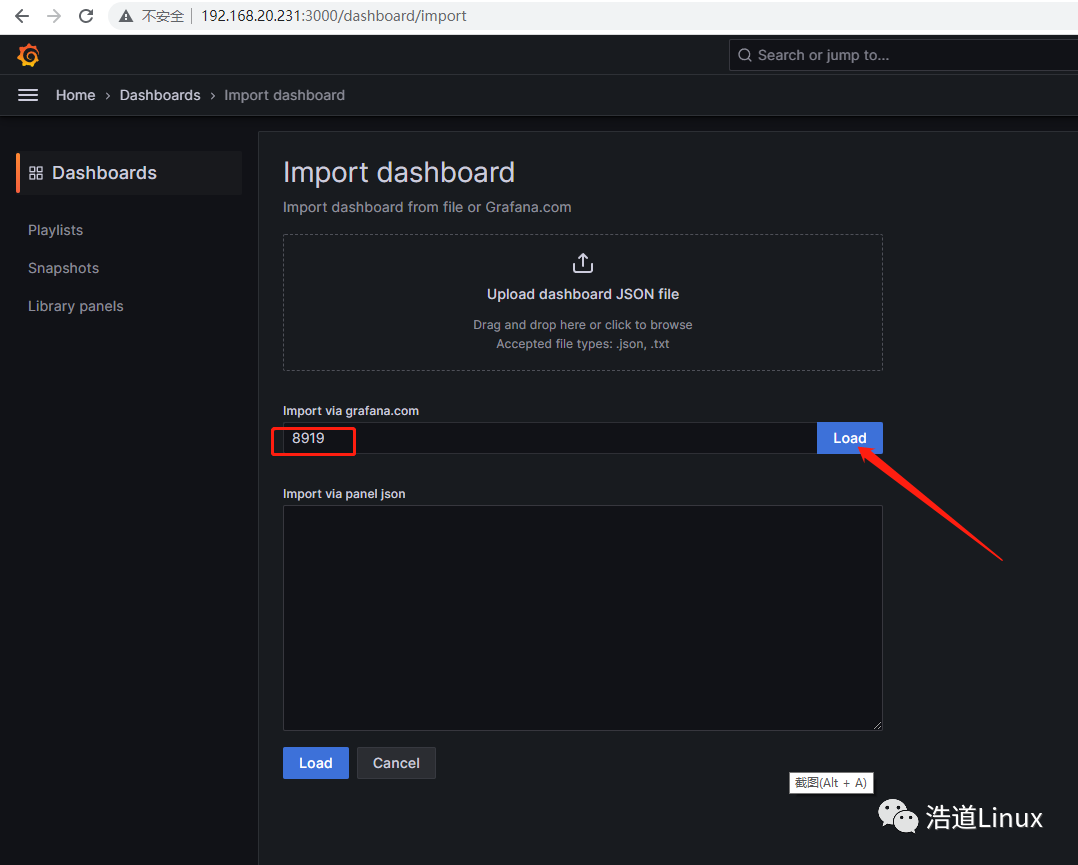
2)如下圖,搜索系統默認模板8919,然后點擊Load
3)點Load后,稍等會,grafana會直接從官方網站導入編號為8919的面板如下圖所示:
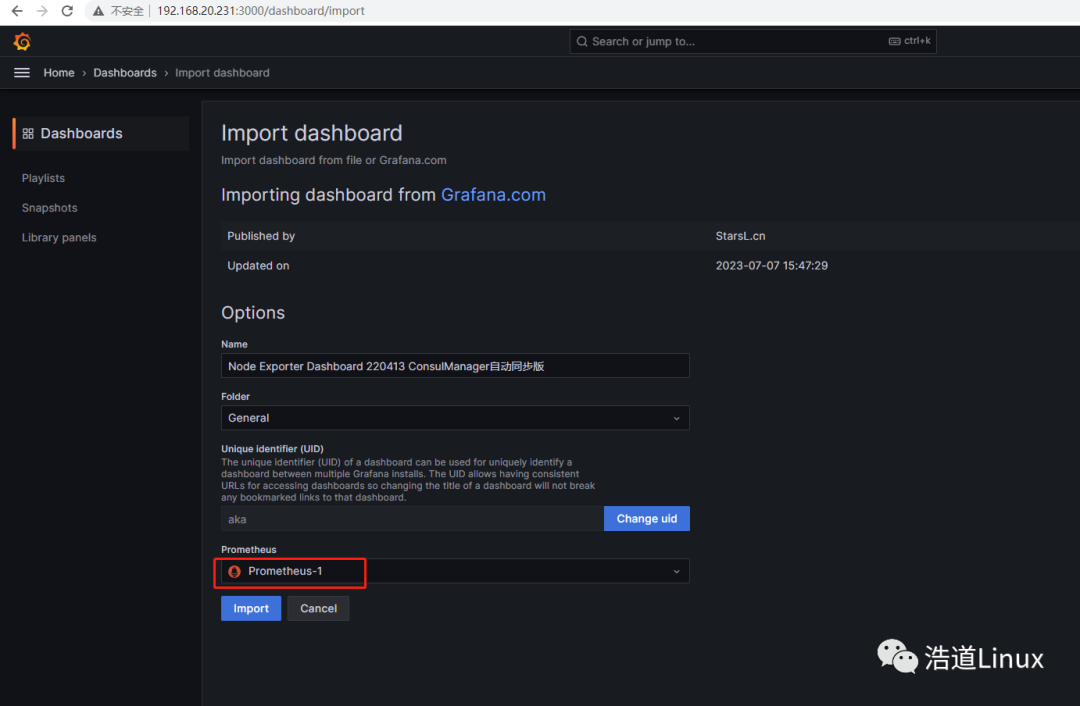
4)選擇數據源Prometheus-1,點擊“Import”,顯示master和node1監控界面顯示如下圖所示:
四、總結
到此、整套Prometheus監控系統已經部署完畢,并且已經可以正常監控。但是其展示的只是它本身最基本的功能,其它組件及模塊相關的功能配置,要靠大家自行去研究學習,那樣方可發揮出它強大的監控系統功能。
-
監控系統
+關注
關注
21文章
3904瀏覽量
174420 -
自動化
+關注
關注
29文章
5562瀏覽量
79239 -
Prometheus
+關注
關注
0文章
27瀏覽量
1714
原文標題:【全網最詳細】40個步驟安裝部署Prometheus監控系統
文章出處:【微信號:浩道linux,微信公眾號:浩道linux】歡迎添加關注!文章轉載請注明出處。
發布評論請先 登錄
相關推薦
Prometheus的架構原理從“監控”談起

Prometheus的基本原理與開發指南

阿里云容器Kubernetes監控(二) - 使用Grafana展現Pod監控數據
簡述linux-arm64 UOS安裝開源Grafana的步驟
部署普羅米修斯(Prometheus)監控平臺前需考慮的六大因素
使用Thanos+Prometheus+Grafana構建監控系統
監控神器:Prometheus
如何基于kube-prometheus設計一個監控系統
關于Prometheus監控系統相關的知識體系
基于kube-prometheus的大數據平臺監控系統設計
基于Prometheus開源的完整監控解決方案


 40個步驟安裝部署Prometheus監控系統


評論