概述
我們先來了解一下 @SpringBootApplication 是什么,以及如何在一個簡單的 Spring Boot 應用程序中使用它。我們先看看 Spring Team 在源碼中對它的定義是什么?
Indicates a configuration class that declares one or more @Bean methods and also triggers auto-configuration and component scanning. This is a convenience annotation that is equivalent to declaring @Configuration, @EnableAutoConfiguration and @ComponentScan.
表示一個配置類,它聲明了一個或多個@Bean方法,也觸發了自動配置和組件掃描。這是一個方便的注解,相當于聲明了@Configuration、@EnableAutoConfiguration和@ComponentScan。
從上面的定義我們可以看出,@SpringBootApplication 注解其實是一個組合注解。使用 @SpringBootApplication 相當于同時使用了 @Configuration、@EnableAutoConfiguration 和 @ComponentScan 。@SpringBootApplication 是在 Spring Boot 1.2.0 之后才開始有的,如何你的項目使用的 Spring Boot 1.2.0 之前的版本,那需要抱歉了,你不能使用這個注解,你只能完整的使用那 3 個注解來代替它。
那我們接下來看看,通過一個簡單的示例來看看怎么使用的。
@SpringBootApplication 示例
下面是一個簡單的例子,說明如何使用 @SpringBootApplication 注解來編寫 Spring Boot 應用程序。
import org.springframework.boot.SpringApplication;
import org.springframework.boot.autoconfigure.SpringBootApplication;

@SpringBootApplication
public class Application {
    public static void main(String[] args) {
        SpringApplication.run(Application.class, args);
    }
}
Spring Boot 項目的啟動類非常的簡潔,沒有一行多余的代碼。@SpringBootApplication 放在項目啟動類上主要起到了自動化配置的作用。下面我們看看 @SpringBootApplication 具體的代碼。
@Target(ElementType.TYPE)
@Retention(RetentionPolicy.RUNTIME)
@Documented
@Inherited
@SpringBootConfiguration
@EnableAutoConfiguration
@ComponentScan(excludeFilters = { @Filter(type = FilterType.CUSTOM, classes = TypeExcludeFilter.class),
        @Filter(type = FilterType.CUSTOM, classes = AutoConfigurationExcludeFilter.class) })
public @interface SpringBootApplication {
    @AliasFor(annotation = EnableAutoConfiguration.class)
    Class< ? >[] exclude() default {};

    @AliasFor(annotation = EnableAutoConfiguration.class)
    String[] excludeName() default {};
    @AliasFor(annotation = ComponentScan.class, attribute = "basePackages")
    String[] scanBasePackages() default {};
    @AliasFor(annotation = ComponentScan.class, attribute = "basePackageClasses")
    Class< ? >[] scanBasePackageClasses() default {};
    @AliasFor(annotation = ComponentScan.class, attribute = "nameGenerator")
    Class< ? extends BeanNameGenerator > nameGenerator() default BeanNameGenerator.class;
    @AliasFor(annotation = Configuration.class)
    boolean proxyBeanMethods() default true;
}
從 @SpringBootApplication 源碼可以看出 @SpringBootApplication = @SpringBootConfiguration + @ComponentScan+ @EnableAutoConfiguration 。
前面已經提過了,@SpringBootApplication 是3個注解的組合,下面分別介紹一下每個注解都有什么作用吧。
@SpringBootConfiguration這個注解將一個類標記為基于 Java Config 的配置類。如果你喜歡基于 Java 的配置而不是基于 XML 的配置,這一點就特別重要。
@ComponentScan該注解使組件掃描成為可能,這樣你創建的 Web 控制器類和其他組件將被自動發現,并在 Spring 應用上下文中注冊為 Bean。你編寫的所有
@Controller類將被該注解發現。
@EnableAutoConfiguration這個注解可以啟用
Spring Boot自動配置功能。
如果你仔細的話會發現和前面講的不一樣, @SpringBootConfiguration 是從那里冒出來的,不是應該是 @Configuration 嗎?下面就告訴你答案。
@SpringBootConfiguration
@Target(ElementType.TYPE)
@Retention(RetentionPolicy.RUNTIME)
@Documented
@Configuration
@Indexed
public @interface SpringBootConfiguration {
    @AliasFor(annotation = Configuration.class)
    boolean proxyBeanMethods() default true;
}
從源碼可以看出,@SpringBootConfiguration 繼承自 @Configuration,二者功能也一致,標注當前類是配置類,不過 @SpringBootConfiguration 是一個特殊的標記類,在項目中只能使用一次。
@ComponentScan
@Retention(RetentionPolicy.RUNTIME)
@Target(ElementType.TYPE)
@Documented
@Repeatable(ComponentScans.class)
public @interface ComponentScan {
 @AliasFor("basePackages")
 String[] value() default {};
 @AliasFor("value")
 String[] basePackages() default {};
 Class< ? >[] basePackageClasses() default {};
 Class< ? extends BeanNameGenerator > nameGenerator() default BeanNameGenerator.class;
 Class< ? extends ScopeMetadataResolver > scopeResolver() default AnnotationScopeMetadataResolver.class;
 ScopedProxyMode scopedProxy() default ScopedProxyMode.DEFAULT;
    ...
}
@ComponentScan 不做過多的解釋了,使用過 Spring 的朋友都懂的。其他的朋友我就啰嗦一句吧, 可以通過該注解指定掃描某些包下包含如下注解的均自動注冊為 Spring beans:@Component、@Service、 @Repository、 @Controller 等等注釋的類。Spring Boot 除了可以使用 @ComponentScan 注解來加載我們的bean,還可以使用 @Import 指定該類。
@EnableAutoConfiguration
@EnableAutoConfiguration 的作用啟動自動的配置,意思就是 Spring Boot 根據你添加的 jar 包來配置你項目的默認配置,比如根據 spring-boot-starter-web ,來判斷你的項目是否需要添加了 web mvc 和 tomcat,就會自動的幫你配置 web 項目中所需要的默認配置。簡單點說就是它會根據定義在 classpath 下的類,自動的給你生成一些 Bean,并加載到 Spring 的上下文中。
@Target(ElementType.TYPE)
@Retention(RetentionPolicy.RUNTIME)
@Documented
@Inherited
@AutoConfigurationPackage
@Import(AutoConfigurationImportSelector.class)
public @interface EnableAutoConfiguration {
    String ENABLED_OVERRIDE_PROPERTY = "spring.boot.enableautoconfiguration";
    Class< ? >[] exclude() default {};
    String[] excludeName() default {};
}
從上述源碼中可以看到 @Import 引入了 AutoConfigurationImportSelector 類。AutoConfigurationImportSelector 使用了 Spring Core 包的 SpringFactoriesLoader#loadFactoryNames() 方法。AutoConfigurationImportSelector 類實現了 DeferredImportSelector 接口,并實現了 selectImports 方法,用來導出 Configuration 類。
public class AutoConfigurationImportSelector implements DeferredImportSelector, BeanClassLoaderAware,
        ResourceLoaderAware, BeanFactoryAware, EnvironmentAware, Ordered {
    @Override
    public String[] selectImports(AnnotationMetadata annotationMetadata) {
        if (!isEnabled(annotationMetadata)) {
            return NO_IMPORTS;
        }
        AutoConfigurationEntry autoConfigurationEntry = getAutoConfigurationEntry(annotationMetadata);
        return StringUtils.toStringArray(autoConfigurationEntry.getConfigurations());
    }
    protected AutoConfigurationEntry getAutoConfigurationEntry(AnnotationMetadata annotationMetadata) {
        if (!isEnabled(annotationMetadata)) {
            return EMPTY_ENTRY;
        }
        AnnotationAttributes attributes = getAttributes(annotationMetadata);
        List< String > configurations = getCandidateConfigurations(annotationMetadata, attributes);
        ...
        return new AutoConfigurationEntry(configurations, exclusions);
    }
    protected boolean isEnabled(AnnotationMetadata metadata) {
        if (getClass() == AutoConfigurationImportSelector.class) {
            return getEnvironment().getProperty(EnableAutoConfiguration.ENABLED_OVERRIDE_PROPERTY, Boolean.class, true);
        }
        return true;
    }
    protected List< String > getCandidateConfigurations(AnnotationMetadata metadata, AnnotationAttributes attributes) {
        List< String > configurations = SpringFactoriesLoader.loadFactoryNames(getSpringFactoriesLoaderFactoryClass(),
                getBeanClassLoader());
        Assert.notEmpty(configurations, "No auto configuration classes found in META-INF/spring.factories. If you "
                + "are using a custom packaging, make sure that file is correct.");
        return configurations;
    }
}
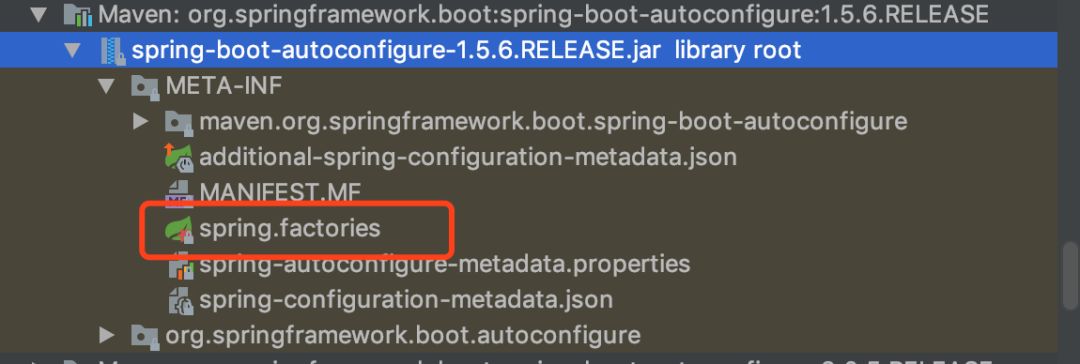
導出的類是通過 SpringFactoriesLoader#loadFactoryNames() 讀取了 classpath 下面的 META-INF/spring.factories 文件。
public final class SpringFactoriesLoader {
    public static final String FACTORIES_RESOURCE_LOCATION = "META-INF/spring.factories";
    public static List< String > loadFactoryNames(Class< ? > factoryType, @Nullable ClassLoader classLoader) {
        ClassLoader classLoaderToUse = classLoader;
        if (classLoaderToUse == null) {
            classLoaderToUse = SpringFactoriesLoader.class.getClassLoader();
        }
        String factoryTypeName = factoryType.getName();
        return loadSpringFactories(classLoaderToUse).getOrDefault(factoryTypeName, Collections.emptyList());
    }
    private static Map< String, List< String >> loadSpringFactories(ClassLoader classLoader) {
        Map< String, List< String >> result = cache.get(classLoader);
        if (result != null) {
            return result;
        }
        result = new HashMap<  >();
        try {
            Enumeration< URL > urls = classLoader.getResources(FACTORIES_RESOURCE_LOCATION);
            while (urls.hasMoreElements()) {
                URL url = urls.nextElement();
                UrlResource resource = new UrlResource(url);
                Properties properties = PropertiesLoaderUtils.loadProperties(resource);
                for (Map.Entry< ?, ? > entry : properties.entrySet()) {
                    String factoryTypeName = ((String) entry.getKey()).trim();
                    String[] factoryImplementationNames =
                            StringUtils.commaDelimitedListToStringArray((String) entry.getValue());
                    for (String factoryImplementationName : factoryImplementationNames) {
                        result.computeIfAbsent(factoryTypeName, key - > new ArrayList<  >())
                                .add(factoryImplementationName.trim());
                    }
                }
            }
            // Replace all lists with unmodifiable lists containing unique elements
            result.replaceAll((factoryType, implementations) - > implementations.stream().distinct()
                    .collect(Collectors.collectingAndThen(Collectors.toList(), Collections::unmodifiableList)));
            cache.put(classLoader, result);
        }
        catch (IOException ex) {
            throw new IllegalArgumentException("Unable to load factories from location [" +
                    FACTORIES_RESOURCE_LOCATION + "]", ex);
        }
        return result;
    }
}
META-INF/spring.factories 文件中一部分自動配置的內容:
# Auto Configure
org.springframework.boot.autoconfigure.EnableAutoConfiguration=
org.springframework.boot.autoconfigure.admin.SpringApplicationAdminJmxAutoConfiguration,
org.springframework.boot.autoconfigure.aop.AopAutoConfiguration,
org.springframework.boot.autoconfigure.amqp.RabbitAutoConfiguration,
org.springframework.boot.autoconfigure.batch.BatchAutoConfiguration,
org.springframework.boot.autoconfigure.cache.CacheAutoConfiguration,
org.springframework.boot.autoconfigure.cassandra.CassandraAutoConfiguration,
org.springframework.boot.autoconfigure.context.ConfigurationPropertiesAutoConfiguration,
org.springframework.boot.autoconfigure.context.LifecycleAutoConfiguration,
org.springframework.boot.autoconfigure.context.MessageSourceAutoConfiguration,
org.springframework.boot.autoconfigure.context.PropertyPlaceholderAutoConfiguration,
org.springframework.boot.autoconfigure.couchbase.CouchbaseAutoConfiguration,
org.springframework.boot.autoconfigure.dao.PersistenceExceptionTranslationAutoConfiguration,
org.springframework.boot.autoconfigure.data.cassandra.CassandraDataAutoConfiguration,
org.springframework.boot.autoconfigure.data.cassandra.CassandraReactiveDataAutoConfiguration,
org.springframework.boot.autoconfigure.data.cassandra.CassandraReactiveRepositoriesAutoConfiguration,
如果你發現自動裝配的 Bean 不是你想要的,你也可以 disable 它。比如說,我不想要自動裝配 Database 的那些Bean:
@EnableAutoConfiguration(exclude = {DataSourceAutoConfiguration.class})
這也是一種為 Spring Boot 項目瘦身的方法。你可以看到網上一些為項目瘦身的方法都是通過這個注解來操作的。
@AutoConfigurationPackage
@EnableAutoConfiguration 又繼承了 @AutoConfigurationPackage ,@AutoConfigurationPackage 會引導類(@SpringBootApplication 標注的類)所在的包及下面所有子包里面的所有組件掃描到Spring容器。具體怎么實現的呢,我們來看代碼,原來它 import 了 AutoConfigurationPackages.Registrar.class, 我們來看看它做了什么?
@Import(AutoConfigurationPackages.Registrar.class)
public @interface AutoConfigurationPackage {
    String[] basePackages() default {};
    Class< ? >[] basePackageClasses() default {};
}
static class Registrar implements ImportBeanDefinitionRegistrar, DeterminableImports {
    @Override
    public void registerBeanDefinitions(AnnotationMetadata metadata, BeanDefinitionRegistry registry) {
        register(registry, new PackageImports(metadata).getPackageNames().toArray(new String[0]));
    }
    @Override
    public Set< Object > determineImports(AnnotationMetadata metadata) {
        return Collections.singleton(new PackageImports(metadata));
    }
}
看代碼就很容易理解,把注解掃描進來的 package 全部給注冊到 spring bean中。這樣 Spring Boot 的自動配置也就完成了。
總結
經過這樣的一番折騰,相信大家已經對 @SpringBootApplication 注解,有了一定的了解。也知道了 @SpringBootApplication 怎么實現 Spring Boot 的自動配置功能。
-
源碼
+關注
關注
8文章
639瀏覽量
29185 -
應用程序
+關注
關注
37文章
3265瀏覽量
57678 -
組件
+關注
關注
1文章
512瀏覽量
17813 -
SpringBoot
+關注
關注
0文章
173瀏覽量
177
發布評論請先 登錄
相關推薦
Spring Boot如何實現異步任務
結合場景談一談微服務配置
結合實際場景談一談微服務配置
Spring Boot的注解原理是什么
Java注解及其底層原理解析 1

Java注解及其底層原理解析2

Spring Boot啟動 Eureka流程


 SpringBootApplication是什么


評論