 【英飛凌測評】英飛凌PSoC? 62開發板試用報告-LCD ILI9341 8080 DEMO
# Infineon Psoc6-evaluationkit-062S2 說明
## 簡介
本文檔為 `RT-Thread` 為 `PSoC6 CY8CKIT-062S2-43012`開發板提供的 BSP (板級支持包) 說明。
This is a fast display driver for interfacing ILI9341 LCD display with infineon microcontroller over an 8bit parallel (8080-II/I) bus. It's mainly written for my personal usage.
## 開發板介紹
`Psoc6-evaluationkit-062S2` 是 RT-Thread 聯合英飛凌推出的一款集成32位雙核CPU子系統( ARM Cortex-M4 和 ARM Cortex-M0)的開發板,其具有單周期乘法的150-MHz Arm Cortex-M4F CPU (浮點和存儲器保護單元),100-MHz Cortex M0+ CPU,帶單周期乘法和MPU,可以充分發揮 PSoC6 雙核芯片性能。
該開發板核心 **板載資源** 如下:
- MCU:CY8C624ABZI-S2D44,Cortex-M4主頻 150MHz,Cortex-M0主頻 100MHz,2MB Flash 和 1MB SRAM
MCU手冊更多詳細信息請參考文檔 [PSoC 6 MCU: CY8C62x8, CY8C62xA Datasheet (infineon.com)](https://www.infineon.com/dgdl/Infineon-PSOC_6_MCU_CY8C62X8_CY8C62XA-DataSheet-v17_00-EN.pdf?fileId=8ac78c8c7d0d8da4017d0ee7d03a70b1)
- 板載資源:microSD card , 觸摸滑條,Arduino 接口
- 開發環境:ModusToolbox 2.0/MDK V5
PSoC? Creator? 下載鏈接 [ModusToolbox? Software - Infineon Technologies](https://www.infineon.com/cms/en/design-support/tools/sdk/modustoolbox-software/)
## 外設支持
本 BSP 目前對外設的支持情況如下:
| **片上外設** | **支持情況** | **備注** |
| :----------: | :----------: | :------: |
| USB 轉串口 | 支持 | UART0 |
| GPIO | 支持 | — |
| UART | 支持 | UART0-5 |
| Touch | 支持 | 觸摸滑條 |
## 目前支持
- [x] Support Arduino (simple, there are a few funtions to use ardino in rtt sdk)
- [x] LCD display (8080, ILI9341)
- [ ] ...
## 快速上手
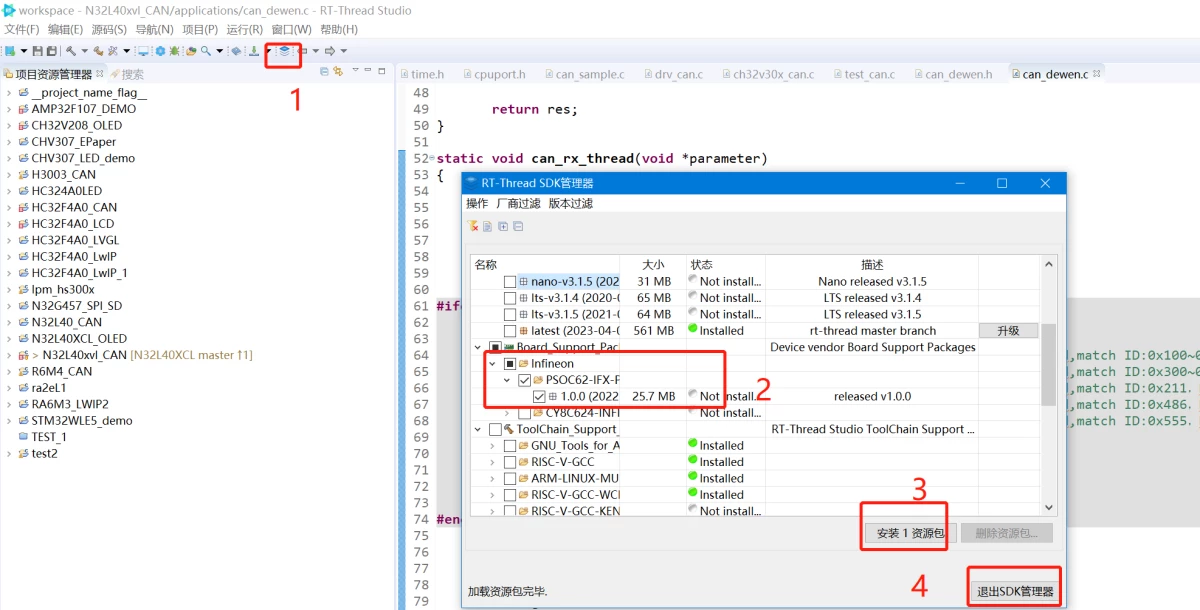
本 BSP 是以 `VS Code` 和 `RT-Thread Studio` 為開發環境,接下來介紹如何將系統運行起來。
### VS Code 開發
#### 硬件連接
使用數據線連接開發板到 PC。
#### 編譯下載
## 運行結果
下載程序成功之后,系統會自動運行。打開終端工具串口助手,選擇波特率為 115200。復位設備后,而且在終端上可以看到 `RT-Thread` 的輸出信息:
```bash
| /
- RT - Thread Operating System
/ | 4.1.1 build Jul 25 2022 18:03:35
2006 - 2022 Copyright by RT-Thread team
msh >
If you want to show lcd demo, you can input lcd_demo to entry, see:
| /
- RT -     Thread Operating System
 / |      4.1.1 build Jul 25 2022 18:03:35
 2006 - 2022 Copyright by RT-Thread team
msh > lcd_demo
msh >
demo: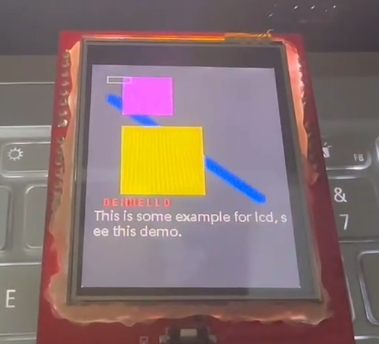
代碼
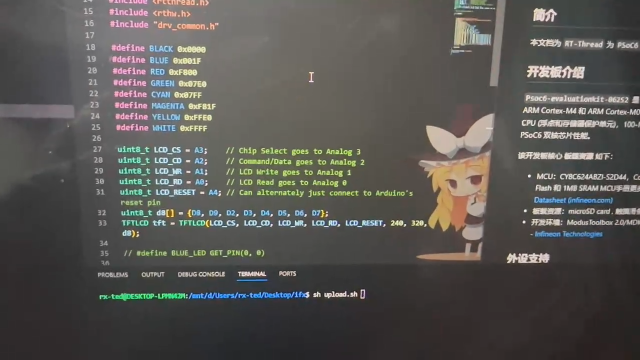
Define pinouts to connect LCD board.
uint8_t LCD_CS = A3;    // Chip Select goes to Analog 3
uint8_t LCD_CD = A2;    // Command/Data goes to Analog 2
uint8_t LCD_WR = A1;    // LCD Write goes to Analog 1
uint8_t LCD_RD = A0;    // LCD Read goes to Analog 0
uint8_t LCD_RESET = A4; // Can alternately just connect to Arduino's reset pin
uint8_t d8[] = {D8, D9, D2, D3, D4, D5, D6, D7}; // write/read the data of 8 pinouts
TFTLCD tft = TFTLCD(LCD_CS, LCD_CD, LCD_WR, LCD_RD, LCD_RESET, 240, 320, d8);
tft.begin(): initialize the lcd device.tft.setRotation(x): set 0-3, set rotatation.tft.fillScreen(color): set color to full background.tft.drawPixel(x, y, color):tft.drawLine(x,y,w,h,l,color): set position to (x,y), set width to w, set height to h, set line width to l .tft.fillRect(x,y,w,h,color): same as drawLine usage.tft.drawRectangle(x,y,w,h,color): same to drawLine.tft.drawChar(x,y,char,front_color,back_color,font,is_bg): font: see application/font.tft.drawString(x,y,string,front_color)
Can see lcd sources to get information.
審核編輯 黃宇
聲明:本文內容及配圖由入駐作者撰寫或者入駐合作網站授權轉載。文章觀點僅代表作者本人,不代表電子發燒友網立場。文章及其配圖僅供工程師學習之用,如有內容侵權或者其他違規問題,請聯系本站處理。
舉報投訴
-
英飛凌
+關注
關注
67文章
2255瀏覽量
139492 -
lcd
+關注
關注
34文章
4470瀏覽量
169121 -
開發板
+關注
關注
25文章
5223瀏覽量
99202
發布評論請先 登錄
相關推薦
ILI9341液晶控制器詳解
16 位模式下,ILI9341 采用 RGB565 格式存儲顏色數據,此時 ILI9341的 18 位數據線與 MCU 的 16 位數據線以及 LCD GRAM 的對應關系如圖所示:從圖中可以看出,
發表于 11-29 08:27
用fsmc模擬8080協議來驅動ILI9341顯示屏幕的步驟簡析
1、用fsmc模擬8080協議來驅動ILI9341的顯示8080協議8080 時序也叫因特爾總線,一般mcu(mpu)模式的lcd上。Int
發表于 08-29 14:49
【新品發布】英飛凌PSoC 6 RTT物聯網開發板內容詳解
4月12日,英飛凌聯合 RT-Thread 發布PSoC? 62 with CAPSENSE? evaluation kit開發板 (以下簡稱PSo
發表于 04-13 13:46
【新品試用】英飛凌PSoC 6 RTT開發板試用活動
概述、軟件調試、硬件接入、視頻演示,不少于500字+2張圖片。
2)報告形式:標題格式 【評測活動標題+自擬標題】示例: 【英飛凌PSoC 6 RTT開發板
發表于 04-13 15:26
【英飛凌PSoC 6 RTT開發板試用】+開箱測試
【英飛凌PSoC 6 RTT開發板試用】+開箱測試
硬件資源介紹
Psoc6-evaluationkit-062S2 是 RT-Thread
發表于 06-05 01:06
ILI9341的使用之【二】ILI9341介紹
ILI9341系列目錄:《ILI9341的使用之【一】TFT-LCD原理(轉載)》《ILI9341的使用之【二】ILI9341介紹》1、簡介
發表于 11-23 16:21
?47次下載

ILI9341的使用之【一】TFT-LCD原理(轉載)
近期開始研究手上的LCD屏的使用。該LCD屏使用了ILI9341的IC做為驅動。因此邊研究邊留下記錄。與上一個時鐘系列類似,想必這又是一個大工程,因為ILI9341的數據手冊就有200
發表于 11-24 14:51
?59次下載
ILI9341的使用之【三】ILI9341系統通信接口模式操作詳解
ILI9341系列目錄:《ILI9341的使用之【一】TFT-LCD原理(轉載)》《ILI9341的使用之【二】ILI9341介紹》MCU系
發表于 12-08 12:36
?48次下載
SPI:在ILI9341 TFT LCD上顯示PM2.5濃度
電子發燒友網站提供《SPI:在ILI9341 TFT LCD上顯示PM2.5濃度.zip》資料免費下載
發表于 10-31 11:05
?3次下載
英飛凌聯合 RT-Thread 發布 PSoC? 62 with CAPSENSE ? evaluation kit開發板
近日,RT-Thread 社區團隊打造了新品開發板:英飛凌聯合 RT-Thread 發布 ?PSoC 62 with CAPSENSE evaluation kit


 工商網監
工商網監
評論