今天的內(nèi)容介紹的是回歸問題。在回歸問題中,我們的目標是預測連續(xù)值的輸出,如價格或概率。將此與分類問題進行對比,我們的目標是預測離散標簽(例如,圖片里有一個蘋果或一個橙子)。
本筆記采用了經(jīng)典的 Auto MPG 數(shù)據(jù)集,并建立了一個模型來預測 20 世紀 70 年代末和 80 年代初汽車的燃油效率。為此,我們將為模型提供該時間段內(nèi)許多模型的描述。此描述包括以下屬性:氣缸,排量,馬力和重量。
此示例使用 tf.keras API,有關(guān)詳細信息,請參閱指南
https://tensorflow.google.cn/guide/keras?hl=zh-CN
# Use seaborn for pairplot!pip install -q seaborn
from __future__ import absolute_import, division, print_functionimport pathlibimport pandas as pdimport seaborn as snsimport tensorflow as tffrom tensorflow import kerasfrom tensorflow.keras import layersprint(tf.__version__)
1.12.0
Auto MPG 數(shù)據(jù)集
該數(shù)據(jù)集可從UCI Machine Learning Repository 獲得(https://archive.ics.uci.edu/)。
取得數(shù)據(jù)
首先下載數(shù)據(jù)集
dataset_path = keras.utils.get_file("auto-mpg.data", "https://archive.ics.uci.edu/ml/machine-learning-databases/auto-mpg/auto-mpg.data")dataset_path
Downloading data from https://archive.ics.uci.edu/ml/machine-learning-databases/auto-mpg/auto-mpg.data
32768/30286 [================================] - 0s 1us/step
'/root/.keras/datasets/auto-mpg.data'
使用 pandas 導入
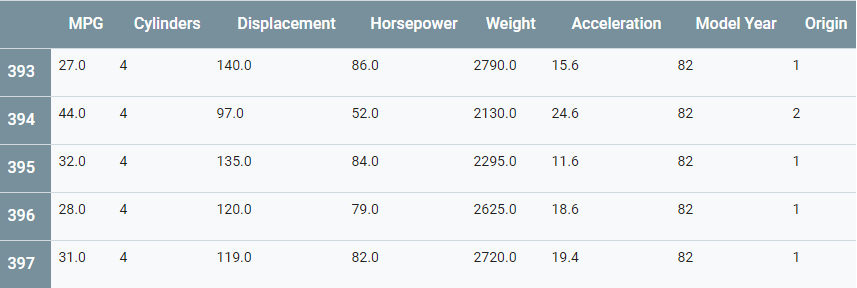
column_names = ['MPG','Cylinders','Displacement','Horsepower','Weight', 'Acceleration', 'Model Year', 'Origin'] raw_dataset = pd.read_csv(dataset_path, names=column_names, na_values = "?", comment='\t', sep=" ", skipinitialspace=True)dataset = raw_dataset.copy()dataset.tail()
清理數(shù)據(jù)
數(shù)據(jù)集包含一些未知數(shù)值
dataset.isna().sum()
MPG 0Cylinders 0Displacement 0Horsepower 6Weight 0Acceleration 0Model Year 0Origin 0dtype: int64
刪除那些行來保持本初始教程簡單明了
dataset = dataset.dropna()
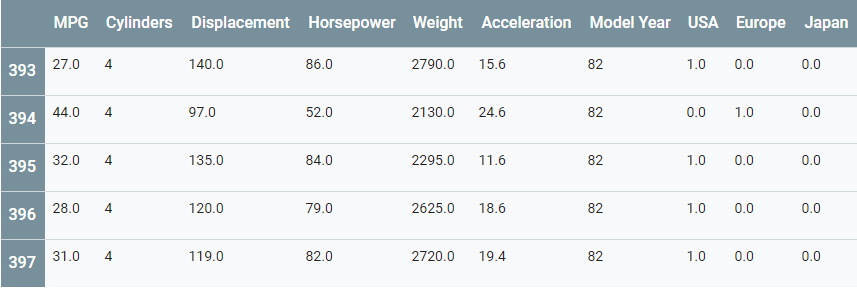
上方表格中,“Origin” 列實際上是分類,而不是數(shù)字。所以把它轉(zhuǎn)換為one-hot:
origin = dataset.pop('Origin')
dataset['USA'] = (origin == 1)*1.0dataset['Europe'] = (origin == 2)*1.0dataset['Japan'] = (origin == 3)*1.0dataset.tail()
將數(shù)據(jù)拆分成訓練和測試
現(xiàn)在將數(shù)據(jù)拆分成一個訓練集和一個測試集。我們將在模型的最終評估中使用測試集。
train_dataset = dataset.sample(frac=0.8,random_state=0)test_dataset = dataset.drop(train_dataset.index)
檢查數(shù)據(jù)
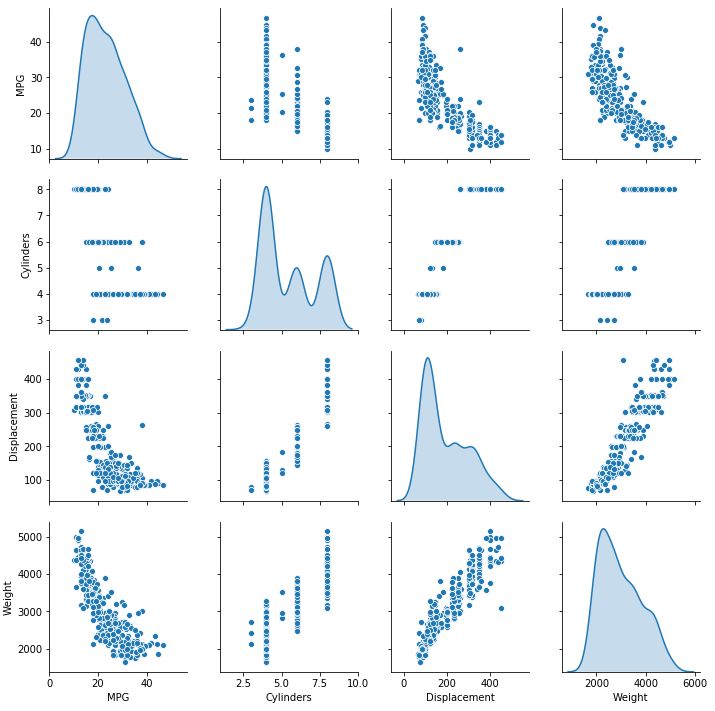
快速瀏覽訓練集中幾個對列的聯(lián)合分布
sns.pairplot(train_dataset[["MPG", "Cylinders", "Displacement", "Weight"]], diag_kind="kde")
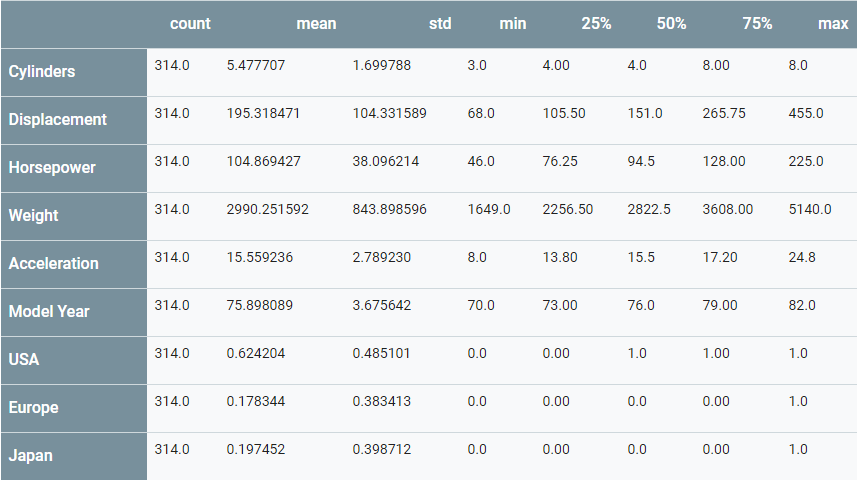
并查看這個整體統(tǒng)計數(shù)據(jù):
train_stats = train_dataset.describe()train_stats.pop("MPG")train_stats = train_stats.transpose()train_stats
從標簽中分割特征
將目標值或 “標簽” 與特征分開。此標簽是您將要訓練模型進行預測的數(shù)值。
train_labels = train_dataset.pop('MPG')test_labels = test_dataset.pop('MPG')
將數(shù)據(jù)規(guī)范化
再次查看上面的train_stats 塊,并注意一下,每個特征的范圍有多么的大相徑庭。
使用不同比例和范圍進行特征規(guī)范化是一個不錯的做法。盡管模型可能在沒有特征歸一化的情況下收斂,但它會使訓練更加困難,并且它使得結(jié)果模型依賴于輸入中使用的單位的選擇。
注意:我們故意只使用來自訓練集的統(tǒng)計數(shù)據(jù),這些統(tǒng)計數(shù)據(jù)也將被用于評估。這樣模型就沒有關(guān)于測試集的任何信息。
defnorm(x): return(x - train_stats['mean']) / train_stats['std']normed_train_data = norm(train_dataset)normed_test_data = norm(test_dataset)
這個規(guī)范化的數(shù)據(jù)是我們用來訓練模型的數(shù)據(jù)。
注意:此處用于規(guī)范化輸入的統(tǒng)計信息與模型權(quán)重同樣重要。
模型
建模
讓我們建立我們的模型。在這里,我們將使用具有兩個密集連接的隱藏層的 Sequential 模型,以及返回單個連續(xù)值的輸出層。模型構(gòu)建步驟包含在一個函數(shù) build_model 中,因為我們稍后將創(chuàng)建第二個模型。
def build_model(): model = keras.Sequential([ layers.Dense(64, activation=tf.nn.relu, input_shape=[len(train_dataset.keys())]), layers.Dense(64, activation=tf.nn.relu), layers.Dense(1) ]) optimizer = tf.train.RMSPropOptimizer(0.001) model.compile(loss='mse', optimizer=optimizer, metrics=['mae', 'mse']) return model
model = build_model()
檢查模型
使用 .summary 方法打印模型的簡單描述
model.summary()
_________________________________________________________________Layer (type) Output Shape Param # =================================================================dense (Dense) (None, 64) 640 _________________________________________________________________dense_1 (Dense) (None, 64) 4160 _________________________________________________________________dense_2 (Dense) (None, 1) 65 =================================================================Total params: 4,865Trainable params: 4,865Non-trainable params: 0_________________________________________________________________
現(xiàn)在來試一試這個模型。從訓練數(shù)據(jù)中取出一批 10 個示例并調(diào)用 model.predict。
example_batch = normed_train_data[:10]example_result = model.predict(example_batch)example_result
array([[ 0.08682194], [ 0.0385334 ], [ 0.11662665], [-0.22370592], [ 0.12390759], [ 0.1889237 ], [ 0.1349103 ], [ 0.41427213], [ 0.19710071], [ 0.01540279]], dtype=float32)
它看上去起效了,產(chǎn)生預期的形狀和類型的結(jié)果。
訓練模型
該模型經(jīng)過 1000 個 epoch 的訓練,并在歷史對象中記錄訓練和驗證的準確性。
# Display training progress by printing a single dot for each completed epochclass PrintDot(keras.callbacks.Callback): def on_epoch_end(self, epoch, logs): if epoch % 100 == 0: print('') print('.', end='')EPOCHS = 1000history = model.fit( normed_train_data, train_labels, epochs=EPOCHS, validation_split = 0.2, verbose=0, callbacks=[PrintDot()])
................................................................................................................................................................................................................................................................................................................................................................................................................
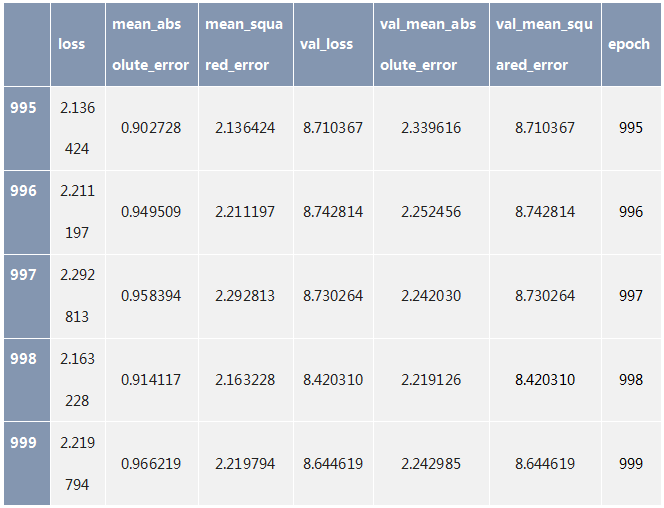
使用存儲在歷史對象中的統(tǒng)計數(shù)據(jù)將模型的訓練進度可視化。
hist = pd.DataFrame(history.history)hist['epoch'] = history.epochhist.tail()
import matplotlib.pyplot as pltdef plot_history(history): plt.figure() plt.xlabel('Epoch') plt.ylabel('Mean Abs Error [MPG]') plt.plot(hist['epoch'], hist['mean_absolute_error'], label='Train Error') plt.plot(hist['epoch'], hist['val_mean_absolute_error'], label = 'Val Error') plt.legend() plt.ylim([0,5]) plt.figure() plt.xlabel('Epoch') plt.ylabel('Mean Square Error [$MPG^2$]') plt.plot(hist['epoch'], hist['mean_squared_error'], label='Train Error') plt.plot(hist['epoch'], hist['val_mean_squared_error'], label = 'Val Error') plt.legend() plt.ylim([0,20])plot_history(history)
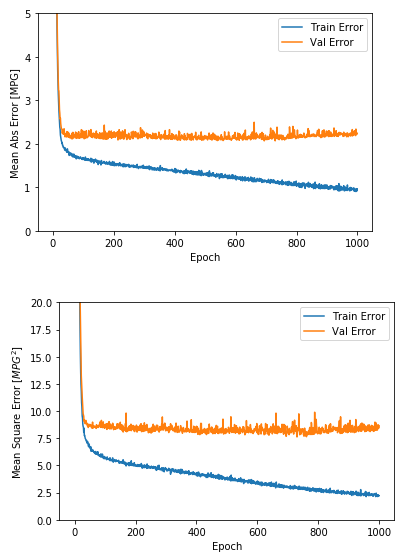
該圖顯示數(shù)百個 epoch 后的驗證錯誤幾乎沒有改善,甚至降低了。讓我們更新 model.fit 方法,以便在驗證分數(shù)沒有提高時自動停止訓練。我們將使用一個回調(diào)測試每個 epoch 的訓練條件。如果經(jīng)過一定數(shù)量的時期而沒有顯示出改進,則自動停止訓練。
您可以在
https://tensorflow.google.cn/api_docs/python/tf/keras/callbacks/EarlyStopping?hl=zh-CN了解有關(guān)此回調(diào)的更多信息。
model = build_model()# The patience parameter is the amount of epochs to check for improvementearly_stop = keras.callbacks.EarlyStopping(monitor='val_loss', patience=50)history = model.fit(normed_train_data, train_labels, epochs=EPOCHS, validation_split = 0.2, verbose=0, callbacks=[early_stop, PrintDot()])plot_history(history)
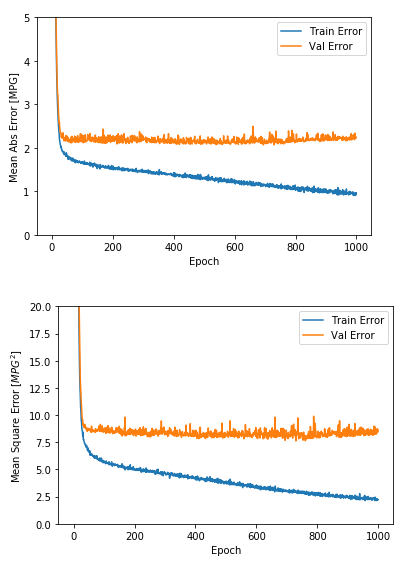
該圖表顯示在驗證集上,平均誤差通常在 +/- 2 MPG 左右。這個結(jié)果好嗎? 我們將決定權(quán)留給你。
讓我們看看模型在測試集上是如何執(zhí)行的,在訓練模型時我們并沒有使用它:
loss, mae, mse = model.evaluate(normed_test_data, test_labels, verbose=0)print("Testing set Mean Abs Error: {:5.2f} MPG".format(mae))
Testing set Mean Abs Error: 1.88 MPG
作出預測
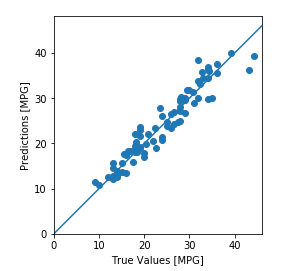
最后,使用測試集中的數(shù)據(jù)預測 MPG 值:
test_predictions = model.predict(normed_test_data).flatten()plt.scatter(test_labels, test_predictions)plt.xlabel('True Values [MPG]')plt.ylabel('Predictions [MPG]')plt.axis('equal')plt.axis('square')plt.xlim([0,plt.xlim()[1]])plt.ylim([0,plt.ylim()[1]])_ = plt.plot([-100, 100], [-100, 100])
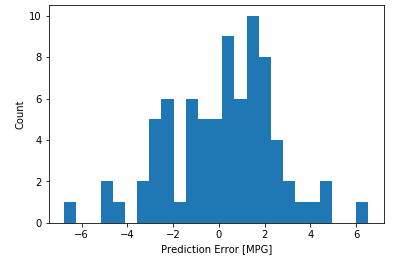
error = test_predictions - test_labelsplt.hist(error, bins = 25)plt.xlabel("Prediction Error [MPG]")_ = plt.ylabel("Count")
結(jié)論
本筆記介紹了一些處理回歸問題的技巧:
均方誤差(MSE)是用于回歸問題的常見損失函數(shù)(與分類問題不同)
同樣,用于回歸的評估指標與分類不同。常見的回歸指標是平均絕對誤差(MAE)
當輸入數(shù)據(jù)要素具有不同范圍的值時,應單獨縮放每個要素
如果訓練數(shù)據(jù)不多,則選擇隱藏層較少的小型網(wǎng)絡,以避免過度擬合
防止過度裝配的一個有用的技術(shù)是盡早停止
-
數(shù)據(jù)集
+關(guān)注
關(guān)注
4文章
1208瀏覽量
24726 -
tensorflow
+關(guān)注
關(guān)注
13文章
329瀏覽量
60538
原文標題:TensorFlow 回歸:預測燃油效率
文章出處:【微信號:tensorflowers,微信公眾號:Tensorflowers】歡迎添加關(guān)注!文章轉(zhuǎn)載請注明出處。
發(fā)布評論請先 登錄
相關(guān)推薦


 TensorFlow回歸:建立了一個模型來預測汽車的燃油效率。


評論