一 背景
一直想通過linux平臺跑一個類似于ubuntu的帶圖形界面的系統,于是買了一塊linux開發板,最終只是能跑個linux系統,沒有把圖形加進去,后來就沒有再去深入研究了,最近終于有一點時間來研究一下了。
二 搭建裸機開發環境
2.1 準備相關的資源
2.1.1 vmware虛擬機
15.1.0 build-13591040
2.1.2 ubuntu系統鏡像
ubuntu-20.04.1-desktop-amd64
這里的鏡像是使用鴻蒙系統已編譯好的code.1.0基礎上開發的
2.1.3 AM335X_StarterWare_02_00_01_01_Setup.bin
到TI官網搜索下載StarterWare:https://www.ti.com/tool/STARTERWARE-SITARA#tech-docs
2.1.4 BBB補丁
StarterWare_BBB_support.tar.gz
2.1.5 交叉編譯器
gcc-arm-none-eabi-4_7-2013q1-20130313-linux.tar.bz2
2.1.6 串口驅動
Adafruit 4 Pin Cable (PL2303),需要下載PL2303串口驅動,需要注意下載特定的版本,否則會提示使用不了,也不能使用WIN10自帶的USB串口驅動
2.1.7 終端調試工具
SecureCRT6.5.0
2.1.8 讀卡器和SD卡
SD卡容量在2G以上
三 安裝交叉編譯環境
3.1 解壓縮工具鏈文件
gcc-arm-none-eabi-4_7-2013q1-20130313-linux.tar.bz2
3.2 設置環境變量
gedit /etc/profile打開配置文件
export PATH=$PATH:/home/harmony/gcc-arm-none-eabi-4_7-2013q1-20130313-linux/gcc-arm-none-eabi-4_7-2013q1/bin/
export LIB_PATH=/home/harmony/gcc-arm-none-eabi-4_7-2013q1-20130313-linux/gcc-arm-none-eabi-4_7-2013q1
source /etc/profile 使配置生效
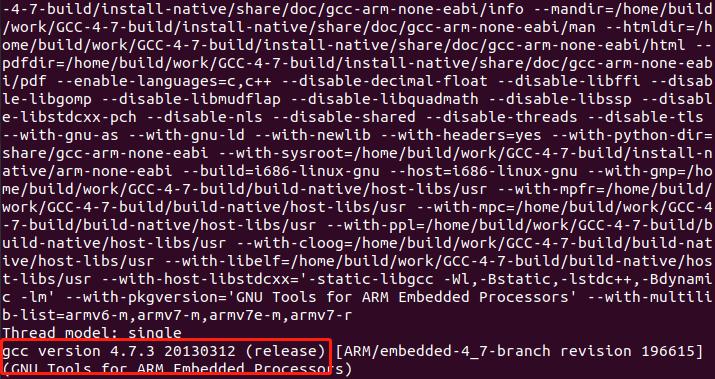
arm-none-eabi-gcc -v查看編譯器是否安裝成功
四 編譯運行GPIO測試程序
4.1 解壓startware軟件包
cd到AM335X_StarterWare_02_00_01_01_Setup.bin所在的目錄
執行安裝指令
./AM335X_StarterWare_02_00_01_01_Setup.bin
4.2 打上bb-black補丁
解壓縮StarterWare_BBB_support.tar.gz覆蓋文件
4.3 編譯源碼
4.3.1 編譯bootloader
cd build/armv7a/gcc/am335x/beaglebone/bootloader/
make clean
make
4.3.2 編譯gpio
cd ..
cd gpio/
make clean
make
4.3.3 插入SD卡通過讀卡器連接到電腦
將bootloader輸出bin文件重命名為MLO(沒有后綴),將gpio輸出的bin文件更改為app(沒有后綴)
4.3.4 將兩個文件拷貝到SD卡根目錄下
4.3.5 將SD卡取出插入到BB-black開發板
先按住boot再開電源上電
可以看到LED在閃爍
五 編譯并運行Debian系統
(參考element14 BeagleBone Black用戶手冊_V2.1.pdf)
5.1 獲取源碼
可通過官網下載或者使用開發板自帶的源文件
bb-black-debian-kernel-3.8.tar.bz2
bb-black-debian-u-boot.tar.bz2
5.2 解碼源碼
tar xvf bb-black-debian-u-boot.tar.bz2
 tar xvf bb-black-debian-kernel-3.8.tar.bz2
5.3 安裝交叉編譯器
gcc-linaro-arm-linux-gnueabihf-4.8-2014.03_linux.tar.xz
5.3.1 設置環境變量
export
CC=`pwd`/gcc-linaro-arm-linux-gnueabihf-4.8-2014.03_linux/bin/arm-linux-gnue
abihf-
5.4 編譯u-boot
cd u-boot
make ARCH=arm CROSS_COMPILE=${CC} distclean //清理
make ARCH=arm CROSS_COMPILE=${CC} am335x_evm_config //配置
make ARCH=arm CROSS_COMPILE=${CC} //編譯輸出
5.5 編譯kernel
sudo apt-get install lzop// 可能會報/bin/sh: lzop: command not found錯誤,需要安裝 lzop 包
cd kernel
cp ../configs/beaglebone .config
 make ARCH=arm CROSS_COMPILE=${CC} zImage dtbs
5.6 準備鏡像文件
一共有五個文件
mkdir ~/images
cd u-boot
cp MLO ~/images
cp u-boot.img ~/images
cd kernel/kernel
cp arch/arm/boot/zImage ~/images
cp arch/arm/boot/dts/am335x-boneblack.dtb ~/images


mkdir ~/images/rootfs
cd ~/kernel/kernel
make ARCH=arm CROSS_COMPILE=${CC} modules
make ARCH=arm CROSS_COMPILE=${CC} modules_install INSTALL_MOD_PATH=$HOME/images/rootfs
cd ~/images/rootfs
tar -czvf ../kernel_modules.tar.gz ./
cd ~/images/
rm -rf rootfs
$HOME/images
cd ~/images/
ls
am335x-boneblack.dtb kernel_modules.tar.gz MLO u-boot.img zImage
5.7 更新鏡像到eMMC中
將以上鏡像復制到SD卡中,把SD卡插入讀卡器,接入BB-black的USB接口
mkdir /media/sda1
mount /dev/sda1 /media/sda1 //掛載U盤
mkdir /media/mmcblk0p1
mount /dev/mmcblk0p1 /media/mmcblk0p1
cp -f /media/sda1/MLO /media/mmcblk0p1/
cp -f /media/sda1/u-boot.img /media/mmcblk0p1/
cp -f /media/sda1/zImage /media/mmcblk0p1/
cp -f /media/sda1/am335x-boneblack.dtb /boot/uboot/dtbs/
tar -xvf /media/sda1/kernel_modules.tar.gz -C /
#同步文件,寫入eMMC
sync
reboot
5.8 至此系統更新完畢后會自動運行
以下為完整的系統啟動日志:
U-Boot SPL 2014.04-rc3 (May 02 2022 - 23:22:21)
reading args
spl_load_image_fat_os: error reading image args, err - -1
reading u-boot.img
reading u-boot.img


U-Boot 2014.04-rc3 (May 02 2022 - 23:22:21)


I2C:   ready
DRAM:  512 MiB
NAND:  0 MiB
MMC:   OMAP SD/MMC: 0, OMAP SD/MMC: 1
*** Warning - readenv() failed, using default environment


Net:    ethaddr ?> not set. Validating first E-fuse MAC
cpsw, usb_ether
Warning: Your board does not use generic board. Please read
doc/README.generic-board and take action. Boards not
upgraded by the late 2014 may break or be removed.
Hit any key to stop autoboot:  0
gpio: pin 53 (gpio 53) value is 1
Card did not respond to voltage select!
mmc0(part 0) is current device
Card did not respond to voltage select!
gpio: pin 56 (gpio 56) value is 0
gpio: pin 55 (gpio 55) value is 0
gpio: pin 54 (gpio 54) value is 0
mmc1(part 0) is current device
gpio: pin 54 (gpio 54) value is 1
SD/MMC found on device 1
reading uEnv.txt
1699 bytes read in 6 ms (276.4 KiB/s)
gpio: pin 55 (gpio 55) value is 1
Loaded environment from uEnv.txt
Importing environment from mmc ...
Checking if uenvcmd is set ...
gpio: pin 56 (gpio 56) value is 1
Running uenvcmd ...
reading zImage
4379112 bytes read in 249 ms (16.8 MiB/s)
reading initrd.img
2952653 bytes read in 190 ms (14.8 MiB/s)
reading /dtbs/am335x-boneblack.dtb
24968 bytes read in 10 ms (2.4 MiB/s)
Kernel image @ 0x82000000 [ 0x000000 - 0x42d1e8 ]
## Flattened Device Tree blob at 88000000
   Booting using the fdt blob at 0x88000000
   Using Device Tree in place at 88000000, end 88009187


Starting kernel ...


Uncompressing Linux... done, booting the kernel.
[    0.355566] omap2_mbox_probe: platform not supported
[    0.362094] tps65217-bl tps65217-bl: no platform data provided
[    0.426288] bone-capemgr bone_capemgr.9: slot #0: No cape found
[    0.463398] bone-capemgr bone_capemgr.9: slot #1: No cape found
[    0.500505] bone-capemgr bone_capemgr.9: slot #2: No cape found
[    0.537613] bone-capemgr bone_capemgr.9: slot #3: No cape found
[    0.552871] bone-capemgr bone_capemgr.9: slot #6: BB-BONELT-HDMIN conflict P8.45 (#5:BB-BONELT-HDMI)
[    0.562503] bone-capemgr bone_capemgr.9: slot #6: Failed verification
[    0.576257] omap_hsmmc mmc.5: of_parse_phandle_with_args of 'reset' failed
[    0.584643] bone-capemgr bone_capemgr.9: loader: failed to load slot-6 BB-BONELT-HDMIN:00A0 (prio 2)
[    0.639443] pinctrl-single 44e10800.pinmux: pin 44e10854 already requested by 44e10800.pinmux; cannot claim for gpio-leds.8
[    0.651156] pinctrl-single 44e10800.pinmux: pin-21 (gpio-leds.8) status -22
[    0.658437] pinctrl-single 44e10800.pinmux: could not request pin 21 on device pinctrl-single
Loading, please wait...
modprobe: chdir(3.8.13): No such file or directory
modprobe: chdir(3.8.13): No such file or directory
modprobe: chdir(3.8.13): No such file or directory
systemd-fsck[215]: rootfs: clean, 79943/233856 files, 452128/933632 blocks


Debian GNU/Linux 7 beaglebone ttyO0


default username:password is [debian:temppwd]


Support/FAQ: http://elinux.org/Beagleboard:BeagleBoneBlack_Debian


The IP Address for usb0 is: 192.168.7.2
beaglebone login: root
Password:
Last login: Thu May 15 02:19:04 UTC 2014 on ttyO0
Linux beaglebone 3.8.13 #1 SMP Mon May 2 23:43:36 CST 2022 armv7l


The programs included with the Debian GNU/Linux system are free software;
the exact distribution terms for each program are described in the
individual files in /usr/share/doc/*/copyright.


Debian GNU/Linux comes with ABSOLUTELY NO WARRANTY, to the extent
permitted by applicable law.
root@beaglebone:~# [   26.168165] libphy: PHY 4a101000.mdio:01 not found
[   26.173471] net eth0: phy 4a101000.mdio:01 not found on slave 1
^C
root@beaglebone:~#
六 LED字符設備開發
6.1 LED驅動程序
6.1.1 寄存器方式
參考startware通過寄存器方式操作gpio,這種方式的執行效率會更高
#include < linux/module.h >
#include< linux/fs.h >
#include< linux/errno.h >
#include< linux/miscdevice.h >
#include< linux/kernel.h >
#include< linux/major.h >
#include< linux/mutex.h >
#include< linux/proc_fs.h >
#include< linux/seq_file.h >
#include< linux/stat.h >
#include< linux/init.h >
#include< linux/device.h >
#include< linux/tty.h >
#include< linux/kmod.h >
#include< linux/gfp.h >
#include< asm/io.h >


//函數聲明
static ssize_t led_drv_read(struct file *file, char __user *buf, size_t nbytes, loff_t *ppos);
static ssize_t led_drv_write(struct file *file, const char __user *buffer,size_t count, loff_t *ppos);
static int led_drv_open(struct inode *inode, struct file *filp);
static int __init led_init(void);
static void __exit led_exit(void);


 /*registers*/
 static volatile unsigned int *SOC_GPIO_1_REGS = NULL;
 static volatile unsigned int *SOC_CONTROL_REGS = NULL;

 // led類

 static struct class *led_class;
 static int major = 250;
static int minor=0;
static dev_t devno;


static struct device *test_device;


#define GPIO_REVISION   (0x0)
#define GPIO_SYSCONFIG   (0x10)
#define GPIO_IRQSTATUS_RAW(n)   (0x24 + (n * 4))
#define GPIO_IRQSTATUS(n)   (0x2C + (n * 4))
#define GPIO_IRQSTATUS_SET(n)   (0x34 + (n * 4))
#define GPIO_IRQSTATUS_CLR(n)   (0x3C + (n * 4))
#define GPIO_IRQWAKEN(n)   (0x44 + (n * 4))
#define GPIO_SYSSTATUS   (0x114)
#define GPIO_CTRL   (0x130)
#define GPIO_OE   (0x134)
#define GPIO_DATAIN   (0x138)
#define GPIO_DATAOUT   (0x13C)
#define GPIO_LEVELDETECT(n)   (0x140 + (n * 4))
#define GPIO_RISINGDETECT   (0x148)
#define GPIO_FALLINGDETECT   (0x14C)
#define GPIO_DEBOUNCENABLE   (0x150)
#define GPIO_DEBOUNCINGTIME   (0x154)
#define GPIO_CLEARDATAOUT   (0x190)
#define GPIO_SETDATAOUT   (0x194)
  /* Values helping to decide the value on a GPIO pin. */
#define GPIO_PIN_LOW                     (0x0)
#define GPIO_PIN_HIGH                    (0x1)
 #define CONTROL_CONF_MUXMODE(n)        (n)
 #define HWREG(x)
        (*((volatile unsigned int *)(x)))

#define CONTROL_CONF_GPMC_AD_CONF_GPMC_AD_SLEWCTRL   (0x00000040u)
#define CONTROL_CONF_GPMC_AD_CONF_GPMC_AD_SLEWCTRL_SHIFT   (0x00000006u)
#define CONTROL_CONF_GPMC_AD_CONF_GPMC_AD_RXACTIVE   (0x00000020u)
#define CONTROL_CONF_GPMC_AD_CONF_GPMC_AD_RXACTIVE_SHIFT   (0x00000005u)
#define CONTROL_CONF_GPMC_AD_CONF_GPMC_AD_PUDEN   (0x00000008u)
#define CONTROL_CONF_GPMC_AD_CONF_GPMC_AD_PUDEN_SHIFT   (0x00000003u)
#define CONTROL_CONF_GPMC_AD_CONF_GPMC_AD_PUTYPESEL   (0x00000010u)
#define CONTROL_CONF_GPMC_AD_CONF_GPMC_AD_PUTYPESEL_SHIFT   (0x00000004u)
  #define GPIO_SYSCONFIG_SOFTRESET   (0x00000002u)
#define CONTROL_CONF_GPMC_AD(n)   (0x800 + (n * 4))
#define GPIO_SYSSTATUS_RESETDONE   (0x00000001u)
#define GPIO_SYSSTATUS_RESETDONE_SHIFT   (0x00000000u)
#define GPIO_SYSSTATUS_RESETDONE_COMPLETE   (0x1u)
#define GPIO_SYSSTATUS_RESETDONE_ONGOING   (0x0u)
#define GPIO_CTRL_DISABLEMODULE   (0x00000001u)
#define GPIO_CTRL_DISABLEMODULE_SHIFT   (0x00000000u)
#define GPIO_CTRL_DISABLEMODULE_DISABLED   (0x1u)
#define GPIO_CTRL_DISABLEMODULE_ENABLED   (0x0u)
/* This is used to configure a GPIO pin as an input pin. */
#define GPIO_DIR_INPUT                1
/* This is used to configure a GPIO pin as an output pin.*/
#define GPIO_DIR_OUTPUT               0
//#define GPIO_INSTANCE_ADDRESS        (SOC_GPIO_1_REGS)
#define GPIO_INSTANCE_PIN_NUMBER     (24)
 //3、定義自己的 file_operations 結構體
 static const struct file_operations my_fops = {
     .read    = led_drv_read,
     .write    = led_drv_write,
     .open     = led_drv_open,
     .owner = THIS_MODULE,
 };

 void GPIOPinWrite(unsigned int baseAdd,
                  unsigned int pinNumber,
                  unsigned int pinValue)
{
    if(GPIO_PIN_HIGH == pinValue)
    {
        HWREG(baseAdd + GPIO_SETDATAOUT) = (1 < < pinNumber);
    }
    else
    {
        HWREG(baseAdd + GPIO_CLEARDATAOUT) = (1 < < pinNumber);
    }
}


 //4、實現對應的 drv_open/drv_read/drv_write 等函數,填入 file_operations 結構體
 static ssize_t led_drv_read(struct file *file, char __user *buf, size_t nbytes, loff_t *ppos)
{
   return 0;
 }
 static ssize_t led_drv_write(struct file *file, const char __user *buffer,size_t count, loff_t *ppos)
{
   char val;
   /*1、get data from app*/
   /*copy_from_user(void * to, const void __user * from, unsigned long n):get form app*/
   copy_from_user(&val,buffer,1);
   /*2、set register out 1/0*/
     printk(KERN_EMERG "led_drv_write =%dn",val);

    GPIOPinWrite(SOC_GPIO_1_REGS,
                     GPIO_INSTANCE_PIN_NUMBER,
                     (val==1));
   return 1;
 }
 static int led_drv_open(struct inode *inode, struct file *filp)
{
   /*3、configure gpA10 as gpio*/


   return 0;
 }


void GPIOModuleEnable(unsigned int baseAdd)
{
    /* Clearing the DISABLEMODULE bit in the Control(CTRL) register. */
    HWREG(baseAdd + GPIO_CTRL) &= ~(GPIO_CTRL_DISABLEMODULE);
}


void GPIOModuleReset(unsigned int baseAdd)
{
    /*
    ** Setting the SOFTRESET bit in System Configuration register.
    ** Doing so would reset the GPIO module.
    */
    HWREG(baseAdd + GPIO_SYSCONFIG) |= (GPIO_SYSCONFIG_SOFTRESET);

    /* Waiting until the GPIO Module is reset.*/
    while(!(HWREG(baseAdd + GPIO_SYSSTATUS) & GPIO_SYSSTATUS_RESETDONE));
}


 void GPIO1PinMuxSetup(unsigned int pinNo)
{
  HWREG(SOC_CONTROL_REGS + CONTROL_CONF_GPMC_AD(pinNo)) =
    (CONTROL_CONF_GPMC_AD_CONF_GPMC_AD_SLEWCTRL |   /* Slew rate slow */
    CONTROL_CONF_GPMC_AD_CONF_GPMC_AD_RXACTIVE |  /* Receiver enabled */
    (CONTROL_CONF_GPMC_AD_CONF_GPMC_AD_PUDEN & (~CONTROL_CONF_GPMC_AD_CONF_GPMC_AD_PUDEN)) | /* PU_PD enabled */
    (CONTROL_CONF_GPMC_AD_CONF_GPMC_AD_PUTYPESEL & (~CONTROL_CONF_GPMC_AD_CONF_GPMC_AD_PUTYPESEL)) | /* PD */
    (CONTROL_CONF_MUXMODE(7))  /* Select mode 7 */
    );
}


void GPIODirModeSet(unsigned int baseAdd,
                    unsigned int pinNumber,
                    unsigned int pinDirection)
{
    /* Checking if pin is required to be an output pin. */
    if(GPIO_DIR_OUTPUT == pinDirection)
    {
        HWREG(baseAdd + GPIO_OE) &= ~(1 < < pinNumber);
    }
    else
    {
        HWREG(baseAdd + GPIO_OE) |= (1 < < pinNumber);
    }
}


#define GPIO_TO_PIN(bank, gpio) (32 * (bank) + (gpio))
#define GPIO_FAIL_SAVE_TIME4_EN GPIO_TO_PIN(1, 2)


 static int __init led_init(void)
{
   printk(KERN_EMERG "%s %s line %dn", __FILE__, __FUNCTION__, __LINE__);

   major = register_chrdev(0,"my_led",&my_fops);

    devno = MKDEV(major, 0);

    printk(KERN_EMERG "major=%dn",major);


   led_class = class_create(THIS_MODULE, "myled");

   /*創建/dev/myled*/
   device_create(led_class, NULL, devno,NULL,"myled");


  gpio_request(GPIO_FAIL_SAVE_TIME4_EN, "set_fail_save_low");


    gpio_direction_output(GPIO_FAIL_SAVE_TIME4_EN, 0);


  return 0;
 }

 static void __exit led_exit(void)
{
    printk(KERN_EMERG "led_exitn");

    if (SOC_CONTROL_REGS)
    {
        //printk(KERN_EMERG "exist SOC_CONTROL_REGSn");
       // iounmap(SOC_CONTROL_REGS);
    }

    if (SOC_CONTROL_REGS)
    {
       // printk(KERN_EMERG "exist SOC_GPIO_1_REGSn");
      //  iounmap(SOC_GPIO_1_REGS);
    }

    if (led_class)
    {
        //device_destroy(cls,devno);
  //class_destroy(cls);
  //unregister_chrdev(major,"led");

  printk(KERN_EMERG "exist led_classn");

  device_destroy(led_class, devno);
  class_destroy(led_class);
  unregister_chrdev(major,"my_led");
    }

    printk(KERN_EMERG "led_exit okn");


 }
 //修飾入口、出口函數
 module_init(led_init);
 module_exit(led_exit);
 MODULE_DESCRIPTION("led Driver");
 MODULE_LICENSE("GPL");
6.1.2 gpio庫方式
使用通用API來操作gpio資源
#include < linux/module.h >
#include < linux/fs.h >
#include< linux/errno.h >
#include< linux/miscdevice.h >
#include< linux/kernel.h >
#include< linux/major.h >
#include< linux/mutex.h >
#include< linux/proc_fs.h >
#include< linux/seq_file.h >
#include< linux/stat.h >
#include< linux/init.h >
#include< linux/device.h >
#include< linux/tty.h >
#include< linux/kmod.h >
#include< linux/gfp.h >
#include< asm/io.h >
#include< linux/gpio.h >

static ssize_t led_drv_read(struct file *file, char __user *buf, size_t nbytes, loff_t *ppos);
static ssize_t led_drv_write(struct file *file, const char __user *buffer,size_t count, loff_t *ppos);
static int led_drv_open(struct inode *inode, struct file *filp);
static int __init led_init(void);
static void __exit led_exit(void);


static struct class *led_class;
static int major = 250;
static int minor=0;
static dev_t devno;


#define GPIO_TO_PIN(bank, gpio) (32 * (bank) + (gpio))
#define GPIO_FAIL_SAVE_TIME4_EN GPIO_TO_PIN(1, 22)
 //3、定義自己的 file_operations 結構體
 static const struct file_operations my_fops = {
     .read    = led_drv_read,
     .write    = led_drv_write,
     .open     = led_drv_open,
     .owner = THIS_MODULE,
 };

 //4、實現對應的 drv_open/drv_read/drv_write 等函數,填入 file_operations 結構體
 static ssize_t led_drv_read(struct file *file, char __user *buf, size_t nbytes, loff_t *ppos)
{
   return 0;
}


 static ssize_t led_drv_write(struct file *file, const char __user *buffer,size_t count, loff_t *ppos)
{
   char val;
   /*1、get data from app*/
   /*copy_from_user(void * to, const void __user * from, unsigned long n):get form app*/
   copy_from_user(&val,buffer,1);
   /*2、set register out 1/0*/
     printk(KERN_EMERG "led_drv_write =%dn",val);
  gpio_set_value(GPIO_FAIL_SAVE_TIME4_EN,val);
   return 1;
 }

static int led_drv_open(struct inode *inode, struct file *filp)
{
   /*3、configure gpA10 as gpio*/
   return 0;
}

 static int __init led_init(void)
{
   printk(KERN_EMERG "%s %s line %dn", __FILE__, __FUNCTION__, __LINE__);

   major = register_chrdev(0,"my_led",&my_fops);

    devno = MKDEV(major, 0);

    printk(KERN_EMERG "major=%dn",major);

   led_class = class_create(THIS_MODULE, "myled");

   /*創建/dev/myled*/
   device_create(led_class, NULL, devno,NULL,"myled");


  int get_result = gpio_request(GPIO_FAIL_SAVE_TIME4_EN, "set_fail_save_low");


    if (0 == get_result)
    {
        gpio_direction_output(GPIO_FAIL_SAVE_TIME4_EN, 0);
    }


  return 0;
 }

 static void __exit led_exit(void)
{
    gpio_free(GPIO_FAIL_SAVE_TIME4_EN);

    if (led_class)
    {
  device_destroy(led_class, devno);
  class_destroy(led_class);
  unregister_chrdev(major,"my_led");
    }
 }
 //修飾入口、出口函數
 module_init(led_init);
 module_exit(led_exit);
 MODULE_DESCRIPTION("led Driver");
 MODULE_LICENSE("GPL");
6.2 測試程序
#include < stdio.h >
#include < sys/types.h >
#include < sys/stat.h >
#include < fcntl.h >
#include < string.h >
#include < unistd.h >
//ledtest /dev/myled on
int main(int argc, char **argv)
{
  int fd;
  char status = 0;
  if(argc != 3){
    printf("Usage: %s < dev > < on|off >n",argv[0]);
    printf("eg:%s /dev/myled onn",argv[0]);
    printf("eg:%s /dev/myled offn",argv[0]);
    return -1;
  }
  //open
  fd = open(argv[1],O_RDWR);
  if(fd < 0){
    printf("open %s errorn",argv[0]);
    return -1;
  }
  //write  if是on,status = 1;if是off,status = 0;
  if(strcmp(argv[2],"on") == 0){
    printf("open ledn");
    status = 1;
  }
  write(fd,&status,1);
}
6.3 Makefile
要注意make rm等字符前需要有個tab,需要指定正在運行的內核源碼路徑
KERN_DIR = /home/harmony/kernel/kernel
all:
  make -C $(KERN_DIR) M=`pwd` modules
  $(CC)gcc -o ledtest ledtest.c
clean:
  make -C $(KERN_DIR) M=`pwd` modules clean
  rm -rf modules.order
  rm -f ledtest


obj-m   += led_my.o
6.4 編譯
make ARCH=arm CROSS_COMPILE=${CC}
6.5 測試
6.5.1 拷貝文件
將輸出的led_my.ko和ledtest文件復制到SD卡boot區
6.5.2 連接讀取器
通過讀卡器插入BB-black開發板的USB端口
6.5.3 加載LED驅動模塊
#進入BOOT目錄
root@beaglebone:~# cd /media/BOOT/
root@beaglebone:/media/BOOT# ls
am335x-boneblack.dtb  ledtest  System Volume Information  zImage
led_my.ko             MLO      u-boot.img
root@beaglebone:/media/BOOT# insmod led_my.ko
Message from syslogd@beaglebone at May 15 02:30:29 ...
 kernel:[  699.497819] /mnt/hgfs/am335/app_ok/led_my.c led_init line 74
root@beaglebone:/media/BOOT#
Message from syslogd@beaglebone at May 15 02:30:29 ...
 kernel:[  699.504546] major=241
6.5.4 運行ledtest測試程序,打開LED
#復制測試程序到/home目錄下
root@beaglebone:/media/BOOT# cp ledtest /home/
# 給ledtest增加權限
root@beaglebone:/home# chmod 777 ledtest
#打開LED燈
root@beaglebone:/home# ./ledtest /dev/myled on
open led
[  911.100696] led_drv_write =1
Message from syslogd@beaglebone at May 15 02:34:00 ...
 kernel:[  911.100696] led_drv_write =1
6.5.5 對照原理圖
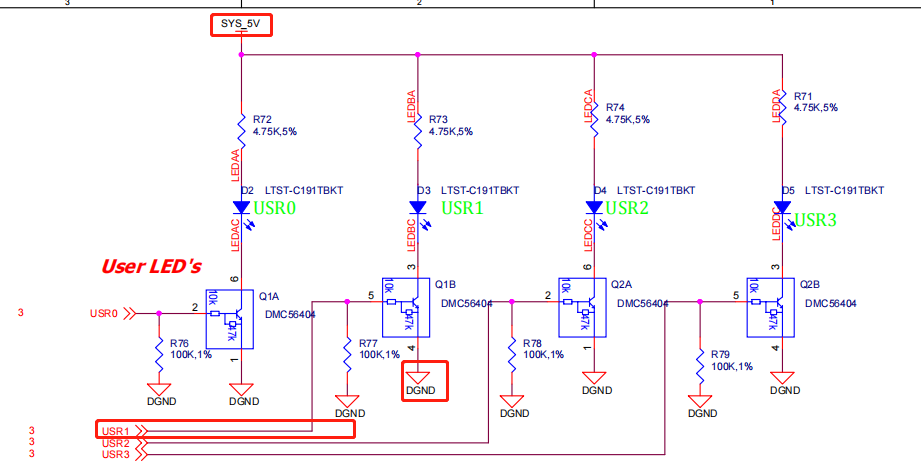
這里的LED的陽極連接了高電平,通過控制陰極為低電平來點亮LED,根據電路原理,使用高電平可使電路導通,使LED的引腳變為低電平。
6.5.6 關閉LED
root@beaglebone:/home# ./ledtest /dev/myled off
kernel:[ 1275.812135] led_drv_write =0
七 總結
7.1 編譯驅動程序時報錯
7.1.1 cc1: error: code model kernel does not support PIC mod
需要在內核源碼目錄下的Makefile文件中增加編譯選項“-fno-pie”
KBUILD_CFLAGS   := -Wall -Wundef -Wstrict-prototypes -Wno-trigraphs
       -fno-strict-aliasing -fno-common
       -Werror-implicit-function-declaration
       -Wno-format-security
       -fno-delete-null-pointer-checks
       -fno-pie
7.1.2 error: expected ‘:’ or ‘)’ before ‘POPCNT64
需要在編譯時增加編譯選項
ARCH=arm CROSS_COMPILE=${CC}
7.2 加載驅動時的問題
7.2.1 insmod: ERROR: could not insert module led_my.ko: Invalid module format
7.2.1.1 版本信息不匹配
原因是正在運行的內核版本與源碼版本信息有差異
需要重新編譯內核,更新內核使編譯驅動的內核版本與正在運行內核版本保持一致,通過以下命令查看,如果還是報錯,則需要更新內核
uname -r
modinfo led_my.ko
7.2.2 printk不打印信息
使用KERN_EMERG關鍵字
printk(KERN_EMERG "%s %s line %dn", __FILE__, __FUNCTION__, __LINE__);
7.3 卸載驅動時提示訪問空指針
Unable to handle kernel NULL pointer dereference at virtual address 0000000
需要注意卸載驅動調用API的順序
device_destroy(led_class, devno);
  class_destroy(led_class);
  unregister_chrdev(major,"my_led");
7.4 測試程序無法運行提示Permission denied
需要把SD卡下的測試程序拷貝到home或其他本地目錄增加權限,如果雙擊tab還是沒有提示,則可能是文件的讀寫權限不夠
chmod 777 ledtest
7.5 相關命令
#查看內核版本號
uname -r
root@beaglebone:/home# uname -r
3.8.13
#查看驅動模塊
root@beaglebone:/home# lsmod
Module                  Size  Used by
led_my                  1475  0
g_multi                47152  2
libcomposite           13879  1 g_multi
ipv6                  229038  21
autofs4                17241  2
#查看模塊信息
root@beaglebone:/media/BOOT# modinfo led_my.ko
filename:       /media/BOOT/led_my.ko
license:        GPL
description:    led Driver
srcversion:     7A16BEF13016A144BB92AF1
depends:
vermagic:       3.8.13 SMP mod_unload modversions ARMv7 thumb2 p2v8
#查看內核構建時間
Linux version 3.8.13 (root@harmony-virtual-machine) (gcc version 4.8.3 20140303 (prerelease) (crosstool-NG linaro-1.13.1-4.8-2014.03 - Linaro GCC 2014.03) ) #1 SMP Mon May 2 23:43:36 CST 2022
#查看模塊是否加載成功
root@beaglebone:/media/BOOT# cat /proc/devices
Character devices:
  1 mem
  4 /dev/vc/0
  4 tty
  4 ttyS
  5 /dev/tty
  5 /dev/console
  5 /dev/ptmx
  7 vcs
 10 misc
 13 input
 14 sound
 29 fb
 81 video4linux
 89 i2c
 90 mtd
116 alsa
128 ptm
136 pts
153 spi
166 ttyACM
180 usb
189 usb_device
212 DVB
226 drm
241 my_led
242 ttyGS
243 roccat
244 hidraw
245 ttySDIO
246 usbmon
247 uio
248 ttyO
249 bsg
250 iio
251 watchdog
252 pps
253 media
254 rtc


Block devices:
  1 ramdisk
259 blkext
  7 loop
  8 sd
 31 mtdblock
 65 sd
 66 sd
 67 sd
 68 sd
 69 sd
 70 sd
 71 sd
128 sd
129 sd
130 sd
131 sd
132 sd
133 sd
134 sd
135 sd
179 mmc
7.6 gpio子系統相關API參考鏈接:
https://blog.csdn.net/orz415678659/article/details/8625284
7.7 交叉編譯器的一些區別
arm-none-eabi-gcc:是 GNU 推出的的ARM交叉編譯工具。可用于交叉編譯ARM MCU(32位)芯片,如ARM7、ARM9、Cortex-M/R芯片程序。
arm-linux-gnueabihf-gcc:是由 Linaro 公司基于GCC推出的的ARM交叉編譯工具。可用于交叉編譯ARM(32位)系統中所有環節的代碼,包括裸機程序、u-boot、Linux kernel、filesystem和App應用程序。
 電子發燒友App






評論