本蚊介紹了仿真的環(huán)境以及二階鎖相環(huán)的仿真過程,并對其仿真結(jié)果進(jìn)行了分析。在前三章的理論基礎(chǔ)上,通過使用MATLAB7.0進(jìn)行了仿真。
驗(yàn)結(jié)果表明:用MATLAB進(jìn)行的二階鎖相環(huán)仿真達(dá)到了最初的設(shè)想,鎖相環(huán)的失鎖、跟蹤、捕獲、鎖定各個(gè)階段均有體現(xiàn)。達(dá)到了最初仿真的要求。
(典型仿真案例)圖
仿真使用軟件MATLAB7.0
仿真使用的軟件是MATLAB7.0。由于MATLAB仿真軟件適合多學(xué)科、多種工作平臺且功能強(qiáng)大、界面友好、方便快捷、語言自然并且開放性強(qiáng)的大型優(yōu)秀應(yīng)用軟件,已經(jīng)也已成為國內(nèi)外高等院校高等數(shù)學(xué)、數(shù)值分析、數(shù)字信號處理、自動控制理論以及工程應(yīng)用等課程的基本教學(xué)工具。使用Matlab對鎖相環(huán)仿真的實(shí)現(xiàn)是方便快捷的。
仿真采用二階鎖相環(huán)
仿真所采用的是二階鎖相環(huán)。這是由于我們實(shí)際應(yīng)用中的絕大多數(shù)PLL,或者是二階的,或者是通過忽略高階效應(yīng)(至少在初步設(shè)計(jì)時(shí))而被設(shè)計(jì)成近似的二階環(huán)路。鑒于二階鎖相環(huán)在實(shí)際應(yīng)用的意義,所以在仿真采用了二階鎖相環(huán)。
MATLAB仿真程序代碼
% File: c6_nltvde.m
w2b=0; w2c=0; % initialize integrators
yd=0; y=0; % initialize differential equation
tfinal = 50; % simulation time
fs = 100; % sampling frequency
delt = 1/fs; % sampling period
npts = 1+fs*tfinal; % number of samples simulated
ydv = zeros(1,npts); % vector of dy/dt samples
yv = zeros(1,npts); % vector of y(t) samples
%
% beginning of simulation loop for i=1:npts t = (i-1)*delt;
% time
if t《20
ydd = 4*exp(-t/2)-3*yd*abs(y)-9*y; % de for t《20
else
ydd = 4*exp(-t/2)-3*yd-9*y;
% de for t》=20 end
w1b=ydd+w2b; % first integrator - step 1 w2b=ydd+w1b;
% first integrator - step 2
yd=w1b/(2*fs); % first integrator output w1c=yd+w2c; % second integrator - step 1 w2c=yd+w1c;
% second integrator - step 2
y=w1c/(2*fs); % second integrator output ydv(1,i) = yd; % build dy/dt vector yv(1,i) = y; % build y(t) vector end
% end of simulation loop
plot(yv,ydv) % plot phase plane xlabel(‘y(t)’) % label x axis ylabel(‘dy/dt’)
% label y zxis
% End of script file. % File: pllpost.m
%
kk = 0; while kk == 0 k = menu(‘Phase Lock Loop Postprocessor’,。。。
‘Input Frequency and VCO Frequency’,。。。
‘Input Phase and VCO Phase’,。。。
‘Frequency Error’,‘Phase Error’,‘Phase Plane Plot’,。。。
‘Phase Plane and Time Domain Plots’,‘Exit Program’);
if k == 1
plot(t,fin,‘k’,t,fvco,‘k’)
title(‘Input Frequency and VCO Freqeuncy’)
xlabel(‘Time - Seconds’);ylabel(‘Frequency - Hertz’);pause
elseif k ==2
pvco=phin-phierror;plot(t,phin,t,pvco)
title(‘Input Phase and VCO Phase’)
xlabel(‘Time - Seconds’);ylabel(‘Phase - Radians’);pause
elseif k == 3 plot
(t,freqerror);title(‘Frequency Error’)
xlabel(‘Time - Seconds’);ylabel(‘Frequency Error - Hertz’);pause
elseif k == 4
plot(t,phierror);title(‘Phase Error’)
xlabel(‘Time - Seconds’);ylabel(‘Phase Error - Radians’);pause
elseif k == 5
ppplot
elseif k == 6
subplot(211);phierrn = phierror/pi;
plot(phierrn,freqerror,‘k’);grid;
title(‘Phase Plane Plot’);xlabel(‘Phase Error /Pi’);
ylabel(‘Frequency Error - Hertz’);subplot(212)
plot(t,fin,‘k’,t,fvco,‘k’);grid
title(‘Input Frequency and VCO Freqeuncy’)
xlabel(‘Time - Seconds’);ylabel(‘Frequency - Hertz’);subplot(111)
elseif k == 7
kk = 1;
end
end % End of script file.
% File: pllpre.m
%
clear all % be safe
disp(‘ ’) % insert blank line
fdel = input(‘Enter the size of the frequency step in Hertz 》 ’);
fn = input(‘Enter the loop natural frequency in Hertz 》 ’);
lambda = input(‘Enter lambda, the relative pole offset 》 ’);
disp(‘ ’)
disp(‘Accept default values:’)
disp(‘ zeta = 1/sqrt(2) = 0.707,’)
disp(‘ fs = 200*fn, and’)
disp(‘ tstop = 1’) dtype = input(‘Enter y for yes or n for no 》 ’,‘s’);
if dtype == ‘y’
zeta = 1/sqrt(2);
fs = 200*fn;
tstop = 1;
else
zeta = input(‘Enter zeta, the loop damping factor 》 ’);
fs = input(‘Enter the sampling frequency in Hertz 》 ’);
tstop = input(‘Enter tstop, the simulation runtime 》 ’);
end %
npts = fs*tstop+1; % number of simulation points
t = (0:(npts-1))/fs; % default time vector
nsettle = fix(npts/10); % set nsettle time as 0.1*npts
tsettle = nsettle/fs; % set tsettle
% The next two lines establish the loop input frequency and phase
% deviations.
fin = [zeros(1,nsettle),fdel*ones(1,npts-nsettle)];
phin = [zeros(1,nsettle),2*pi*fdel*t(1:(npts-nsettle))];
disp(‘ ’) % insertblank line
% end of script file pllpre.m
% File: pll2sin.m
w2b=0; w2c=0; s5=0; phivco=0; %initialize
twopi=2*pi; % define 2*pi
twofs=2*fs; % define 2*fs
G=2*pi*fn*(zeta+sqrt(zeta*zeta-lambda)); % set loop gain
a=2*pi*fn/(zeta+sqrt(zeta*zeta-lambda)); % set filter parameter
a1=a*(1-lambda); a2 = a*lambda; % define constants
phierror = zeros(1,npts); % initialize vector
fvco=zeros(1,npts); % initialize vector
% beginning of simulation loop
for i=1:npts
s1=phin(i) - phivco; % phase error
s2=sin(s1); % sinusoidal phase detector
s3=G*s2;
s4=a1*s3;
s4a=s4-a2*s5; % loop filter integrator input
w1b=s4a+w2b; % filter integrator (step 1)
w2b=s4a+w1b; % filter integrator (step 2)
s5=w1b/twofs; % generate fiter output
s6=s3+s5; % VCO integrator input
w1c=s6+w2c; % VCO integrator (step 1)
w2c=s6+w1c; % VCO integrator (step 2)
phivco=w1c/twofs; % generate VCO output
phierror(i)=s1; % build phase error vector
fvco(i)=s6/twopi; % build VCO input vector
end
% end of simulation loop
freqerror=fin-fvco; % build frequency error vector
% End of script file.
function [] = pplane(x,y,nsettle)
% Plots the phase plane with phase in the range (-pi,pi)
ln = length(x);
maxfreq = max(y);
minfreq = min(y);
close % Old figure discarded
axis([-1 1 1.1*minfreq 1.1*maxfreq]); % Establish scale
hold on % Collect info for new fig
j = nsettle; while j 《 ln
i = 1;
while x(j) 《 pi & j 《 ln
a(i) = x(j)/pi;
b(i) = y(j);
j = j+1;
i = i+1;
end
plot(a,b,‘k’)
a = [];
b = [];
x = x - 2*pi;
end hold off title(‘Phase-Plane Plot’)
xlabel(‘Phase Error / Pi’)
ylabel(‘Frequency Error in Hertz’)
grid % End of script file.
% File: ppplot.m
% ppplot.m is the script file for plotting phase plane plots. If the
% phase plane is constrained to (-pi,pi) ppplot.m calls pplane.m.
kz = 0;
仿真過程及結(jié)果

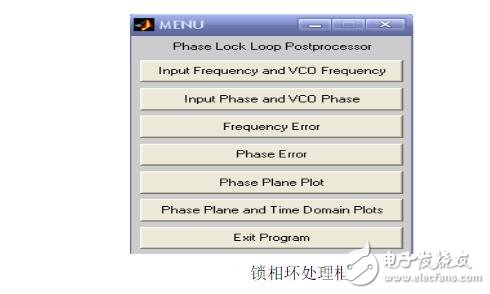
上圖是利用MATLAB提供的函數(shù)將計(jì)算結(jié)果圖形化功能建立的。在運(yùn)行程序后,就會出現(xiàn)上面的對話框,點(diǎn)擊點(diǎn)擊其中的任何一項(xiàng)就會出現(xiàn)相應(yīng)的仿真圖形。上圖中包含了輸入頻率和VCO頻率,輸入相位和VCO相位,頻率誤差,相位誤差,相位空間波特圖,相位空間和時(shí)域,退出程序等選項(xiàng)。運(yùn)行程序后出現(xiàn)如下指令:
Accept the tentative values: the first loop frequency is 5 第一循環(huán)頻率
Enter y for yes or n for no 》 y
Enter the loop gain 》40 輸入環(huán)路增益為
40 Enter the sampling frequency in Hertz 》 1200 輸入采樣頻率
Enter tstop, the simulation runtime 》 5 仿真時(shí)間為5秒
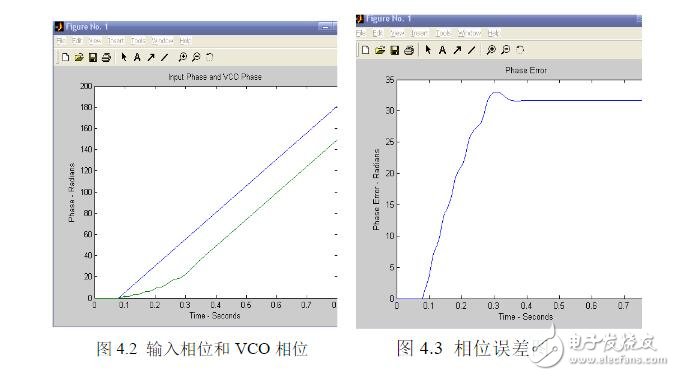
設(shè)置好參數(shù)后運(yùn)行程序,由上我們可知環(huán)路增益為40,仿真時(shí)間為5s,采樣頻率為1200Hz。接著點(diǎn)擊上圖鎖相環(huán)處理框中的菜單,就能得到如下仿真圖像。其中我們主要觀察輸入相位和VCO相位。

圖4.2中藍(lán)線為輸入相位,綠線代表VCO相位,從圖中可以看見隨著時(shí)間的變化輸入信號相位為線性,而VCO相位則是經(jīng)歷了一段曲線后斜率與輸入信號相位斜率相同,輸出相位跟隨輸入相位,達(dá)到穩(wěn)定。圖4.3中VCO的相位也是先經(jīng)歷了一段時(shí)間的曲線后變?yōu)橐粭l直線達(dá)到穩(wěn)定。根據(jù)鎖相環(huán)的基本原理我們可知鎖相環(huán)是個(gè)反饋網(wǎng)絡(luò),它是由輸出信號(VCO產(chǎn)生)與參考頻率在頻率和相位上保持同步或者保持常數(shù)。由此我們可以看出鎖相環(huán)工作后,在最初的一段時(shí)間中鎖相環(huán)開始工作,輸入信號經(jīng)過鑒相器,環(huán)路慮波器后,將輸出相位反饋給VCO壓控振蕩器,使壓控振蕩器與輸入頻率逐步實(shí)現(xiàn)同步,保持一個(gè)常數(shù),實(shí)現(xiàn)鎖定。其中經(jīng)歷了鎖相環(huán)的失鎖、跟蹤、捕獲、鎖定,從而達(dá)到最后達(dá)到穩(wěn)定狀態(tài)。從開始到達(dá)到穩(wěn)定的這段時(shí)間則為做捕獲時(shí)間。

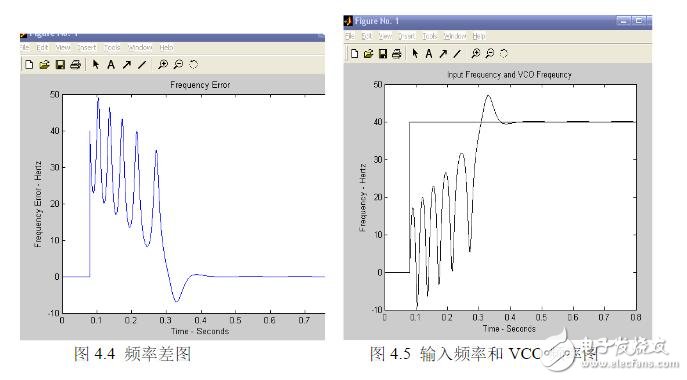
圖4..4與圖4.5也顯示了鎖相環(huán)工作后從失鎖、跟蹤、捕獲、鎖定的過程,過程。從不停的擺動到最后的直線狀態(tài),這個(gè)過程稱為鎖定過程。其中我們可以發(fā)現(xiàn)在捕捉過程中隨著捕捉次數(shù)的增加,捕捉過程也變得較慢,這說明此時(shí)的的鎖相環(huán)工作平率處在穩(wěn)定工作的動態(tài)界限內(nèi),工作正常。
 電子發(fā)燒友App


評論