資料介紹
描述
有時讓貴重物品遠離窺探可能很困難,除非你把它放在一個大保險箱或類似的東西里……但誰有空間呢?
相反,請使用 MKR IoT Bundle 中的組件和一些紙板創建您自己的拼圖盒!我們不能保證您財物的安全,但至少對于潛在的小偷來說這將是一種有趣的威懾。
當然,我們建議您將糖果存放在那里……而不是真正的貴重物品。
簡而言之
為了打開用伺服電機保持關閉的盒子,您必須轉動電位器,直到獲得正確的組合。可以通過在線應用程序Blynk設置組合。LED 將幫助您猜測,給您顏色反饋:您越接近顏色越暖。
當猜到正確的組合時,蜂鳴器將開始播放歌曲,而伺服器將打開盒子。
為了創建我們的拼圖框,我們需要以下組件:
- 蜂鳴器
- RGB LED
- 3個電位器
- 液晶屏
- 伺服電機
學習目標
- 介紹Blynk互聯網平臺
- 液晶顯示屏的接線和使用
- 用蜂鳴器播放星球大戰主題
想知道更多?
本教程是讓您熟悉 MKR1000 和 IoT 的一系列實驗的一部分。所有實驗都可以使用 MKR IoT Bundle 中包含的組件構建。
- 拼圖盒
介紹布林克
Blynk是一款流行的物聯網移動應用程序,它讓我們可以隨時隨地輕松控制與互聯網連接的 Arduino。
它在Kickstarter上成立,并迅速成為該領域最常用的應用程序之一,這要歸功于其出色的文檔和簡單性。
開始使用 Blynk
創建一個新項目真的很容易,只需按照這幾個簡單的步驟或看一下 Blynk 的官方入門。
成功創建新項目后,您還應該通過郵件收到Auth Token。這是將硬件連接到智能手機所需的唯一標識符。您創建的每個新項目都將擁有自己的 Auth Token。
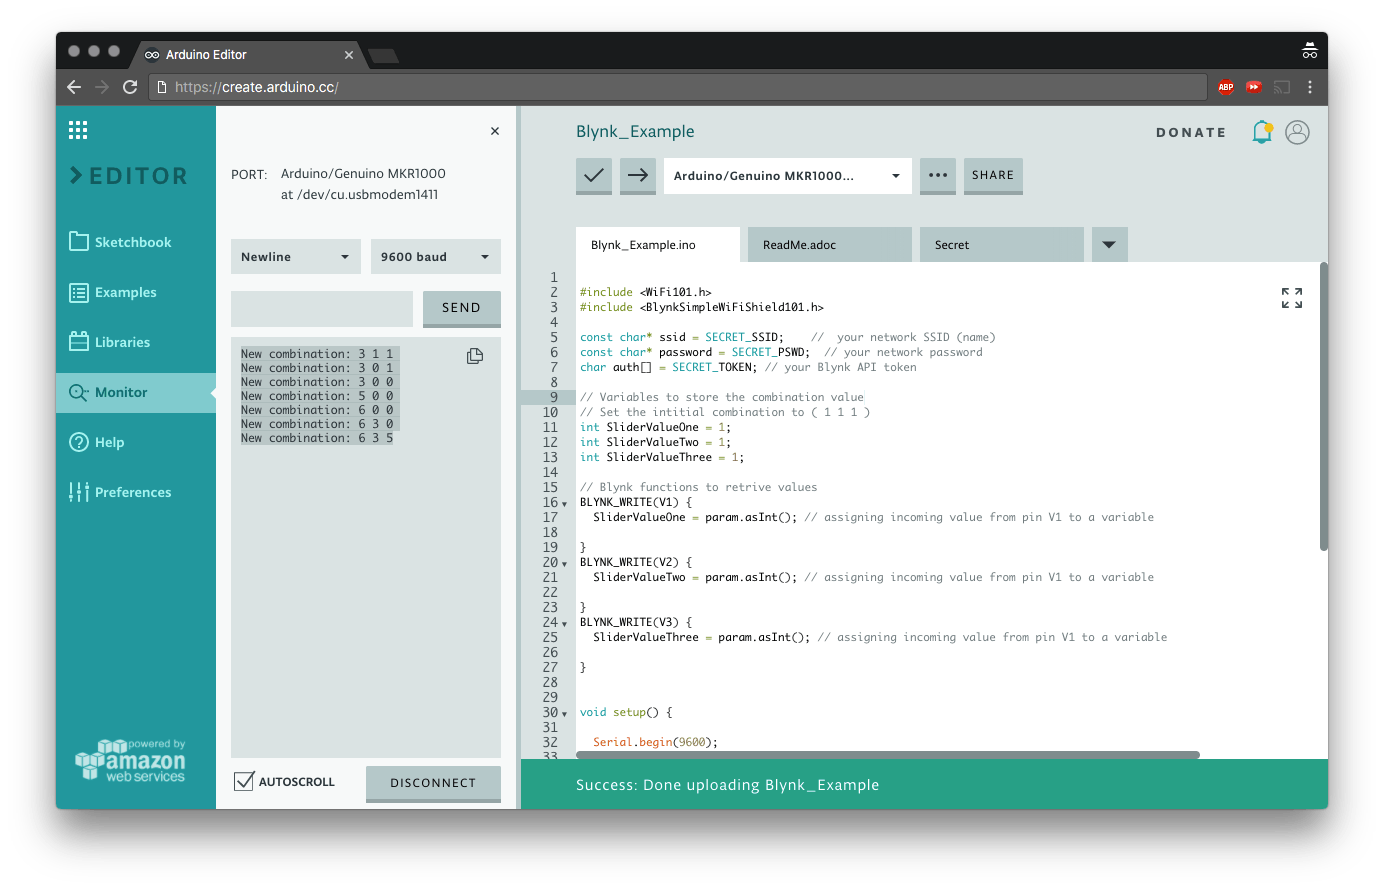
為了將 Arduino 連接到應用程序,我們需要安裝Blynk 庫。如果您使用的是 Arduino Web 編輯器,則當您將其包含在草圖中時,該庫將自動下載,否則您可以從庫管理器下載該庫。
現在我們準備好了。上傳此草圖并使用滑塊查看結果:
#include <WiFi101.h>
#include <BlynkSimpleWiFiShield101.h>
const char* ssid = SECRET_SSID;    //  your network SSID (name)
const char* password = SECRET_PSWD;  // your network password
char auth[] = SECRET_TOKEN; // your Blynk API token
// Variables to store the combination value
// Set the intitial combination to ( 1 1 1 )
int SliderValueOne = 1;
int SliderValueTwo = 1;
int SliderValueThree = 1;
// Blynk functions to retrive values
BLYNK_WRITE(V1) {
 SliderValueOne = param.asInt(); // assigning incoming value from pin V1 to a variable
}
BLYNK_WRITE(V2) {
 SliderValueTwo = param.asInt(); // assigning incoming value from pin V1 to a variable
}
BLYNK_WRITE(V3) {
 SliderValueThree = param.asInt(); // assigning incoming value from pin V1 to a variable
}
void setup() {
 Serial.begin(9600);
 Blynk.begin(auth, ssid, password); // start Blynk functionalities and connect to WiFi
}
void loop() {
 // Variambles to temporarily store the combination
 int Temp_Slider_One_value = SliderValueOne;
 int Temp_Slider_Two_value = SliderValueTwo;
 int Temp_Slider_Three_value = SliderValueThree;
 Blynk.run(); // poll new combination values from the online app
 // check if combination values are changed and print them on the console
 if(Temp_Slider_One_value != SliderValueOne || Temp_Slider_Two_value != SliderValueTwo || Temp_Slider_Three_value != SliderValueThree){
   Serial.print("New combination: ");
   Serial.print(SliderValueOne);
   Serial.print(" ");
   Serial.print(SliderValueTwo);
   Serial.print(" ");
   Serial.println(SliderValueThree);
 }
}
使用液晶屏
是時候連接屏幕了!
LCD 屏幕易于使用,但需要大量電線,因此請準備好證明您的耐心。
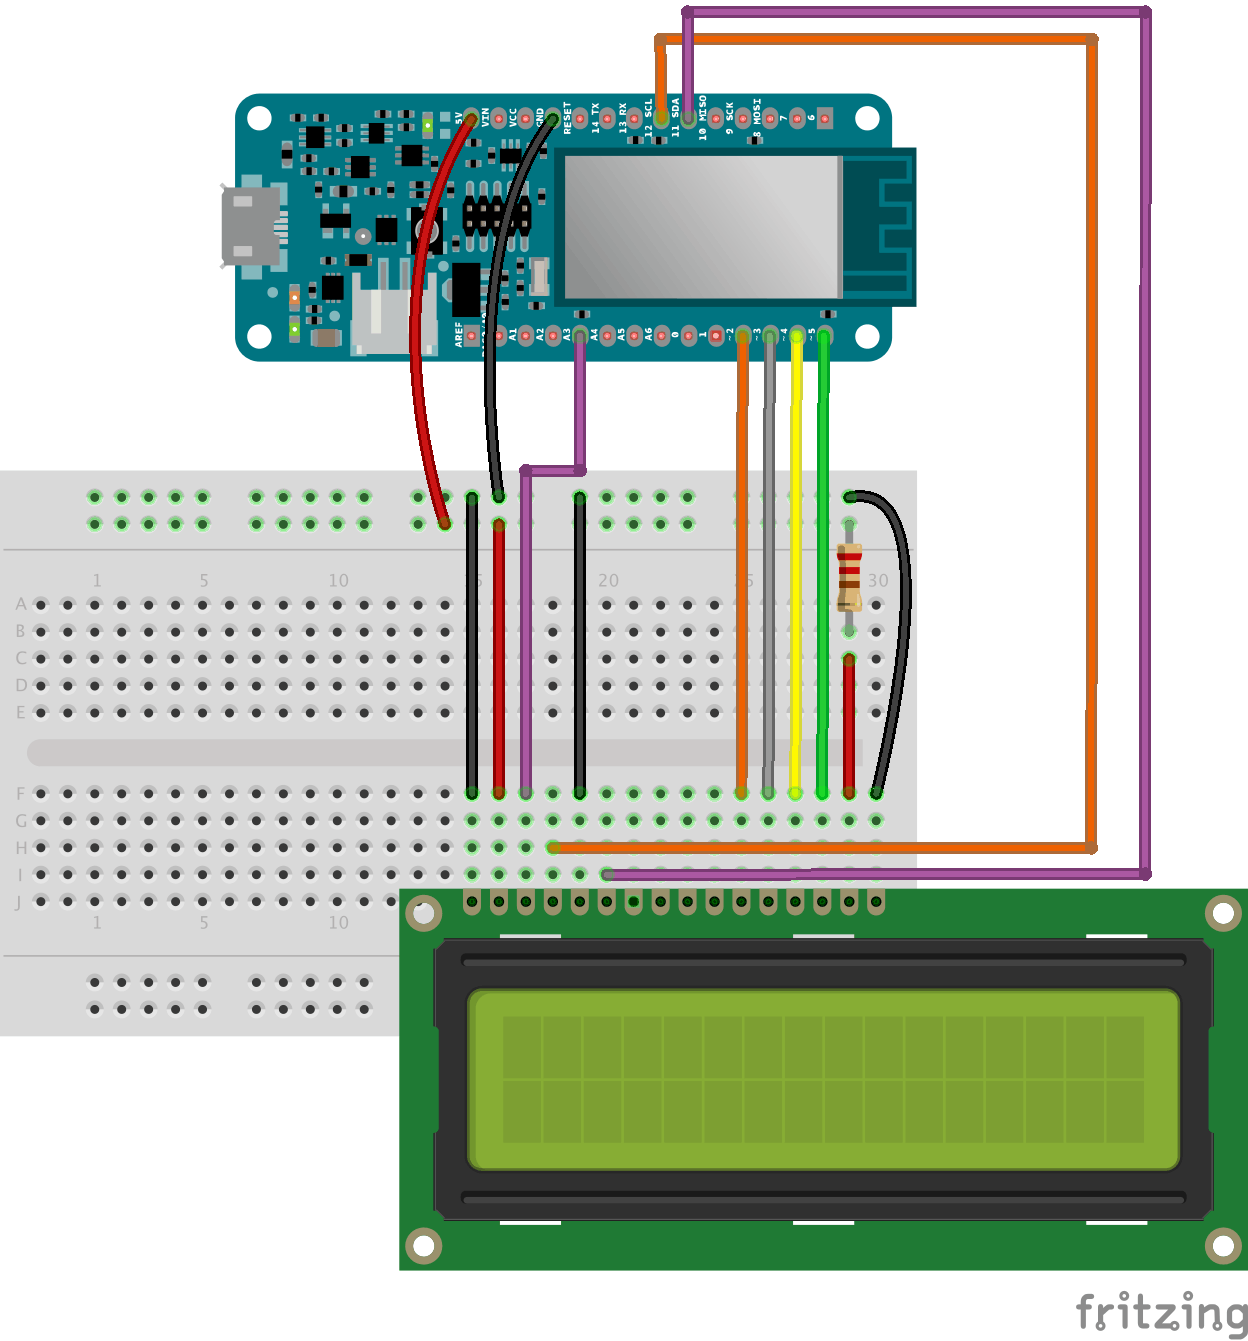
可以調節亮度,將模擬引腳 3 的輸出值從 0 更改為 255,其中 0 為最大值。
analogWrite(A3, 0);
現在我們可以上傳示例草圖,看看是否一切正常。
// include the library code:
#include
// initialize the library by associating any needed LCD interface pin
// with the arduino pin number it is connected to
const int rs = 12, en = 11, d4 = 2, d5 = 3, d6 = 4, d7 = 5;
LiquidCrystal lcd(rs, en, d4, d5, d6, d7);
void setup() {
 analogWrite(A3, 0); // Set the brightness to its maximum value
 // set up the LCD's number of columns and rows:
 lcd.begin(16, 2);
 // Print a message to the LCD.
 lcd.print("hello, world!");
}
void loop() {
 // set the cursor to column 0, line 1
 // (note: line 1 is the second row, since counting begins with 0):
 lcd.setCursor(0, 1);
 // print the number of seconds since reset:
 lcd.print(millis() / 1000);
}
添加電位器
要讀取電位器的值,我們只需要analogRead() 正確引腳上的一個。我們將它們連接到模擬引腳 0、1、2。
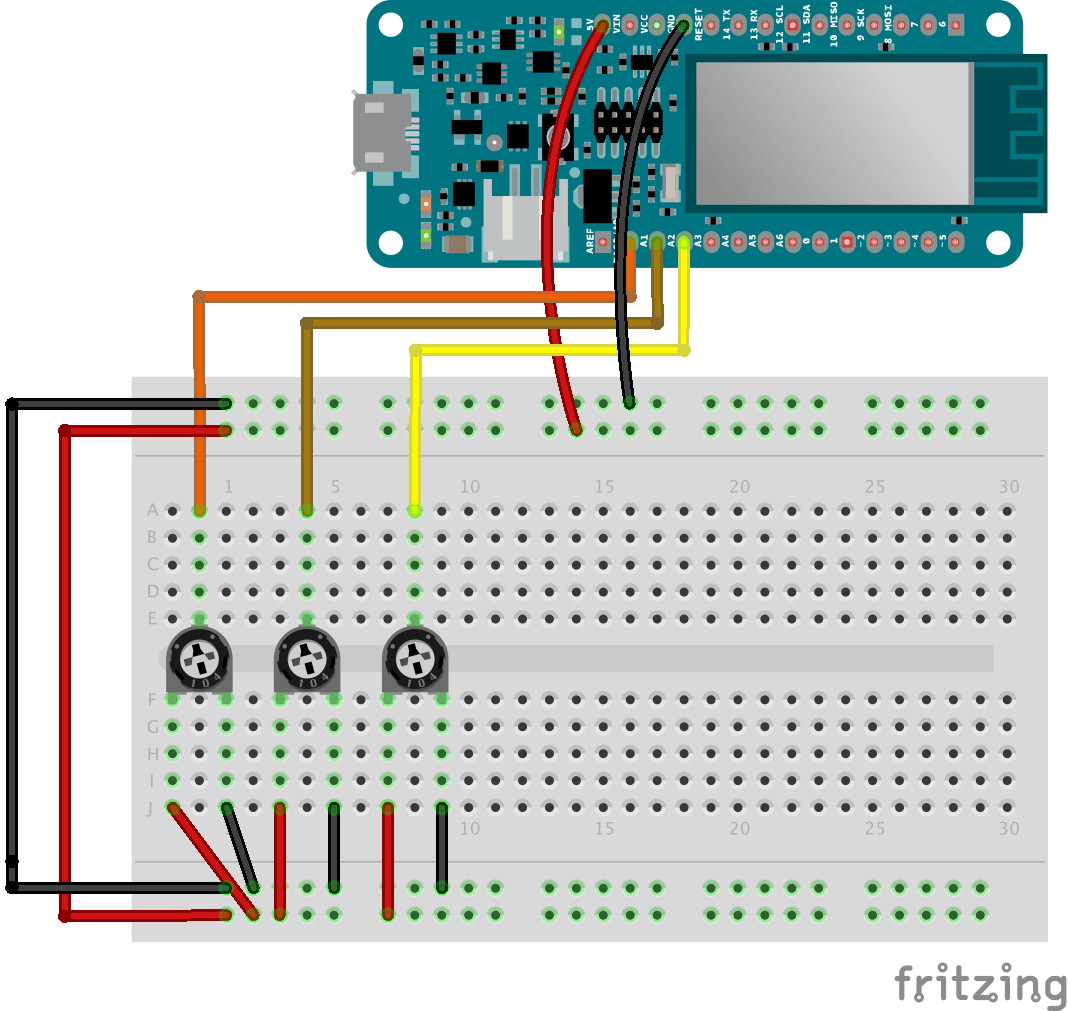
請注意,電位器的值范圍從 0 到 1023,因此無法猜測組合。要將這些值從 0 映射到 9,我們將使用該map() 函數,
int PotOne = map(analogRead(A0), 0, 1023, 0, 9);
您可以使用此示例代碼在 LCD 屏幕上打印電位器的值。
#include
// LCD screen pins
const int rs = 12,
         en = 11,
         d4 = 2,
         d5 = 3,
         d6 = 4,
         d7 = 5;
LiquidCrystal lcd(rs, en, d4, d5, d6, d7);
void setup() {
 analogWrite(A3, 0); // set the brightness of the LCD screen to the maximum value
 Serial.begin(9600);
 lcd.begin(16, 2); // begin LCD screen with 16 columns and 2 rows
}
void loop() {
 int PotOne = map(analogRead(A0), 0, 1023, 0, 9);
 int PotTwo = map(analogRead(A1), 0, 1023, 0, 9);
 int PotThree = map(analogRead(A2), 0, 1023, 0, 9);
 lcd.setCursor(0, 0);
 lcd.print(PotOne);
 lcd.setCursor(2, 0);
 lcd.print(PotTwo);
 lcd.setCursor(4, 0);
 lcd.print(PotThree);
}
添加 RGB LED
我們將使用 RGB LED 作為反饋來幫助人們猜測組合,他們越接近正確的值,LED 的顏色就越暖和,從藍色、淺綠色、黃色和紅色。
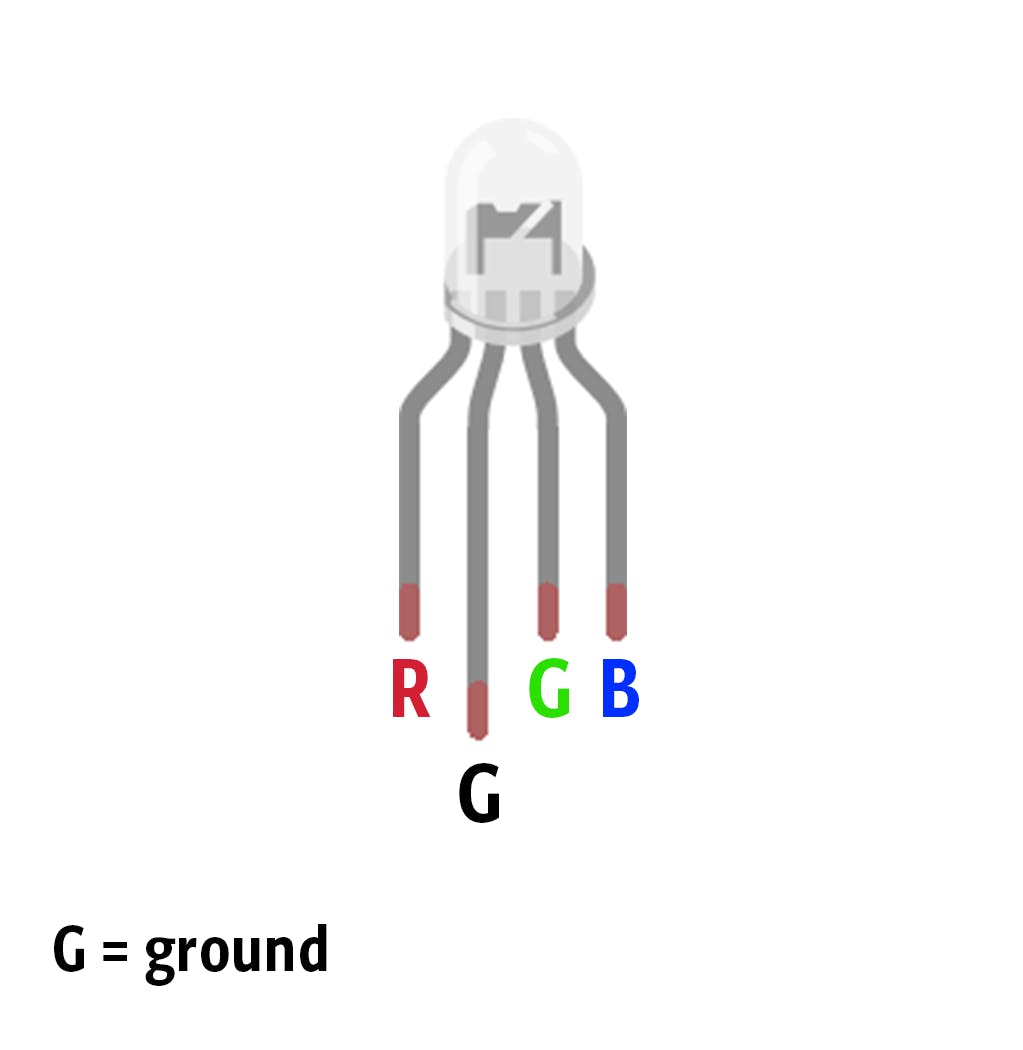
您可以使用此示例草圖來查看 RGB 的實際效果!
// RGB LED pins
int redPin = 6;
int greenPin = 8;
int bluePin = 7;
void setup() {
 pinMode(redPin, OUTPUT);
 pinMode(greenPin, OUTPUT);
 pinMode(bluePin, OUTPUT);
 Serial.begin(9600);
}
void loop() {
   setColor(0, 0, 255); // blue
   delay(1000);
   setColor(0, 255, 255); // aqua
   delay(1000);
   setColor(255, 255, 0); // yellow
   delay(1000);
   setColor(255, 0, 0); // Red
   delay(1000);
}
// Send RGB values to the LED pins
void setColor(int red, int green, int blue){
 analogWrite(redPin, red);
 analogWrite(greenPin, green);
 analogWrite(bluePin, blue);
}
將其連接到 Blynk
現在我們準備把東西放在一起:將電路板連接到 Blynk,將電位器連接到 LCD 屏幕,并在組合正確時使 LED 閃爍綠色。
-
請注意,
giveColorFeedback()當每個電位器的絕對值接近某個閾值時,我們將使用該功能設置 LED 的顏色以正確組合。
void giveColorFeedback(int PotOne, int PotTwo, int PotThree){...}
- 我們還將使用這些變量來存儲從應用程序發送的值以及組合。
int SliderValueOne = 1;
int SliderValueTwo = 1;
int SliderValueThree = 1;
請注意,初始值設置為 1,只有在您修改應用程序上滑塊的值時才會更改。如果您重置板,組合將恢復為默認值。
-
布爾變量
bool start = true;用于檢測何時已經猜到組合,以避免在每個循環中重新打開框。
上傳此示例草圖以查看它的實際效果:
#include
#include
#include
#include
// RGB LED pins
int redPin = 6;
int greenPin = 8;
int bluePin = 7;
const char* ssid = SECRET_SSID;    //  your network SSID (name)
const char* password = SECRET_PSWD;  // your network password
char auth[] = SECRET_TOKEN; // your Blynk API token
// LCD screen pins
const int rs = 12,
         en = 11,
         d4 = 2,
         d5 = 3,
         d6 = 4,
         d7 = 5;
bool start = true;
// Variables to store the combination value
// Set the intitial combination to ( 1 1 1 )
int SliderValueOne = 1;
int SliderValueTwo = 1;
int SliderValueThree = 1;
// Blynk functions to retrive values
BLYNK_WRITE(V1) {
 SliderValueOne = param.asInt(); // assigning incoming value from pin V1 to a variable
}
BLYNK_WRITE(V2) {
 SliderValueTwo = param.asInt(); // assigning incoming value from pin V1 to a variable
}
BLYNK_WRITE(V3) {
 SliderValueThree = param.asInt(); // assigning incoming value from pin V1 to a variable
}
LiquidCrystal lcd(rs, en, d4, d5, d6, d7);
void setup() {
 pinMode(redPin, OUTPUT);
 pinMode(greenPin, OUTPUT);
 pinMode(bluePin, OUTPUT);
 analogWrite(A3, 0); // set the brightness of the LCD screen to the maximum value
 Serial.begin(9600);
 lcd.begin(16, 2); // begin LCD screen with 16 columns and 2 rows
 Blynk.begin(auth, ssid, password); // start Blynk functionalities
}
void loop() {
 // Variambles to temporarily store the combination
 int Temp_Slider_One_value = SliderValueOne;
 int Temp_Slider_Two_value = SliderValueTwo;
 int Temp_Slider_Three_value = SliderValueThree;
 Blynk.run(); // poll new combination values from the online app
 // check if combination values are changed and print them on the console
 if(Temp_Slider_One_value != SliderValueOne || Temp_Slider_Two_value != SliderValueTwo || Temp_Slider_Three_value != SliderValueThree){
   Serial.print("New combination: ");
   Serial.print(SliderValueOne);
   Serial.print(" ");
   Serial.print(SliderValueTwo);
   Serial.print(" ");
   Serial.println(SliderValueThree);
 }
 int PotOne = map(analogRead(A0), 0, 1023, 0, 9);
 int PotTwo = map(analogRead(A1), 0, 1023, 0, 9);
 int PotThree = map(analogRead(A2), 0, 1023, 0, 9);
 lcd.setCursor(0, 0);
 lcd.print(PotOne);
 lcd.setCursor(2, 0);
 lcd.print(PotTwo);
 lcd.setCursor(4, 0);
 lcd.print(PotThree);
 if (start) {
   giveColorFeedback(PotOne, PotTwo, PotThree);
   if (PotOne == SliderValueOne && PotTwo == SliderValueTwo && PotThree == SliderValueThree) {
     blinkGreenLed();
     start = false;
   }
 }
 if(!start) {
   if(PotOne == 0 && PotTwo == 0 && PotThree == 0){
     start = true;
   }
 }
}
// Give feedback based on how close the potentiometer are to the combination value
// The more it's close the warmer is the color of the LED
void giveColorFeedback(int PotOne, int PotTwo, int PotThree) {
 if (abs(PotOne - SliderValueOne) <= 1 && abs(PotTwo - SliderValueTwo) <= 1 && abs(PotThree - SliderValueThree) <= 1 ) {
   // Red
   setColor(255, 0, 0);
 }
 else   if (abs(PotOne - SliderValueOne) <= 3 && abs(PotTwo - SliderValueTwo) <= 3 && abs(PotThree - SliderValueThree) <= 3 ) {
   // yellow
   setColor(255, 255, 0);
 }
   else   if (abs(PotOne - SliderValueOne) <= 4 && abs(PotTwo - SliderValueTwo) <= 4 && abs(PotThree - SliderValueThree) <= 4 ) {
   // aqua
   setColor(0, 255, 255);
 }
 else {
   // blue
   setColor(0, 0, 255);
 }
}
void blinkGreenLed() {
 for (int a = 0; a < 2; a++) {
   for (int b = 0; b <= 255; b += 5) {
     setColor(0, b, 0);
     delay(5);
   }
   for (int b = 255; b >= 0; b -= 5) {
     setColor(0, b, 0);
     delay(5);
   }
 }
 for (int b = 0; b <= 255; b += 5) {
   setColor(0, b, 0);
   delay(5);
 }
}
// Send RGB values to the LED pins
void setColor(int red, int green, int blue){
 analogWrite(redPin, red);
 analogWrite(greenPin, green);
 analogWrite(bluePin, blue);
}
添加蜂鳴器
打開盒子時,我們將使用蜂鳴器播放旋律。更確切地說,我們將播放星球大戰主題曲!
連接蜂鳴器很簡單:
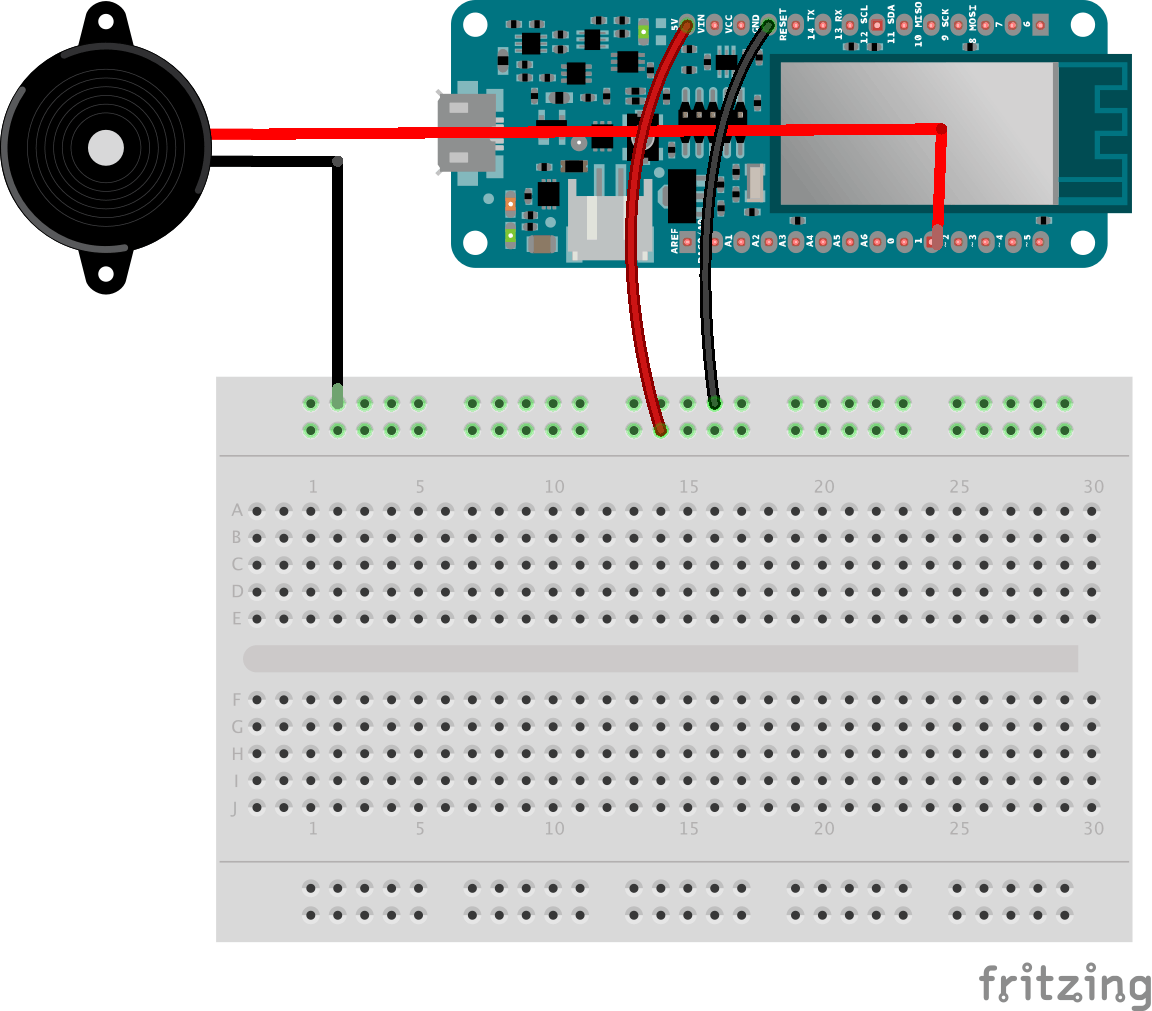
上傳此示例代碼并收聽:
const int c = 261;
const int d = 294;
const int e = 329;
const int f = 349;
const int g = 391;
const int gS = 415;
const int a = 440;
const int aS = 455;
const int b = 466;
const int cH = 523;
const int cSH = 554;
const int dH = 587;
const int dSH = 622;
const int eH = 659;
const int fH = 698;
const int fSH = 740;
const int gH = 784;
const int gSH = 830;
const int aH = 880;
int counter = 0;
#define buzzerPin 1
void setup() {
 pinMode(buzzerPin, OUTPUT);
 Serial.begin(9600);
}
void loop() {
 play_jingle();
 delay(3000);
}
void play_jingle()
{
 beep(a, 500);
 beep(a, 500);
 beep(a, 500);
 beep(f, 350);
 beep(cH, 150);
 beep(a, 500);
 beep(f, 350);
 beep(cH, 150);
 beep(a, 650);
 delay(500);
 beep(eH, 500);
 beep(eH, 500);
 beep(eH, 500);
 beep(fH, 350);
 beep(cH, 150);
 beep(gS, 500);
 beep(f, 350);
 beep(cH, 150);
 beep(a, 650);
 delay(500);
}
void beep(int note, int duration)
{
 //Play tone on buzzerPin
 tone(buzzerPin, note, duration);
 //Stop tone on buzzerPin
 noTone(buzzerPin);
 delay(50);
 //Increment counter
 counter++;
}
添加伺服電機
伺服電機是我們盒子的鎖,當密碼正確時,我們需要它旋轉90度,這樣盒子才會打開。
連接伺服只需要三根線。
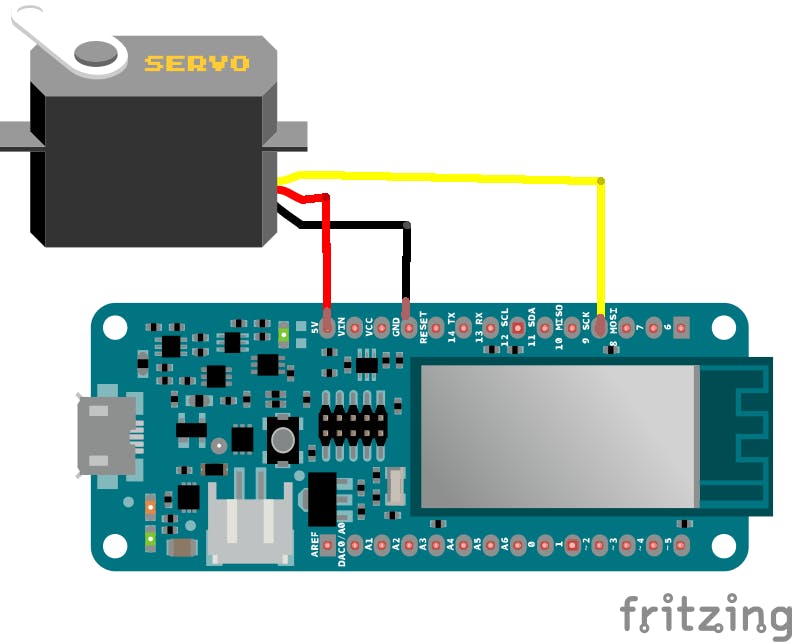
為了將其旋轉 90 度,我們將使用以下函數:
#include
int pos = 0;    // variable to store the servo position
Servo myservo;  // create servo object to control a servo
void setup() {
 myservo.attach(9);  // attaches the servo on pin 9 to the servo object
 myservo.write(pos); // set the servo in position 0
}
void loop() {
     open_the_box();
     delay(2000);
     close_the_box();
     delay(2000);
}
void open_the_box(){
     for (pos = 0; pos <= 90; pos += 1) { // goes from 0 degrees to 90 degrees
     myservo.write(pos);              // tell servo to go to position in variable 'pos'
     delay(15);                       // waits 15ms for the servo to reach the position
   }
}
void close_the_box(){
   for (pos = 90; pos >= 0; pos -= 1) { // goes from 90 degrees to 0 degrees
     myservo.write(pos);              // tell servo to go to position in variable 'pos'
     delay(15);                       // waits 15ms for the servo to reach the position
   }
}
請注意,為了將伺服器轉回并關閉盒子,您只需將所有電位器轉為 0。
建立你的拼圖盒
它不會是一個沒有盒子的盒子,所以請下載下面的案例文件并將其用作構建您自己的指南。
請注意,我們使用了 2 毫米厚的紙板。
- MKR WiFi 1010 + MKR RS 485 Shield連接到Ignition
- 如何安全地將Arduino MKR GSM 1400板與GCP IoT Core結合使用
- 通過WiFi Web服務器公開您的IoT Bundle Kit信息
- 如何將Arduino MKR和Portenta安裝到機柜中
- 使用Arduino MKR1000作為微控制器來創建筆更換系統
- 使用MKR IoT載體的Arduino燈控制器
- 使用MKR IoT Bundle組件和紙板來教貓的晚餐時間
- 使用Grove Sensor的Arduino MKR1010和阿里云IoT
- 使用MKR IoT Bundle中組件和紙板讓貓知道晚餐時間
- 如何創建和使用LabVIEW中的LLB文件 0次下載
- 一種圖像局部區域匹配驅動的導航式拼圖方法 4次下載
- AN1246中文手冊之如何在Microchip圖形庫中創建控件
- 煙支盒模輸送從動帶輪組件結構改進 0次下載
- 太陽能電池組件中接線盒的應用解析 17次下載
- 10TE Connectivity超薄接線盒組件 0次下載
- 如何在Draftsman中創建PCB制造圖紙 317次閱讀
- 可重用的驗證組件中構建測試平臺的步驟 482次閱讀
- ESP32 IDF創建WEB SERVER的流程 3798次閱讀
- 如何在HMI中創建診斷視圖 1328次閱讀
- SpinalHDL中Bundle數據類型的轉換 1184次閱讀
- 在QML動畫設計中通過指定關鍵幀創建時間線動畫 1859次閱讀
- 如何在Qt Design Studio中創建連接和狀態 2084次閱讀
- 如何創建FPGA內核/SoC所需的所有常用組件 1443次閱讀
- 米爾科技 Beetle IoT 評估板概述 1187次閱讀
- 如何使用Cyber RT創建新組件 5738次閱讀
- 簡評FPGA——Arduino MKR Vidor 4000 6807次閱讀
- 在Tableau中盒須圖幫你6步篩除異常值 1.1w次閱讀
- 手把手教你用紙板和鋁箔做一個簡易的可變電容 1.5w次閱讀
- EtherCAT P — 適用于傳感器、執行器及測量技術組件的理想總線 2257次閱讀
- 白盒測試和黑盒測試的優缺點 1.8w次閱讀
下載排行
本周
- 1山景DSP芯片AP8248A2數據手冊
- 1.06 MB | 532次下載 | 免費
- 2RK3399完整板原理圖(支持平板,盒子VR)
- 3.28 MB | 339次下載 | 免費
- 3TC358743XBG評估板參考手冊
- 1.36 MB | 330次下載 | 免費
- 4DFM軟件使用教程
- 0.84 MB | 295次下載 | 免費
- 5元宇宙深度解析—未來的未來-風口還是泡沫
- 6.40 MB | 227次下載 | 免費
- 6迪文DGUS開發指南
- 31.67 MB | 194次下載 | 免費
- 7元宇宙底層硬件系列報告
- 13.42 MB | 182次下載 | 免費
- 8FP5207XR-G1中文應用手冊
- 1.09 MB | 178次下載 | 免費
本月
- 1OrCAD10.5下載OrCAD10.5中文版軟件
- 0.00 MB | 234315次下載 | 免費
- 2555集成電路應用800例(新編版)
- 0.00 MB | 33566次下載 | 免費
- 3接口電路圖大全
- 未知 | 30323次下載 | 免費
- 4開關電源設計實例指南
- 未知 | 21549次下載 | 免費
- 5電氣工程師手冊免費下載(新編第二版pdf電子書)
- 0.00 MB | 15349次下載 | 免費
- 6數字電路基礎pdf(下載)
- 未知 | 13750次下載 | 免費
- 7電子制作實例集錦 下載
- 未知 | 8113次下載 | 免費
- 8《LED驅動電路設計》 溫德爾著
- 0.00 MB | 6656次下載 | 免費
總榜
- 1matlab軟件下載入口
- 未知 | 935054次下載 | 免費
- 2protel99se軟件下載(可英文版轉中文版)
- 78.1 MB | 537798次下載 | 免費
- 3MATLAB 7.1 下載 (含軟件介紹)
- 未知 | 420027次下載 | 免費
- 4OrCAD10.5下載OrCAD10.5中文版軟件
- 0.00 MB | 234315次下載 | 免費
- 5Altium DXP2002下載入口
- 未知 | 233046次下載 | 免費
- 6電路仿真軟件multisim 10.0免費下載
- 340992 | 191187次下載 | 免費
- 7十天學會AVR單片機與C語言視頻教程 下載
- 158M | 183279次下載 | 免費
- 8proe5.0野火版下載(中文版免費下載)
- 未知 | 138040次下載 | 免費
 電子發燒友App


 創作
創作 發文章
發文章 發帖
發帖  提問
提問  發資料
發資料 發視頻
發視頻 上傳資料賺積分


評論