資料介紹
描述
探索醫療保健和醫藥行業等眾多行業的所有可能奇跡已成為一項關鍵而艱巨的任務,在這些行業中,手術涉及精確度和來自世界各地專家的意見,在化學制造廠、包裝和生產行業等地方,以及所有具有惡劣化學環境的商業領域。該項目只是所有所述問題的解決方案。Nero 是一個飛躍,使所有僅靠人工干預和技能無法完成的任務成為可能。
這種手勢控制的智能機器人手套使我們能夠使用現有技術實現經濟的解決方案。它可以用于控制和自動化機器,如機械臂、傳送帶、滑輪、起重機和無數其他設備。
您的想象力是 Nero 效率的極限。該項目為我們提供了非凡的精度、準確性,并為進一步的可訪問性和自動化提供了自由。
尼祿在行動!
概述
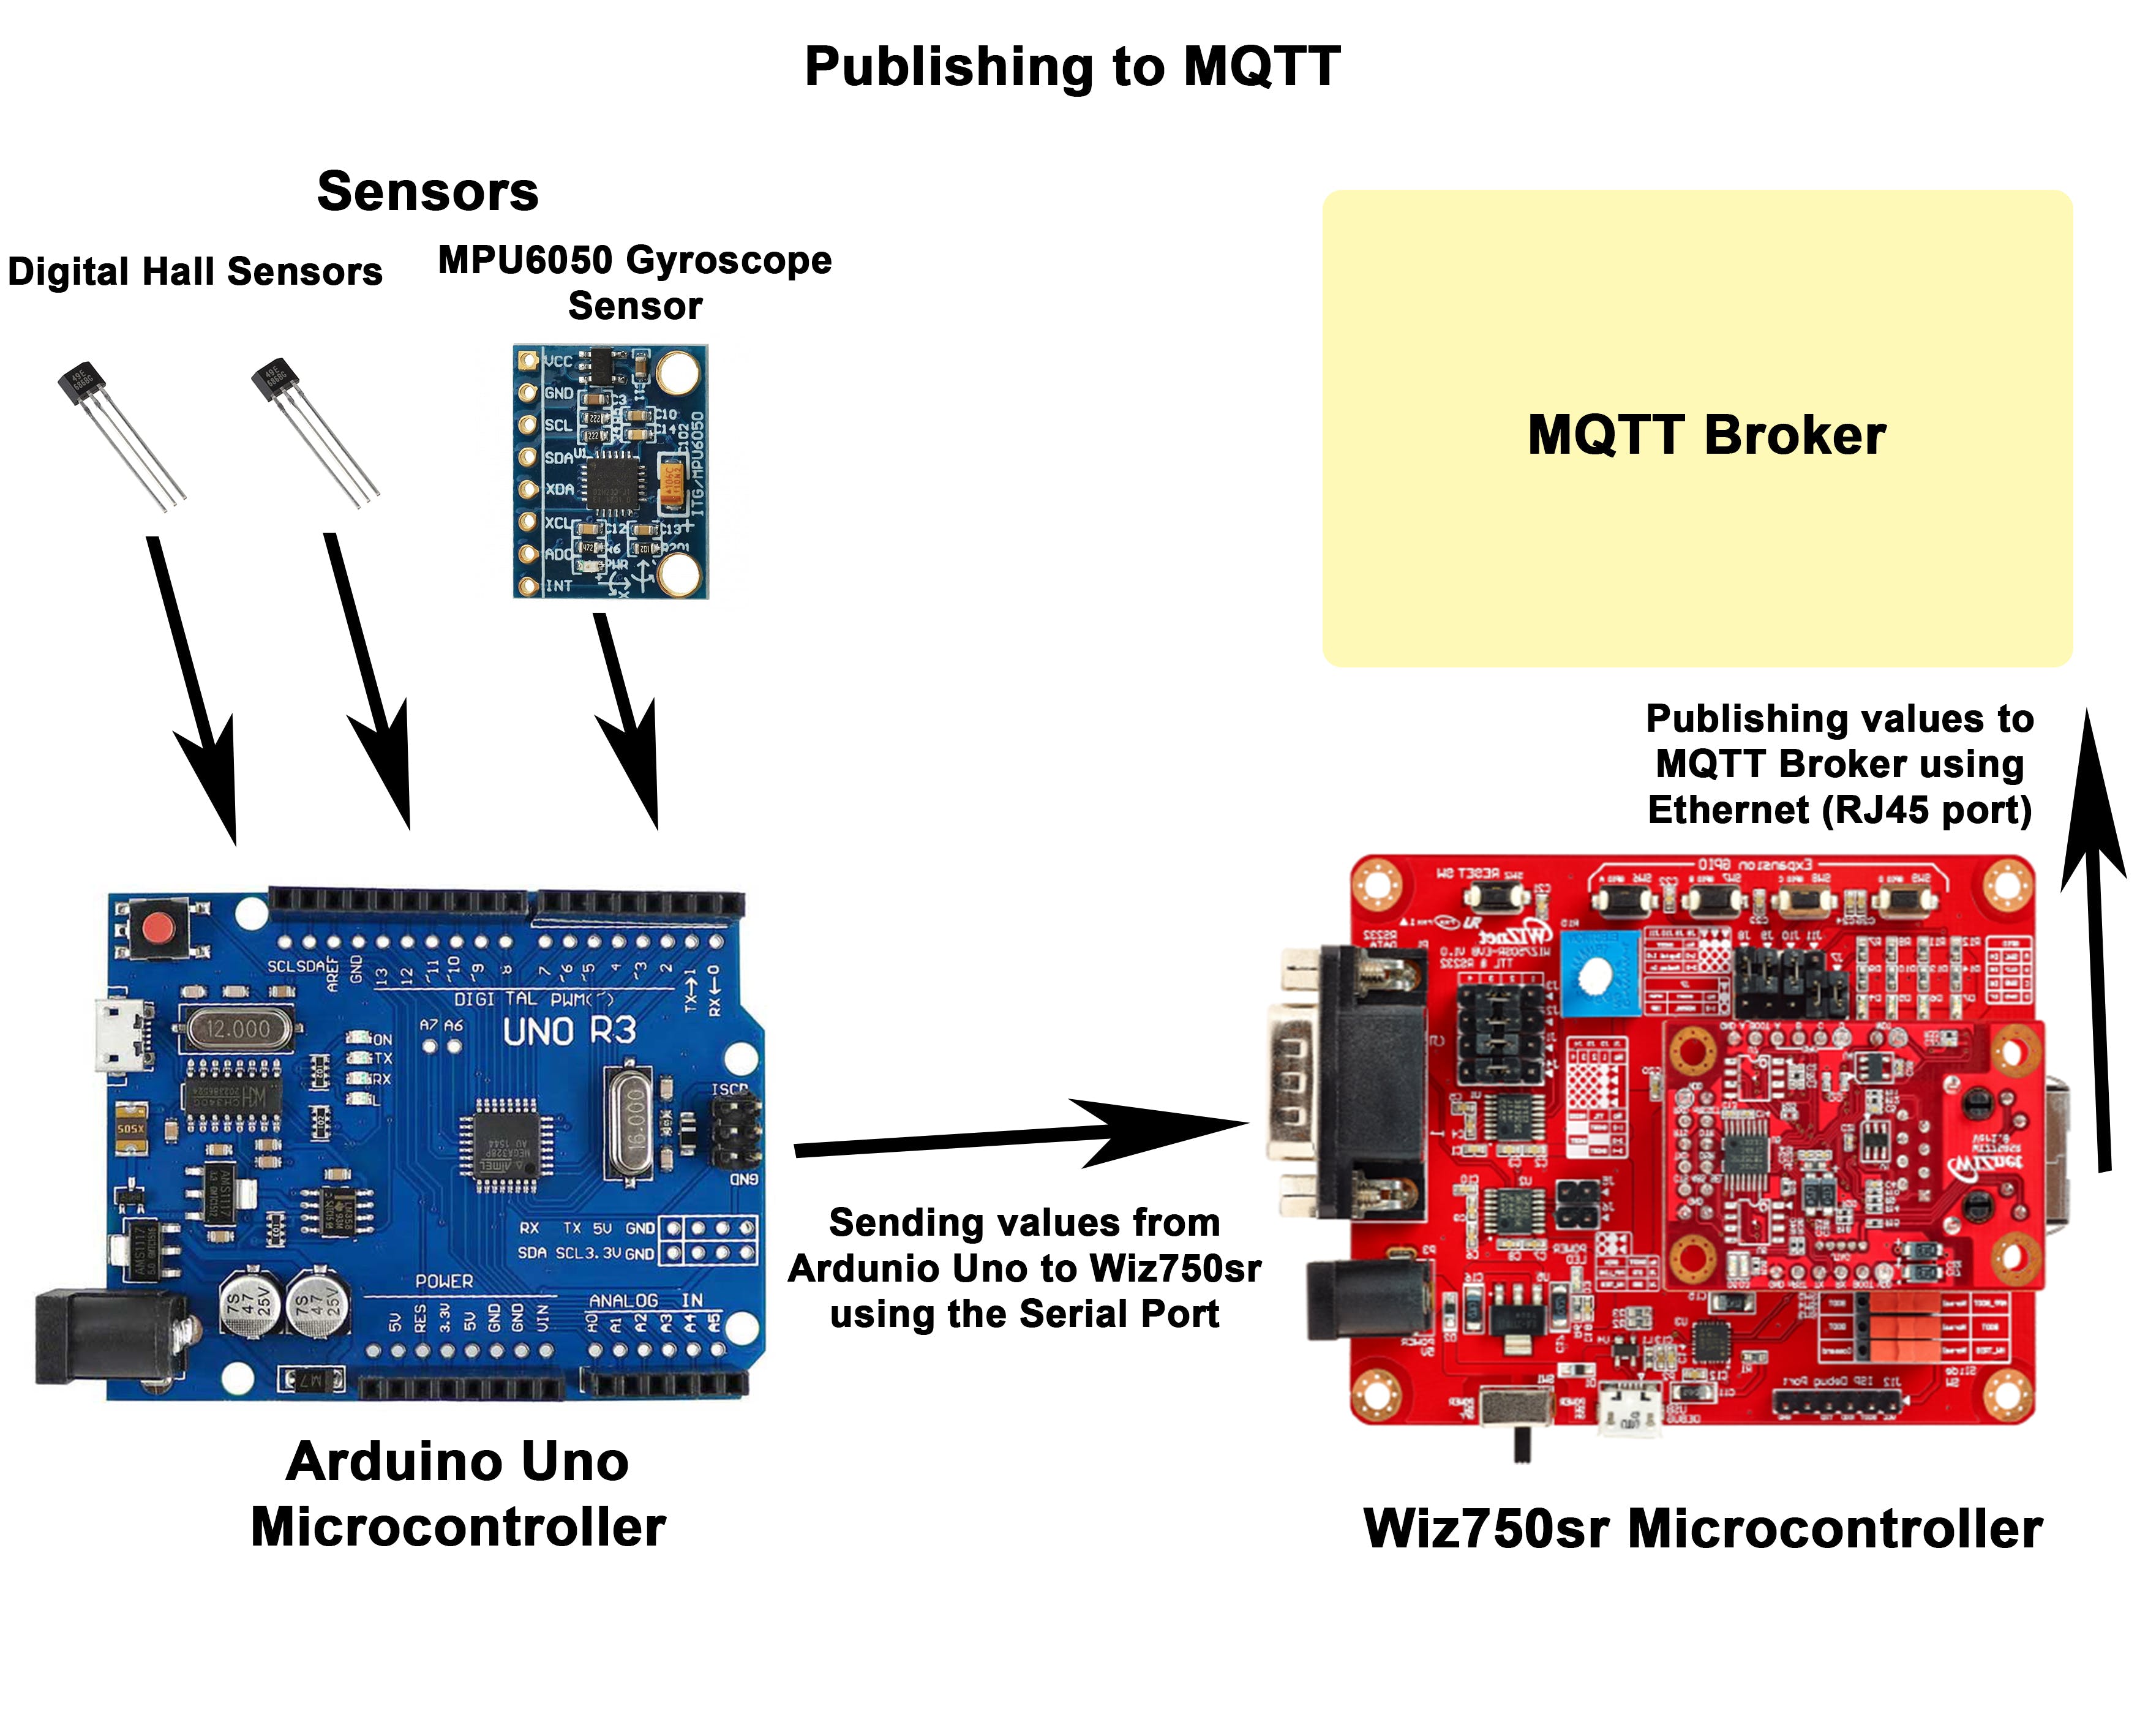
在這個項目中,我們基本上有 2 個主要部分,傳輸端和接收端。我們利用 WIZnet 串口轉以太網板將從 arduino 接收到的數據發布到 MQTT 代理,并使用 nodeMCU 在接收端訂閱數據。兩端的技術步驟將在下一節中詳細介紹。
?
?
腳步
發射端
電路連接:
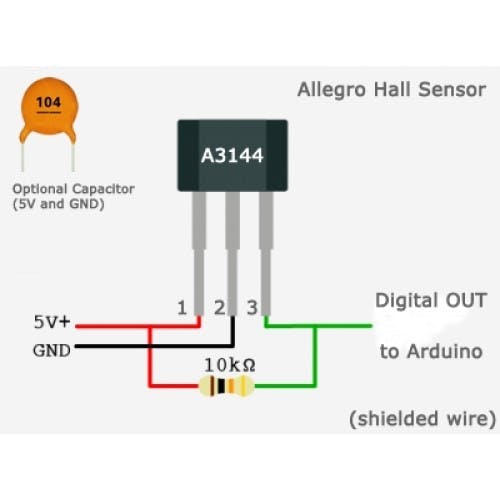
第 1 步:將霍爾效應傳感器 (A3144) 和陀螺儀傳感器 (MPU6050) 連接到 arduino,如下所示。(請參閱連接的引腳圖)
o 霍爾傳感器連接到 arduino 的 d9 和 d6
?
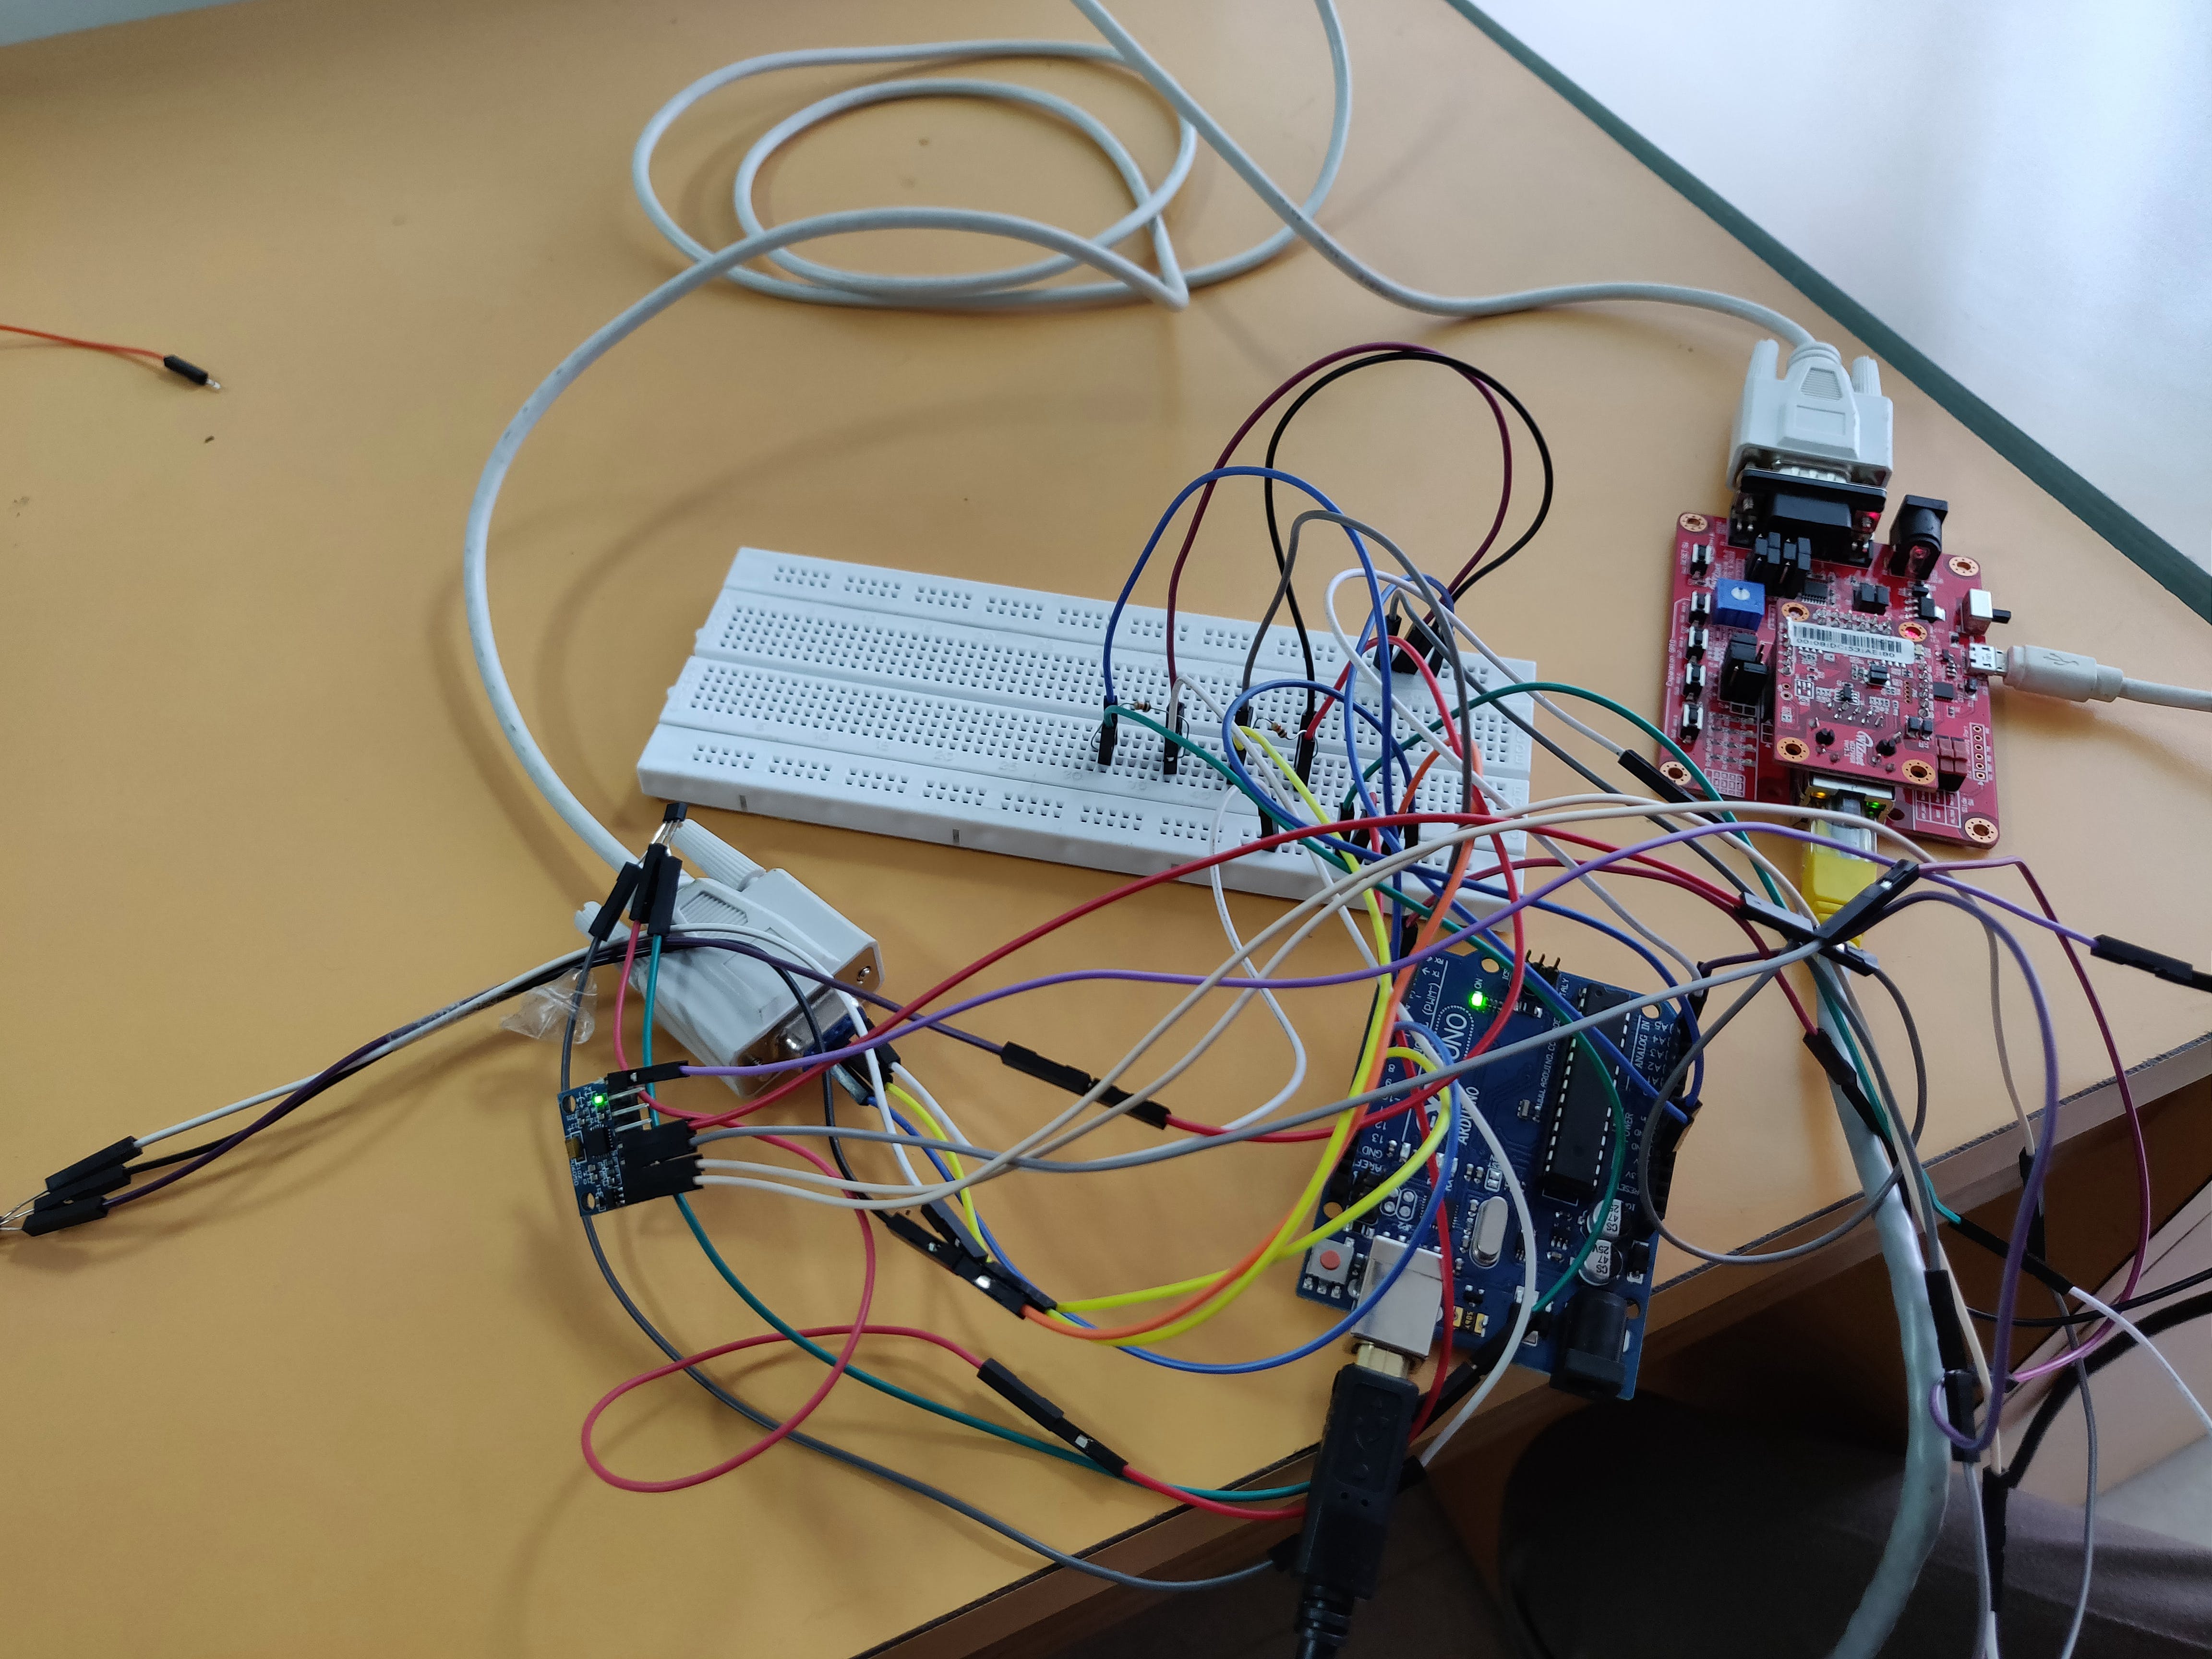
第 2 步:使用 RS-232 電纜將 Arduino Uno 連接到 WIZ750SR 板(帶有串口到以太網轉換器),如下所示:
o Arduino Uno 的發送引腳(本例中為引腳 11)使用 RS-232 電纜和跳線連接到 WIZ750SR 串口轉以太網的接收引腳。
o Arduino 的接收引腳(本例中為引腳 10)連接到發送引腳。
o Arduino 的接地引腳連接到 WIZnet 板的接地引腳。
?
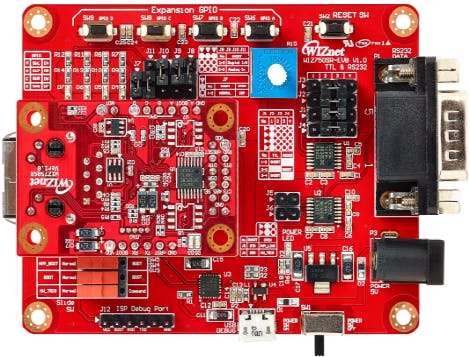
第 3 步:使用以太網 LAN 電纜將 WIZnet 板連接到網絡(用于 MQTT 連接)。
第 4 步:將兩塊板連接到 PC 以上傳代碼。
?
-發送方代碼:
將代碼上傳到串口轉以太網板的步驟:
1. 將開機開關從正常模式推到開機模式。
2、使用ISP工具軟件打開串口。
3. 顯示“serial open complete”后,上傳“os.mbed”編譯代碼。
4.將開機開關推回正常位置,重新設置wiz板。
5.板子接收到的數據可以使用“COOLTERM”進行監控。
?
//Code to publish data from the Wiznet Board
#include "mbed.h"
#include "MQTTEthernet.h"
#include "MQTTClient.h"
#define ECHO_SERVER_PORT   7
Serial a(D1,D0);
   Serial s(USBTX, USBRX);
int arrivedcount = 0;
void messageArrived(MQTT::MessageData& md)
{
   MQTT::Message &message = md.message;
   printf("Message arrived: qos %d, retained %d, dup %d, packetid %d\n", message.qos, message.retained, message.dup, message.id);
   printf("Payload %.*s\n", message.payloadlen, (char*)message.payload);
   ++arrivedcount;
}
void baud(int baudrate) {
   s.baud(baudrate);
}
int main (void)
{
   baud(9600);
   printf("Wait a second...\r\n");
   char* topic = "Ultrasonic";
   MQTTEthernet ipstack = MQTTEthernet();
   MQTT::Client client = MQTT::Client(ipstack);
,>,>   char* hostname = "172.16.73.4";
   int port = 1883;
   int rc = ipstack.connect(hostname, port);
   if (rc != 0)
       printf("rc from TCP connect is %d\n", rc);
   printf("Topic: %s\r\n",topic);
   MQTTPacket_connectData data = MQTTPacket_connectData_initializer;
   data.MQTTVersion = 3;
   data.clientID.cstring = "parents";
   if ((rc = client.connect(data)) != 0)
       printf("rc from MQTT connect is %d\n", rc);
   if ((rc = client.subscribe(topic, MQTT::QOS0, messageArrived)) != 0)
       printf("rc from MQTT subscribe is %d\n", rc);
   MQTT::Message message;
   char buf[100];
   while (true)
   {
       char b;
       int i=0;
       char q[100];
       if(a.readable())
       {
           for(i=0;i<=1;i++)
           {
           b= a.getc();
           q[i]=b;
           s.printf("%c",q[i]);
           }
       sprintf(buf,"%s",q);
       message.qos = MQTT::QOS1;
       message.retained = false;
       message.dup = false;
       message.payload = (void*)buf;
       message.payloadlen = strlen(buf);
       rc = client.publish("Ultrasonic", message);
       client.yield(2000);
           }
           }
}
將代碼上傳到 Arduino Uno 的步驟:
- 將 Arduino Uno 連接到 PC。
- 從工具->端口選擇正確的 COM 端口。
- 從 Tools->Boards 選擇 Arduino Uno。
- 編譯并上傳代碼。
//Arduino code to recieve values of the sensors and serially transmit it to the wiznet  board
//defines pins numbers
#include#include"Wire.h"
//I2Cdev and MPU6050 must be installed as libraries, or else the .cpp/.h files
//for both classes must be in the include path of your project
#include"I2Cdev.h"
#include"MPU6050.h"
//class default I2C address is 0x68
//specific I2C addresses may be passed as a parameter here
//AD0 low = 0x68 (default for InvenSense evaluation board)
//AD0 high = 0x69
MPU6050accelgyro;
int16_tax, ay, az;
int16_tgx, gy, gz;
SoftwareSerialmySerial(10, 11); // RX, TX
inthPin=9;
intvalue1;
intmyInts[2];
constint trigPin = 3;
constint echoPin = 2;
longduration;
intdistance;
inthPin1=6;
inthState1=0;
intvalue;
inthState=0;
intolds=0;
intod;
intolds1=0;
//accelerometer values
intaccel_reading;
intaccel_corrected;
intaccel_offset = 200;
floataccel_angle;
floataccel_scale = 1; // set to 0.01
voidsetup() {
//join I2C bus (I2Cdev library doesn't do this  automatically)
Wire.begin();
 accelgyro.initialize();
 pinMode(trigPin,OUTPUT); // Sets the trigPin as an Output
pinMode(echoPin,INPUT); // Sets the echoPin as an Input
 //put your setup code here, to run once:
Serial.begin(9600);
 //put your setup code here, to run once:
pinMode(hPin,INPUT);
pinMode(hPin1,INPUT);
 mySerial.begin(9600);
 pinMode(LED_BUILTIN,OUTPUT);
olds=olds1=80;
}
voidloop() {
digitalWrite(trigPin,LOW);
delayMicroseconds(2);
// Sets the trigPin onHIGH state for 10 micro seconds
digitalWrite(trigPin,HIGH);
delayMicroseconds(10);
digitalWrite(trigPin,LOW);
// Reads the echoPin,returns the sound wave travel time in microseconds
duration =pulseIn(echoPin, HIGH);
// Calculating thedistance
distance=duration*0.034/2;
// Prints the distanceon the Serial Monitor
accelgyro.getMotion6(&ax,&ay, &az, &gx, &gy, &gz);
 //accelerometer_X_Axis angle calc
 accel_reading= ax;
 accel_corrected= accel_reading - accel_offset;
 accel_corrected= map(accel_corrected, -16800, 16800, -90, 90);
 accel_corrected= constrain(accel_corrected, -90, 90);
 accel_angle= (float)(accel_corrected * accel_scale);
  // put your main code here, to run repeatedly:
 hState=digitalRead(hPin);
 hState1=digitalRead(hPin1);
if(hState != olds ||hState1 != olds1){
 if(hState==LOW && hState1==LOW){
value=1;
olds = hState;
olds1 = hState1;
}
if (hState1==HIGH&& hState==LOW){
value=2;
olds = hState;
olds1 = hState1; }
if (hState1==LOW&& hState==HIGH){
value=3;
olds = hState;
olds1 = hState1;}
if (hState1==HIGH&& hState==HIGH){
value=4;
olds = hState;
olds1 = hState1;
}
}
else{
  if(accel_angle>=0 &&accel_angle<=30)
  {
 value= 5;
 od=value;
  }
 elseif(accel_angle>=30 && accel_angle<70)
 {
 value=6;
 od=value;
 }
 elseif(accel_angle>=70 && accel_angle<=90)
 {
 value=7;
 od=value;
 }
 else{
 if(od==0){
 value=5;
 }
 else{
 value=od;}
 }
}
mySerial.println(value);
Serial.println(value);
delay(1000);
}
?
接收方
- 電路連接
第 1 步:將三個伺服電機連接到 NodeMCU。
第二步:按照下圖定位伺服電機。
第三步:通過PC將代碼上傳到NodeMCU(ESP8266)。
第 4 步:檢查串行監視器上的輸出。
?
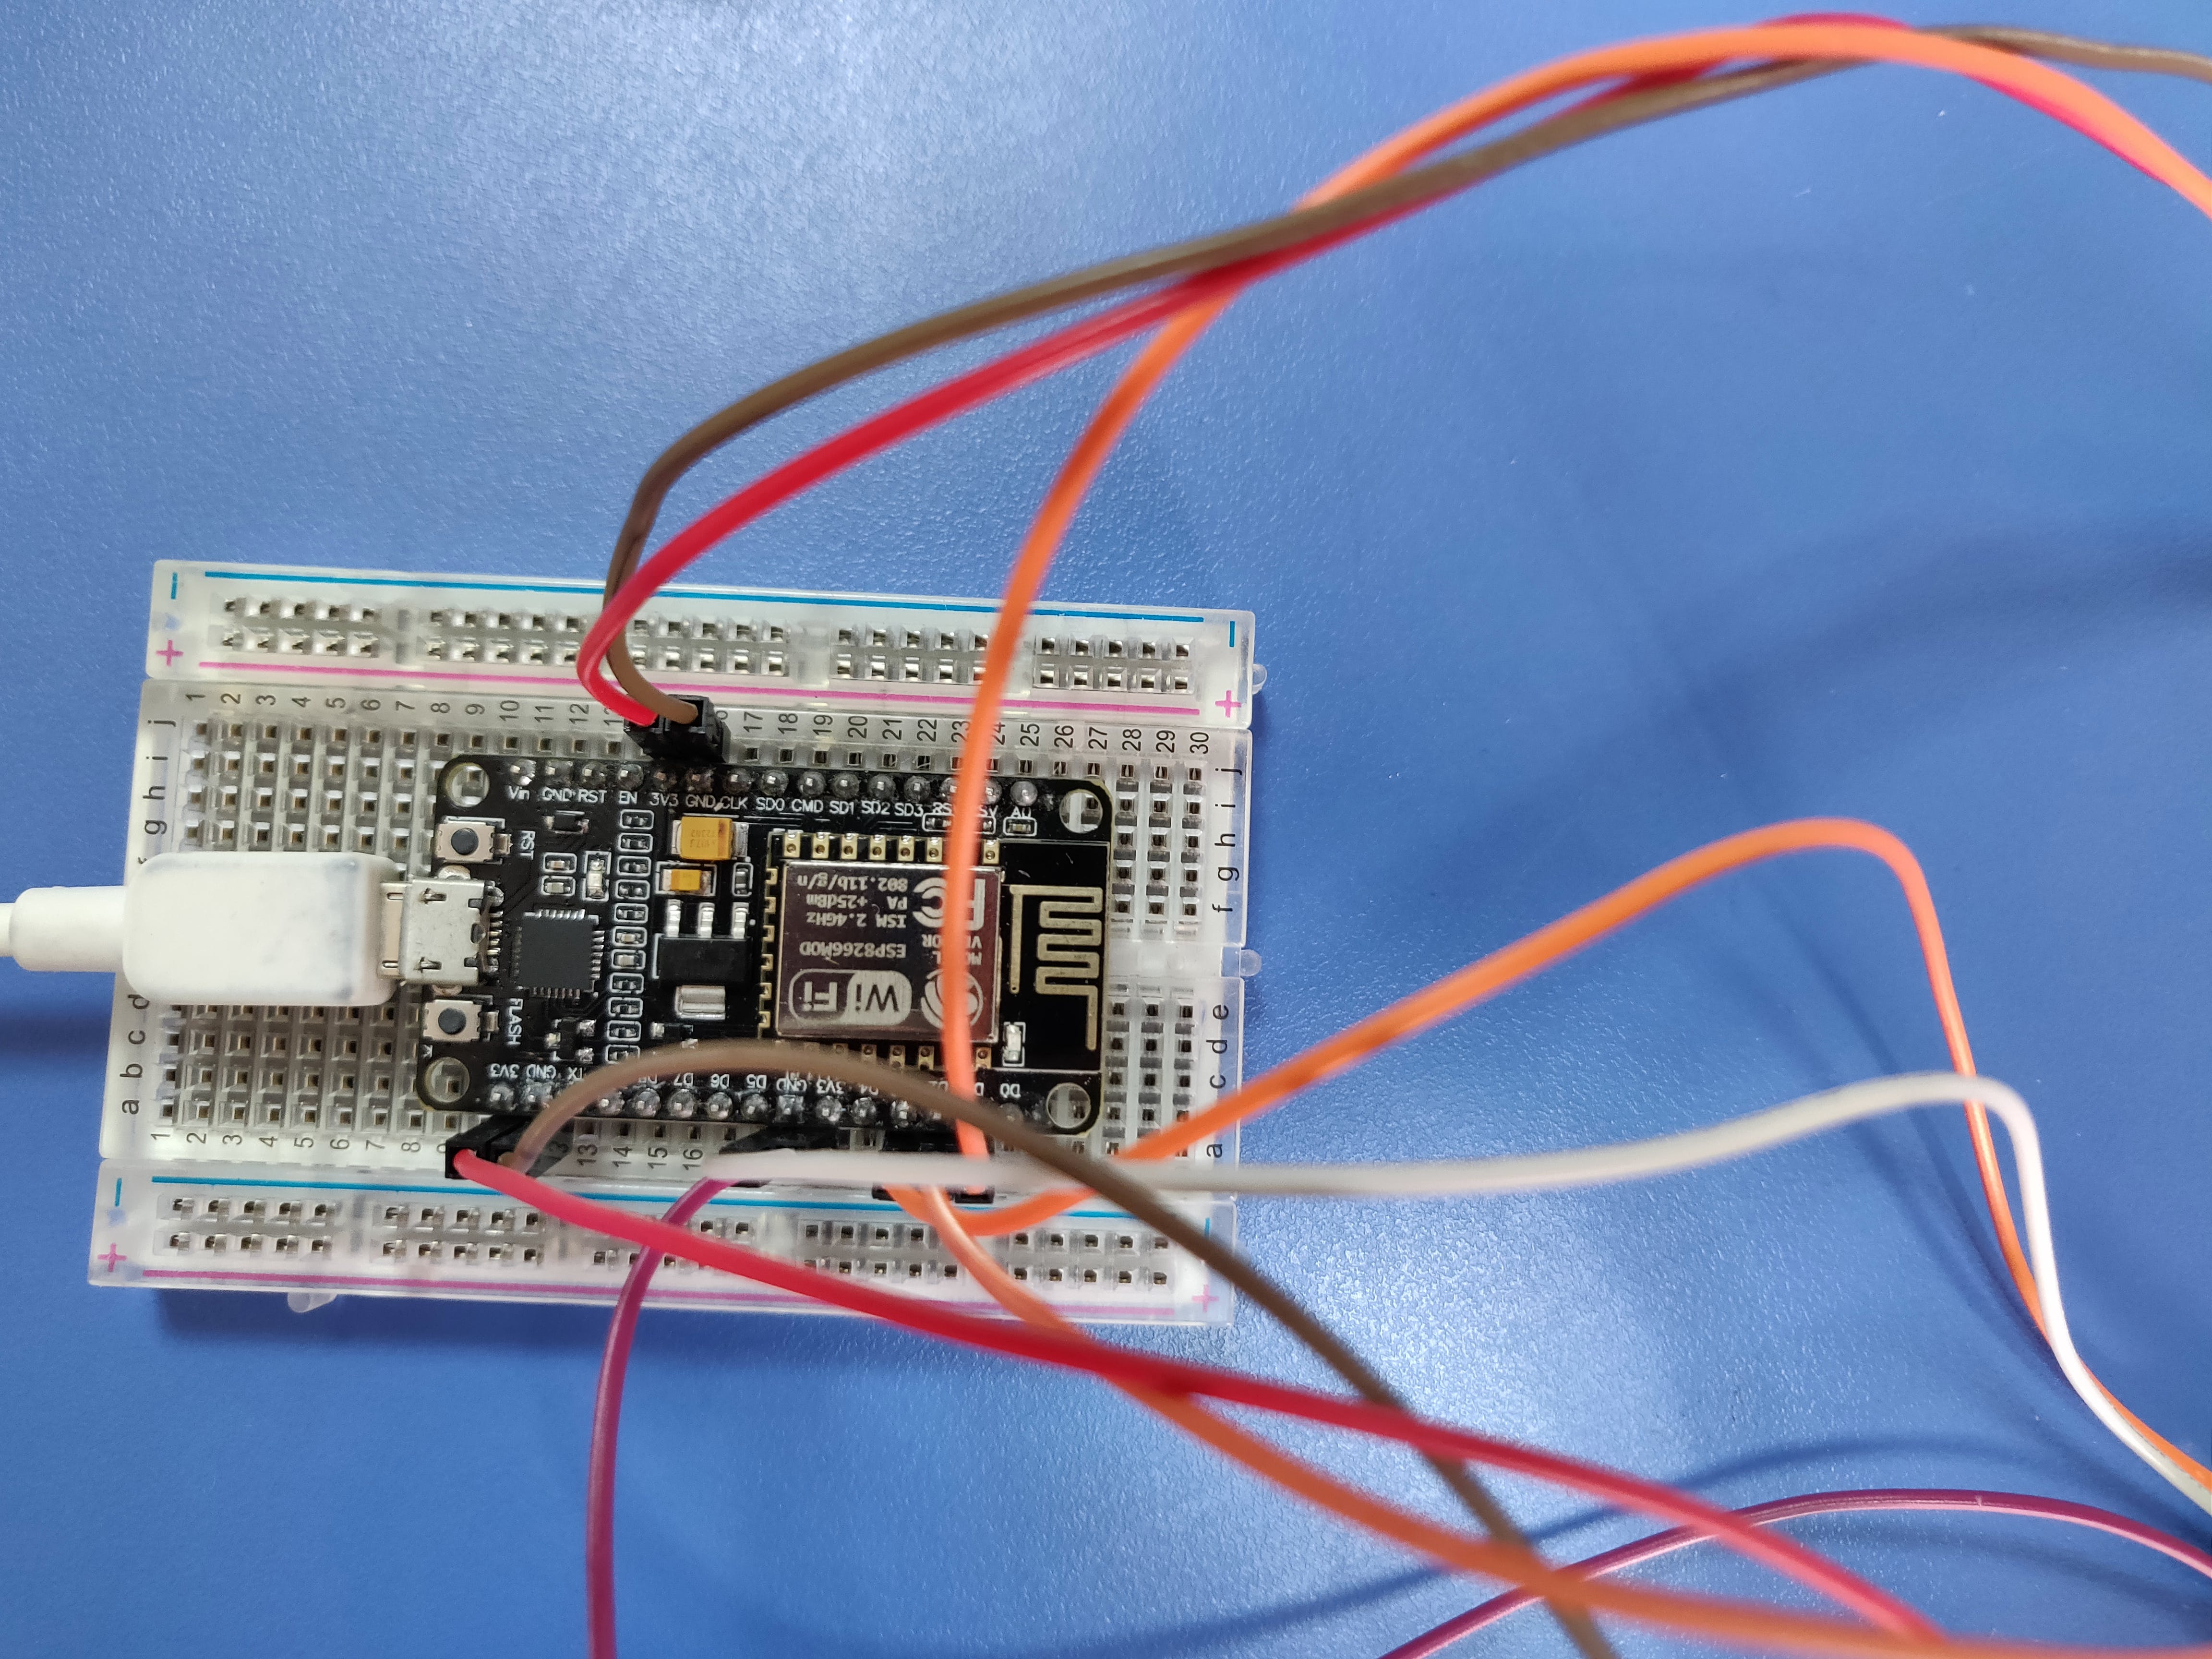
?
- 接收方代碼:
將代碼上傳到 NodeMCU 的步驟:
- 將 NodeMCU (ESP8266) 連接到 PC。
- 從工具->端口選擇正確的 COM 端口。
- 將所需的庫添加到 Ardunio 編譯器。(參考 1.1)
- 從 Tools->Boards 選擇 NodeMCU (ESP8266)。
- 編譯并上傳代碼。
/*
This code basically sets up an ESP8266 board as a MQTT client and helps in subscribing to desired topics that are published.
It is required that the board in the 'Tools' section must be selected to NodeMCU and the ESP8266 drivers are installed.
The baud rate must be set at 115200
Here we are operating three servo motors using the nodeMCU based on the values received via the MQTT topic
*/
#include
#include
#include
// Creating objects for the 3 servo motors
Servo servo;
Servo servo1;
Servo servo2;
// The pins we have used for the servo motors are D1,D2 and D3
// Update these with values suitable for your network.
const char* ssid = "CDI";
const char* password = "Cdi*1717";
const char* mqtt_server = "172.16.73.4";
WiFiClient espClient;
PubSubClient client(espClient);
long lastMsg = 0;
char msg[50];
int value = 0;
char old ;
void setup() {
 //Initial Setup Code
 Serial.begin(115200);
 setup_wifi();
 client.setServer(mqtt_server, 1883);
 client.setCallback(callback);
 delay(1000);
}
//Code for connecting to the wifi
void setup_wifi() {
 delay(10);
 // We start by connecting to a WiFi network
 Serial.println();
 Serial.print("Connecting to ");
 Serial.println(ssid);
 WiFi.begin(ssid, password);
 while (WiFi.status() != WL_CONNECTED) {
   delay(500);
   Serial.print(".");
 }
 Serial.println("");
 Serial.println("WiFi connected");
 Serial.println("IP address: ");
 Serial.println(WiFi.localIP());
}
//This function is responsible for subscribing to a topic and receiving the values from it
void callback(char* topic, byte* payload, unsigned int length) {
 Serial.print("Message arrived [");
 Serial.print(topic);
 Serial.print("] ");
 old = (char)payload[0];
 //detach each time to avoid jitter of the servo motors
 servo2.detach();
 servo.detach();
 servo1.detach();
for (int i = 0; i < length; i++) {
 Serial.println("Received message is :");
 Serial.println((char)payload[i]);
 servo.detach();
 servo1.detach();
 servo2.detach();
 if((char)payload[i] == '1')
 {
   servo.detach();
   servo2.detach();
   servo1.detach();
   servo.attach(0);
   servo.write(89);
   delay(1000);
   servo.detach();
   servo1.attach(4);
   servo1.write(89);
   delay(1000);
   servo1.detach();
   servo2.detach();
   old='1';
   break;
 }
if((char)payload[i] == '2')
 {
   servo.detach();
   servo2.detach();
   servo1.detach();
   servo1.attach(4);
   servo1.write(89);
   delay(1000);
   servo1.detach();
   servo2.detach();
   old='2';
   break;
 }
if((char)payload[i] == '3')
 {
   servo.detach();
   servo2.detach();
   servo1.detach();
   servo.attach(0);
   servo.write(89);
   delay(1000);
   servo.detach();
   servo2.detach();
   old='3';
   break;
 }
if((char)payload[i] == '4')
 {
   servo.detach();
   servo1.detach();
   servo2.detach();
   servo.attach(0);
   servo.write(180);
   delay(1000);
   servo.detach();
   servo1.attach(4);
   servo1.write(180);
   delay(1000);
   servo1.detach();
   servo2.detach();
   old='4';
   break;
 }
 if((char)payload[i]=='5')
 {
   servo2.detach();
   servo2.attach(5);
   servo2.write(179);
   delay(1000);
   servo2.detach();
 }
 if((char)payload[i]=='6')
 { servo2.detach();
   servo2.attach(5);
   servo2.write(89);
   delay(1000);
   servo2.detach();
  }
 if((char)payload[i]=='7')
 { servo2.detach();
   servo2.attach(5);
   servo2.write(2);
   delay(1000);
   servo2.detach();
 }
   servo2.detach();
 }
   servo.detach();
   servo1.detach();
   servo2.detach();
}
//This function is to reconnect once the connection is lost
void reconnect() {
 // Loop until we're reconnected
 while (!client.connected()) {
   Serial.print("Attempting MQTT connection...");
   // Attempt to connect
   if (client.connect("ESP8266Client")) {
     Serial.println("connected");
     // Once connected, publish an announcement...
     // ... and resubscribe
     client.subscribe("Ultrasonic");
   } else {
     Serial.print("failed, rc=");
     Serial.print(client.state());
     Serial.println(" try again in 5 seconds");
     // Wait 5 seconds before retrying
     delay(5000);
   }
 }
}
void loop() {
 if (!client.connected()) {
   reconnect();
 }
 client.loop();
}
未來的改進
我們的目標是減少延遲時間并開發客戶端監控應用程序作為進一步改進,使該項目可在各種行業中實施。
- 智能手套開源構建
- 智能手套開源項目
- 帶遠程arduino的藍牙智能手機控制
- 探究LRC產品在智能手機中的應用.pdf 13次下載
- 遠程手機控制開關應用
- 如何實現手機遠程控制電源開關
- 基于JJBoover的遠程控制ARDUNO自平衡機器人資料下載 2次下載
- 使用OpenWrt設計智能家居遠程控制系統的論文免費下載 11次下載
- 智能家居服務是什么?為什么需要關注它?
- 遠程電源管理控制器
- 智能電話遠程家電控制系統的設計
- 智能家用遠程控制儀的設計與實現
- 智能型電話遠程復合控制系統
- 基于智能手機的電腦遠程控制系統設計
- 具有遠程控制和遠程報警功能的智能測控器
- HDJS-6智能絕緣手套(靴)耐壓試驗裝置的使用手冊 175次閱讀
- 什么是遠程IO控制器?它有哪些作用? 1196次閱讀
- 采用RC4和RSA混合加密方式實現藍牙遠程控制功能 4292次閱讀
- 工業自動化設備遠程監控實現/系統功能 4916次閱讀
- 基于Internet遠程串口通信實現機械手遠程控制系統的設計 5203次閱讀
- ZETAOTA提供遠程升級服務 提高實用性 686次閱讀
- 更小更智能的電機控制器推進HEV/EV市場 1105次閱讀
- 對未來智能手機的展望 9203次閱讀
- 智能工業設備遠程監控系統設計方案 9373次閱讀
- HiNet智能網關在工業設備自動化檢測和控制設備中的應用 1939次閱讀
- 【新專利介紹】一種可遠程控制式智能燃氣表 5485次閱讀
- 智能手環怎么用_智能手環使用教程 10.9w次閱讀
- 智能手環到底有啥用_智能手環的功能及用途 5.2w次閱讀
- 探討Wi-Fi智能插座,如何實現遠程開關控制 3.9w次閱讀
- 光電自動手套機電路 2756次閱讀
下載排行
本周
- 1山景DSP芯片AP8248A2數據手冊
- 1.06 MB | 532次下載 | 免費
- 2RK3399完整板原理圖(支持平板,盒子VR)
- 3.28 MB | 339次下載 | 免費
- 3TC358743XBG評估板參考手冊
- 1.36 MB | 330次下載 | 免費
- 4DFM軟件使用教程
- 0.84 MB | 295次下載 | 免費
- 5元宇宙深度解析—未來的未來-風口還是泡沫
- 6.40 MB | 227次下載 | 免費
- 6迪文DGUS開發指南
- 31.67 MB | 194次下載 | 免費
- 7元宇宙底層硬件系列報告
- 13.42 MB | 182次下載 | 免費
- 8FP5207XR-G1中文應用手冊
- 1.09 MB | 178次下載 | 免費
本月
- 1OrCAD10.5下載OrCAD10.5中文版軟件
- 0.00 MB | 234315次下載 | 免費
- 2555集成電路應用800例(新編版)
- 0.00 MB | 33566次下載 | 免費
- 3接口電路圖大全
- 未知 | 30323次下載 | 免費
- 4開關電源設計實例指南
- 未知 | 21549次下載 | 免費
- 5電氣工程師手冊免費下載(新編第二版pdf電子書)
- 0.00 MB | 15349次下載 | 免費
- 6數字電路基礎pdf(下載)
- 未知 | 13750次下載 | 免費
- 7電子制作實例集錦 下載
- 未知 | 8113次下載 | 免費
- 8《LED驅動電路設計》 溫德爾著
- 0.00 MB | 6656次下載 | 免費
總榜
- 1matlab軟件下載入口
- 未知 | 935054次下載 | 免費
- 2protel99se軟件下載(可英文版轉中文版)
- 78.1 MB | 537798次下載 | 免費
- 3MATLAB 7.1 下載 (含軟件介紹)
- 未知 | 420027次下載 | 免費
- 4OrCAD10.5下載OrCAD10.5中文版軟件
- 0.00 MB | 234315次下載 | 免費
- 5Altium DXP2002下載入口
- 未知 | 233046次下載 | 免費
- 6電路仿真軟件multisim 10.0免費下載
- 340992 | 191187次下載 | 免費
- 7十天學會AVR單片機與C語言視頻教程 下載
- 158M | 183279次下載 | 免費
- 8proe5.0野火版下載(中文版免費下載)
- 未知 | 138040次下載 | 免費
 電子發燒友App


 創作
創作 發文章
發文章 發帖
發帖  提問
提問  發資料
發資料 發視頻
發視頻 上傳資料賺積分


評論